КАТЕГОРИИ:
Архитектура-(3434)Астрономия-(809)Биология-(7483)Биотехнологии-(1457)Военное дело-(14632)Высокие технологии-(1363)География-(913)Геология-(1438)Государство-(451)Демография-(1065)Дом-(47672)Журналистика и СМИ-(912)Изобретательство-(14524)Иностранные языки-(4268)Информатика-(17799)Искусство-(1338)История-(13644)Компьютеры-(11121)Косметика-(55)Кулинария-(373)Культура-(8427)Лингвистика-(374)Литература-(1642)Маркетинг-(23702)Математика-(16968)Машиностроение-(1700)Медицина-(12668)Менеджмент-(24684)Механика-(15423)Науковедение-(506)Образование-(11852)Охрана труда-(3308)Педагогика-(5571)Полиграфия-(1312)Политика-(7869)Право-(5454)Приборостроение-(1369)Программирование-(2801)Производство-(97182)Промышленность-(8706)Психология-(18388)Религия-(3217)Связь-(10668)Сельское хозяйство-(299)Социология-(6455)Спорт-(42831)Строительство-(4793)Торговля-(5050)Транспорт-(2929)Туризм-(1568)Физика-(3942)Философия-(17015)Финансы-(26596)Химия-(22929)Экология-(12095)Экономика-(9961)Электроника-(8441)Электротехника-(4623)Энергетика-(12629)Юриспруденция-(1492)Ядерная техника-(1748)
Animating the parent layer
|
|
|
|
Setting up parenting
Animating the scenery using parenting
To animate the various elements of the scenery efficiently with the background, you’re going to use parenting. As you learned in Lesson 3, “Animating Text,” creating a parenting relationship between layers synchronizes the changes in the parent layer with the corresponding transformation values of the child layers. In Lesson 3, you used parenting to quickly apply one layer’s scale transformation to another layer. Now, you will use it to synchronize the movement of the objects in three layers—the leaves, full skyline, and the FG (foreground) layers—with the BG (background) layer of the animation.
First, you’ll set up the parent-child relationship between the relevant layers in the Timeline panel.
1 In the Timeline panel, Ctrl-click (Windows) or Command-click (Mac OS) to select the leaves, FG, and full skyline layers.
2 In the Parent column for any one of the selected layers, choose 8.BG from the pop-up menu. This establishes the three selected layers as child layers to the parent layer, which is layer 8, named BG (the background).

_ Tip: If you don’t see the Parent column, choose Columns > Parent from the Timeline panel menu.
Now, you’ll animate the position of the background layer—the parent layer—so that it moves horizontally. This, in turn, will animate the child layers in the same way.
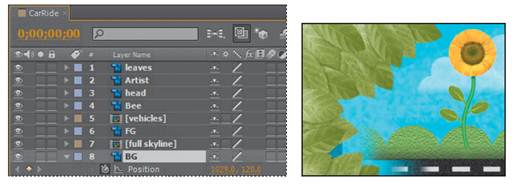
1 Press the Home key, or move the current-time indicator to the beginning of the time ruler.
2 Select the BG layer in the Timeline panel, and press P to reveal its Position property.
3 Set the BG layer’s Position values to 1029, 120, and click the stopwatch icon () to create a Position keyframe. This moves the background layer off to the left side of the scene, as if the camera had been moved.
_ Tip: A quick way to go to a frame is to press Alt+Shift+J (Windows)or Option+Shift+J (Mac OS) to open the Go To Time dialog box. Then type the desired time without punctuation (as in 1015 for 10:15), and press Enter or Return.
4 Go to 10:15.
5 Set the BG layer’s Position values to -626, 120. After Effects automatically creates a second keyframe and shows you the motion path of the animation in the Composition panel. The background now moves across the composition, and because the leaves, full skyline, and FG layers are child layers to the BG (parent) layer, they also move horizontally from the same starting position.
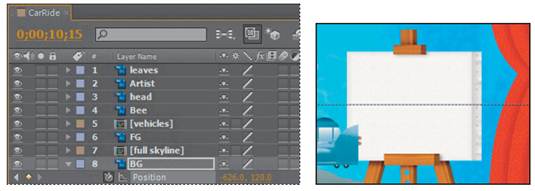
6 Select the BG layer, and press P to hide its Position property and keep the Timeline panel neat.
Animating the bee’s position
Another element of the composition that moves across the scene at the beginning of the animation is the bee. You will animate it next.
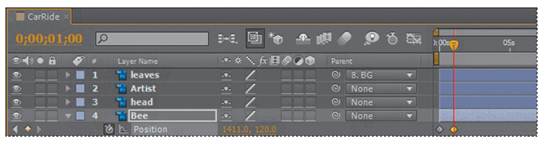
1 Press the Home key, or go to 0:00.
2 Select the Bee layer in the Timeline panel, and press P to reveal its Position property. (The bee is not visible at 0:00 in the Composition panel.)
3 Set the Position values of the Bee layer to 825, 120, so that the bee is offscreen to the left at the beginning of the animation. Then click the stopwatch icon () to create a Position keyframe.
4 Go to 1:00, and set the Bee layer’s Position values to 1411, 120, putting the bee offscreen to the right. After Effects adds a keyframe.
5 Select the Bee layer, and press P to hide its Position property in the Timeline panel.
_ Tip: You can also change the Bee layer’s Position values by dragging the layer in the Composition panel (using the Selection tool) until the layer is in the correct position.
|
|
|
|
|
Дата добавления: 2014-11-20; Просмотров: 401; Нарушение авторских прав?; Мы поможем в написании вашей работы!