КАТЕГОРИИ:
Архитектура-(3434)Астрономия-(809)Биология-(7483)Биотехнологии-(1457)Военное дело-(14632)Высокие технологии-(1363)География-(913)Геология-(1438)Государство-(451)Демография-(1065)Дом-(47672)Журналистика и СМИ-(912)Изобретательство-(14524)Иностранные языки-(4268)Информатика-(17799)Искусство-(1338)История-(13644)Компьютеры-(11121)Косметика-(55)Кулинария-(373)Культура-(8427)Лингвистика-(374)Литература-(1642)Маркетинг-(23702)Математика-(16968)Машиностроение-(1700)Медицина-(12668)Менеджмент-(24684)Механика-(15423)Науковедение-(506)Образование-(11852)Охрана труда-(3308)Педагогика-(5571)Полиграфия-(1312)Политика-(7869)Право-(5454)Приборостроение-(1369)Программирование-(2801)Производство-(97182)Промышленность-(8706)Психология-(18388)Религия-(3217)Связь-(10668)Сельское хозяйство-(299)Социология-(6455)Спорт-(42831)Строительство-(4793)Торговля-(5050)Транспорт-(2929)Туризм-(1568)Физика-(3942)Философия-(17015)Финансы-(26596)Химия-(22929)Экология-(12095)Экономика-(9961)Электроника-(8441)Электротехника-(4623)Энергетика-(12629)Юриспруденция-(1492)Ядерная техника-(1748)
Adjusting an anchor point
Previewing the animation
A quick manual preview will show you how the elements in the scenery move.
1 Drag the current-time indicator from 0:00 to 10:15. The animation of the background, leaves, bee, foreground objects, and the objects in the skyline makes it appear as if a camera is panning across the scene.
2 After you preview, return the current-time indicator to 0:00 and then choose File > Save to save your work.
The background is moving; now it’s time to animate the artist in his red car so that he appears to drive across the composition. To begin that process, you must first move the anchor point of the layer that contains the red car, without moving the layer’s relative position in the composition. The red car is on the Artist layer. To edit the anchor point of the Artist layer, you need to work on the Artist layer in the Layer panel.
1 Double-click the Artist layer in the Timeline panel to open it in the Layer panel.
2 At the bottom of the Layer panel, choose Anchor Point Path from the View menu. This view displays the layer’s anchor point, which by default is at the center of the layer.
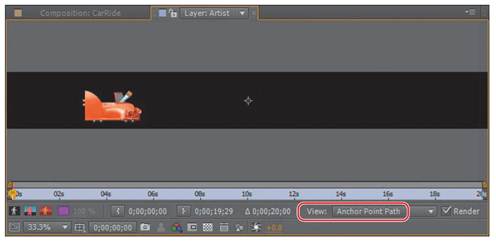
3 Select the Pan Behind tool () in the Tools panel (or press Y to activate it).
4 Choose Fit Up To 100% from the Magnification Ratio pop-up menu to see the entire layer, and then drag the anchor point to the lower-left corner of the car.

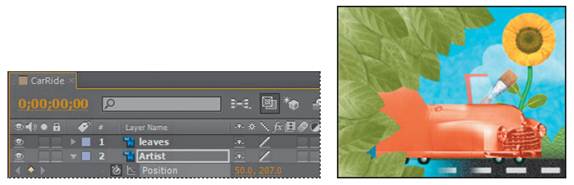
5 Click the Composition: CarRide tab to view the CarRide composition.
6 Select the Artist layer in the Timeline panel, and press P to reveal its Position property.
7 Set the Position values for the Artist layer to 50, 207 so that the car is in the center of the frame, and then click the stopwatch icon () to set a Position keyframe. This is a temporary position that lets you see the car onscreen while you mask the driver into place, which is your next task. Then you’ll animate the car so that it drives across the composition.
8 Select the Artist layer, press P to hide its Position property, and then choose File > Save to save your work.
|
|
Дата добавления: 2014-11-20; Просмотров: 400; Нарушение авторских прав?; Мы поможем в написании вашей работы!