КАТЕГОРИИ:
Архитектура-(3434)Астрономия-(809)Биология-(7483)Биотехнологии-(1457)Военное дело-(14632)Высокие технологии-(1363)География-(913)Геология-(1438)Государство-(451)Демография-(1065)Дом-(47672)Журналистика и СМИ-(912)Изобретательство-(14524)Иностранные языки-(4268)Информатика-(17799)Искусство-(1338)История-(13644)Компьютеры-(11121)Косметика-(55)Кулинария-(373)Культура-(8427)Лингвистика-(374)Литература-(1642)Маркетинг-(23702)Математика-(16968)Машиностроение-(1700)Медицина-(12668)Менеджмент-(24684)Механика-(15423)Науковедение-(506)Образование-(11852)Охрана труда-(3308)Педагогика-(5571)Полиграфия-(1312)Политика-(7869)Право-(5454)Приборостроение-(1369)Программирование-(2801)Производство-(97182)Промышленность-(8706)Психология-(18388)Религия-(3217)Связь-(10668)Сельское хозяйство-(299)Социология-(6455)Спорт-(42831)Строительство-(4793)Торговля-(5050)Транспорт-(2929)Туризм-(1568)Физика-(3942)Философия-(17015)Финансы-(26596)Химия-(22929)Экология-(12095)Экономика-(9961)Электроника-(8441)Электротехника-(4623)Энергетика-(12629)Юриспруденция-(1492)Ядерная техника-(1748)
Keyframing a motion path
 |
Swapping a composition into a layer
Now that Gordon Studer’s mug is constrained to the vector shape, you need to attach it to the car. You’ll return to the main CarRide composition and swap the GordonsHead composition into the Head layer, which is currently a solid layer that serves as a placeholder.
1 Click the CarRide tab in the Timeline panel.
2 Select the head layer in the Timeline panel, and then do one of the following:
Select the GordonsHead composition in the Project panel, and press Ctrl+Alt+/ (Windows) or Command+Option+/ (Mac OS).
Alt-drag (Windows) or Option-drag (Mac) the GordonsHead composition from the Project panel to the head layer in the Timeline panel.
3 Using the Selection tool (), drag the head layer in the Composition panel so that Gordon is sitting properly in the car.

Now, use parenting again so that Gordon’s head will move with the car.
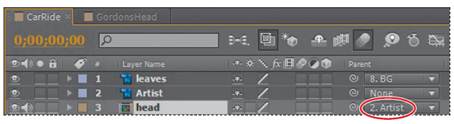
4 In the head layer in the Timeline panel, choose 2. Artist from the Parent menu.
5 Choose File > Save to save your work.
Finally, you’re ready to animate the car so that it drives onscreen at the beginning of the composition, scales larger during the middle of the composition—as if it’s approaching the camera—and then pops a wheelie and drives offscreen. You’ll start by keyframing the car’s position to get it on the screen.
1 Press the Home key, or move the current-time indicator to the beginning of the time ruler.
2 Click the Video switch () for the leaves layer in the Timeline panel to hide the layer so that you can clearly see the Artist layer below it.

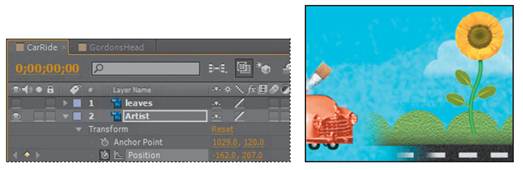
3 Select the Artist layer in the Timeline panel, and expand its Transform properties.
4 Change the layer’s Position values to -162, 207 to move it offscreen to the left (behind the leaves).
_ Note: There’s already a keyframe at this time from the anchor-point exercise.
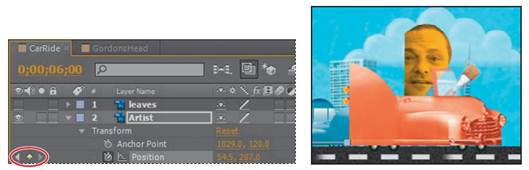
5 Go to 2:20, and change the Position values for the Artist layer to 54.5, 207. After Effects adds a keyframe.
6 Go to 6:00, and click the Add Or Remove Keyframe At The Current Time button (in the Switches column) for the Artist layer to add a Position keyframe for the Artist layer at the same values (54.5, 207).
_ Note: You can’t add a keyframe here by clicking the stopwatch—it’s already active. And After Effects won’t automatically add a new keyframe if you haven’t entered new values. Thus, you must click the Add Or Remove Keyframe At The Current Location button to add a keyframe with the same values..
When you animate the Position property, After Effects displays the movement as a motion path. You can create a motion path for the position of the layer or for the anchor point of a layer. A position motion path appears in the Composition panel; an anchor-point motion path appears in the Layer panel. The motion path appears as a sequence of dots in which each dot marks the position of the layer at each frame. A box in the path marks the position of a keyframe. The density of dots between the boxes in a motion path indicates the layer’s relative speed. Dots close together indicate a slower speed; dots farther apart indicate a faster speed.
|
|
|
|
|
Дата добавления: 2014-11-20; Просмотров: 383; Нарушение авторских прав?; Мы поможем в написании вашей работы!