КАТЕГОРИИ:
Архитектура-(3434)Астрономия-(809)Биология-(7483)Биотехнологии-(1457)Военное дело-(14632)Высокие технологии-(1363)География-(913)Геология-(1438)Государство-(451)Демография-(1065)Дом-(47672)Журналистика и СМИ-(912)Изобретательство-(14524)Иностранные языки-(4268)Информатика-(17799)Искусство-(1338)История-(13644)Компьютеры-(11121)Косметика-(55)Кулинария-(373)Культура-(8427)Лингвистика-(374)Литература-(1642)Маркетинг-(23702)Математика-(16968)Машиностроение-(1700)Медицина-(12668)Менеджмент-(24684)Механика-(15423)Науковедение-(506)Образование-(11852)Охрана труда-(3308)Педагогика-(5571)Полиграфия-(1312)Политика-(7869)Право-(5454)Приборостроение-(1369)Программирование-(2801)Производство-(97182)Промышленность-(8706)Психология-(18388)Религия-(3217)Связь-(10668)Сельское хозяйство-(299)Социология-(6455)Спорт-(42831)Строительство-(4793)Торговля-(5050)Транспорт-(2929)Туризм-(1568)Физика-(3942)Философия-(17015)Финансы-(26596)Химия-(22929)Экология-(12095)Экономика-(9961)Электроника-(8441)Электротехника-(4623)Энергетика-(12629)Юриспруденция-(1492)Ядерная техника-(1748)
Animating the shadows
|
|
|
|
Adding motion blur
The birds will look more authentic if they include motion blur. You’ll add the motion blur and then set the shutter angle and phase, which control the intensity of the blur.
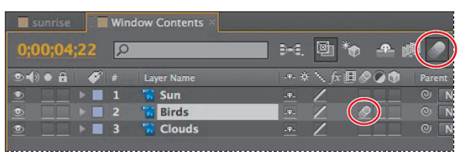
1 Switch to the Window Contents Timeline panel.
2 Go to 4:22—the middle of the birds animation. Then select the Birds layer, and choose Layer > Switches > Motion Blur to turn on motion blur for the layer.
3 Click the Enable Motion Blur button () at the top of the Timeline panel to display the motion blur for the Birds layer in the Composition panel.
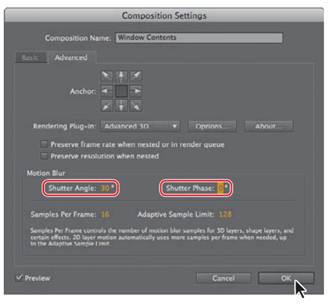
4 Choose Composition > Composition Settings.
5 In the Composition Settings dialog box, click the Advanced tab, and reduce the Shutter Angle to 30˚. This setting imitates the effect of adjusting a shutter angle on a real camera, which controls how long the camera aperture is open, gathering light. Larger values create more motion blur.
6 Change the Shutter Phase to 0˚, and then click OK.
It’s time to turn your attention to the shadows cast on the table by the clock and the vase. In a realistic time-lapse image, they would shorten as the sun rises.
Th ere are a few ways to create and animate shadows in After Eff ects. For example, you could use 3D layers and lights. In this project, however, you will use the Corner Pin eff ect to distort the Shadows layer of the imported Photoshop image. Using the Corner Pin eff ect is like animating with the Photoshop Free Transform tool—theeff ect distorts an image by repositioning each of its four corners. You can use it to stretch, shrink, skew, or twist an image, or to simulate perspective or movement that pivots from the edge of a layer, such as a door opening.
1 Switch to the Sunrise Timeline panel, and make sure you’re at the beginning of the time ruler.
2 Select the Shadows layer in the Timeline panel, and then choose Eff ect > Distort > Corner Pin. Small circles appear around the corner points of the Shadows layer in the Composition panel.
_ Note: If you don’t see the controls, choose View Options from the Composition panel menu. In the View Options dialog box, select the Handles and Eff ect Controls options, and then click OK.
_ Tip: The lower-right corner of the Shadows layer is off screen. To adjust that corner, switch to the Hand tool (), and drag up in the Composition panel so that you can see some of the pasteboard below the image. Thenswitch back to the Selection tool (), and drag the lower-right corner-pin handle to the approximate location of the lower-right corner of the glass tabletop.
You’ll start by setting the four corners of the Shadows layer to correspond to the four corners of the glass tabletop. Begin about midway into the animation, when the sun is high enough to start aff ecting the shadow.
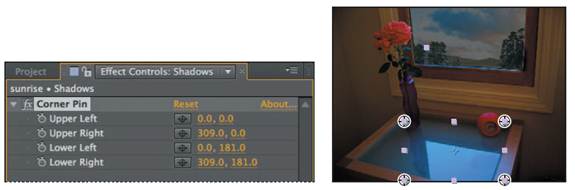
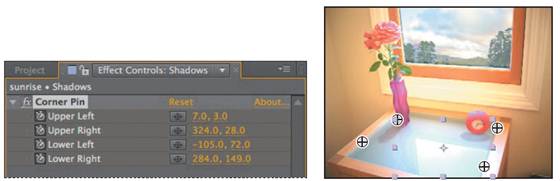
3 Go to 6:00, and then drag each of the four corner-pin handles to the respective corners of the glass tabletop. Notice that the x, y coordinates update in the Eff ect Controls panel.
If you have trouble getting the shadows to look right, you can manually enter the values shown in the fi gure that follows step 4.
|
|
|
4 Set a keyframe for each corner at 6:00 by clicking the stopwatch icon () for each position in the Effect Controls panel.
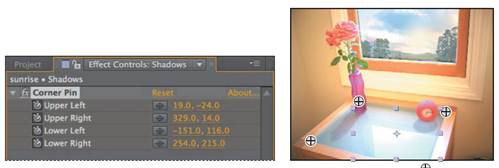
5 Press the End key, or move the current-time indicator to the last frame of the composition.
6 Using the Selection tool (), drag the two lower corner-pin handles to shorten the shadows: Drag them about 25% closer to the back edge of the tabletop. You may also need to move the two upper corners in slightly so that the bases of the shadows still align properly with the vase and clock. Your corner-pin values should be similar to those in the figure below; you can enter the values directly if you prefer not to drag the corners. After Effects adds keyframes.
7 If necessary, select the Hand tool (), and drag the composition down to center it vertically in the Composition panel. Then switch back to the Selection tool (), and deselect the layer.
8 Go to 0:00, and then press the spacebar to preview the entire animation, including the corner-pin effect. When you’re done, press the spacebar again.

9 Choose File > Save to save your project.
|
|
|
|
|
Дата добавления: 2014-11-20; Просмотров: 455; Нарушение авторских прав?; Мы поможем в написании вашей работы!