КАТЕГОРИИ:
Архитектура-(3434)Астрономия-(809)Биология-(7483)Биотехнологии-(1457)Военное дело-(14632)Высокие технологии-(1363)География-(913)Геология-(1438)Государство-(451)Демография-(1065)Дом-(47672)Журналистика и СМИ-(912)Изобретательство-(14524)Иностранные языки-(4268)Информатика-(17799)Искусство-(1338)История-(13644)Компьютеры-(11121)Косметика-(55)Кулинария-(373)Культура-(8427)Лингвистика-(374)Литература-(1642)Маркетинг-(23702)Математика-(16968)Машиностроение-(1700)Медицина-(12668)Менеджмент-(24684)Механика-(15423)Науковедение-(506)Образование-(11852)Охрана труда-(3308)Педагогика-(5571)Полиграфия-(1312)Политика-(7869)Право-(5454)Приборостроение-(1369)Программирование-(2801)Производство-(97182)Промышленность-(8706)Психология-(18388)Религия-(3217)Связь-(10668)Сельское хозяйство-(299)Социология-(6455)Спорт-(42831)Строительство-(4793)Торговля-(5050)Транспорт-(2929)Туризм-(1568)Физика-(3942)Философия-(17015)Финансы-(26596)Химия-(22929)Экология-(12095)Экономика-(9961)Электроника-(8441)Электротехника-(4623)Энергетика-(12629)Юриспруденция-(1492)Ядерная техника-(1748)
Using the Rectangle and Ellipse tools
|
|
|
|
Creating a vignette
A popular effect in motion graphic design is to apply a vignette to the composition. This is often done to simulate light variations of a glass lens. It creates an interesting look that focuses the attention on the subject and sets the shot apart.
1 Zoom out to see the whole image.
2 Choose Layer > New > Solid.
3 In the Solid Settings dialog box, name this layer Vignette, click the Make Comp Size button, change the Color to black (R= 0, G= 0, B= 0), and then click OK.
In addition to the Pen tool, After Effects provides tools thatlet you easily create square and elliptical masks.
4 In the Tools panel, select the Ellipse tool (), hidden behind the Rectangle tool ().
5 In the Composition panel, position the cross-hair pointer in the upper-left corner of the image. Drag to the opposite corner to create an elliptical shape that fills the image. Adjust the shape and position using the Selection tool, if necessary.
6 Expand the Mask 1 property in the Vignette layer to display all of the mask properties for the layer.
The Rectangle tool, as the name suggests, creates a rectangle or square. The Ellipse tool creates an ellipse or circle. You create mask shapes with these tools by dragging them in the Composition or Layer panel.
If you want to draw a perfect square or circle, press the Shift key as you drag with the Rectangle tool or the Ellipse tool. To create your mask from the center, press Ctrl (Windows) or Command (Mac OS) after you start to drag. Press Ctrl+Shift or Command+Shift after you start to drag to create a perfect square or circle mask from a center anchor point.
Be careful! If you use these tools without a layer selected, you’ll draw a shape, not a mask.
7 Choose Subtract from the Mask 1 Mode pop-up menu.
8 Increase the Mask Feather amount to 200, 200 pixels.
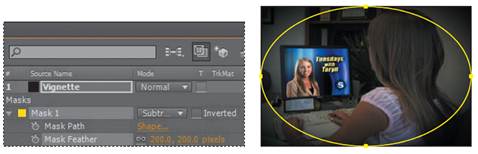
Your composition should now resemble the following figure.
Even with this large feather amount, the vignette is a bit intense and constricting.
You can give the composition more breathing room by adjusting the Mask Expansion property. The Mask Expansion property represents, in pixels, how far from the original mask edge you are expanding or contracting the adjusted edge.
9 Increase Mask Expansion to 90 pixels.
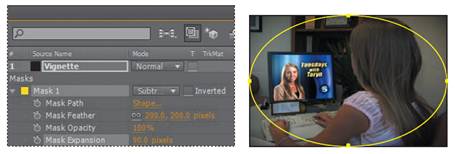
10 Hide the properties for the Vignette layer, and then choose File > Save.
|
|
|
|
|
Дата добавления: 2014-11-20; Просмотров: 366; Нарушение авторских прав?; Мы поможем в написании вашей работы!