КАТЕГОРИИ:
Архитектура-(3434)Астрономия-(809)Биология-(7483)Биотехнологии-(1457)Военное дело-(14632)Высокие технологии-(1363)География-(913)Геология-(1438)Государство-(451)Демография-(1065)Дом-(47672)Журналистика и СМИ-(912)Изобретательство-(14524)Иностранные языки-(4268)Информатика-(17799)Искусство-(1338)История-(13644)Компьютеры-(11121)Косметика-(55)Кулинария-(373)Культура-(8427)Лингвистика-(374)Литература-(1642)Маркетинг-(23702)Математика-(16968)Машиностроение-(1700)Медицина-(12668)Менеджмент-(24684)Механика-(15423)Науковедение-(506)Образование-(11852)Охрана труда-(3308)Педагогика-(5571)Полиграфия-(1312)Политика-(7869)Право-(5454)Приборостроение-(1369)Программирование-(2801)Производство-(97182)Промышленность-(8706)Психология-(18388)Религия-(3217)Связь-(10668)Сельское хозяйство-(299)Социология-(6455)Спорт-(42831)Строительство-(4793)Торговля-(5050)Транспорт-(2929)Туризм-(1568)Физика-(3942)Философия-(17015)Финансы-(26596)Химия-(22929)Экология-(12095)Экономика-(9961)Электроника-(8441)Электротехника-(4623)Энергетика-(12629)Юриспруденция-(1492)Ядерная техника-(1748)
Adjusting color balance
|
|
|
|
After Effects provides several tools for color correction. Some may do the job with a single click, but understanding how to adjust colors manually gives you the greatest freedom to achieve the look you want. You’ll use the Levels effect to darken theshadows, remove the blue cast, and make the image pop a little more.
1 Press the Home key, or move the current-time indicator to the beginning of the time ruler.
2 Select the Albertson_Hall.mov layer inthe Timeline panel.
3 Press Enter or Return, rename thelayer Building, and then press Enter or Return to accept the new name.
4 With the Building layer selected, choose Effect > Color Correction > Levels(Individual Controls).
The Levels (Individual Controls) effect may be a little intimidating at first, but it can give you great control over your shot. It remaps the range of input color or alpha channel levels onto a new range of output levels, functioning much the same as the Levels adjustment in Adobe Photoshop.
The Channel menu specifies the channel to be modified, and the histogram shows the number of pixels with each luminance value in the image. When the selected channel is RGB, you can adjust the overall brightness and contrast of the image.That’s a good place to start.
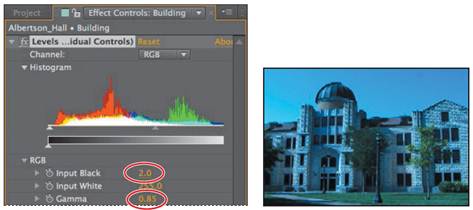
5 In the Effect Controls panel, make sure RGB is selected in the Channel menu. Then click the triangle next to RGB to expand its properties.
6 Enter 2 for the Input Black value, slightly darkening the shadows. The Input Black slider under the histogram moves accordingly.
7 Enter 0.85 for the Gamma value, increasing the contrast so that it pops a little more. The Gamma value represents the midtones.
To correct the blue cast, you must first determine what areas are supposed to be gray (or white or black) in the image. In this shot, the building is supposed to be a neutral color.
8 Move the cursor over the concrete areas of the building, and note the RGB values in the Info panel. The values change as you move the cursor.
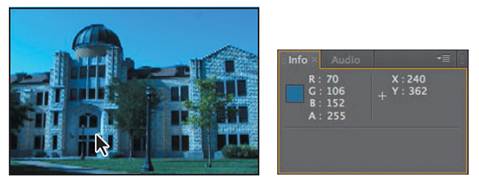
In a region near the door, the RGB value is R=70, G=95, B=125. To determine what the values should be, divide 255 (the highest possible RGB value) by the highest of the values in the sample. That gives you 255 divided by 125 (the blue value near the door), or 2.04. To equalize the colors so that blue is no longer prominent, you need to multiply 2.04 by the original red and green values (70 and 95, respectively). The new values are 142.8 for red and 193.8 for green.
9 In the Effect Controls panel, expand the Red and Green properties.
10 For the Red Input White value, enter 142.8; for the Green Input White value, enter 193.8.
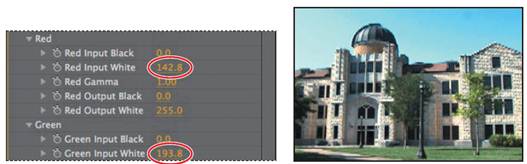
The blue cast is gone, revealing a much more realistic scene.
For each channel, the Input settings increase the value, while the Output settings decrease the value. For example, lowering the Red Input White value adds red to the highlights in the shot, and increasing the Red Output White value adds red to the shadows or dark areas in the shot.
Performing the math lets you zero in on the appropriate settings quickly. If you prefer, you could experiment with the settings to find the best values for your purpose.
11 Hide the Levels properties in the Effect Controls panel.
|
|
|
|
|
Дата добавления: 2014-11-20; Просмотров: 390; Нарушение авторских прав?; Мы поможем в написании вашей работы!