КАТЕГОРИИ:
Архитектура-(3434)Астрономия-(809)Биология-(7483)Биотехнологии-(1457)Военное дело-(14632)Высокие технологии-(1363)География-(913)Геология-(1438)Государство-(451)Демография-(1065)Дом-(47672)Журналистика и СМИ-(912)Изобретательство-(14524)Иностранные языки-(4268)Информатика-(17799)Искусство-(1338)История-(13644)Компьютеры-(11121)Косметика-(55)Кулинария-(373)Культура-(8427)Лингвистика-(374)Литература-(1642)Маркетинг-(23702)Математика-(16968)Машиностроение-(1700)Медицина-(12668)Менеджмент-(24684)Механика-(15423)Науковедение-(506)Образование-(11852)Охрана труда-(3308)Педагогика-(5571)Полиграфия-(1312)Политика-(7869)Право-(5454)Приборостроение-(1369)Программирование-(2801)Производство-(97182)Промышленность-(8706)Психология-(18388)Религия-(3217)Связь-(10668)Сельское хозяйство-(299)Социология-(6455)Спорт-(42831)Строительство-(4793)Торговля-(5050)Транспорт-(2929)Туризм-(1568)Физика-(3942)Философия-(17015)Финансы-(26596)Химия-(22929)Экология-(12095)Экономика-(9961)Электроника-(8441)Электротехника-(4623)Энергетика-(12629)Юриспруденция-(1492)Ядерная техника-(1748)
Completing the scene
|
|
|
|
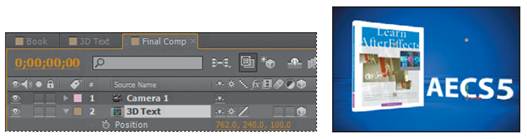
You’re ready to add the 3D Text composition you created earlier. As with the Book composition, you’ll need to select the 3D switch and the Collapse Transformations switch for it to behave as a true 3D object.
1 Drag the 3D Text composition from the Project panel to the Timeline panel, placing it directly below the Camera 1 layer.
2 Select the 3D Layer switch () and the Collapse Transformations switch () for the 3D Text layer.

3 In the Composition panel, choose 1 View from the Select View Layout menu, and choose Active Camera from the 3D View pop-up menu.
4 With the 3D Text layer selected in the Timeline panel, press R to reveal the Rotation properties for the layer. Then change the Y Rotation value to 60 degrees.
5 Press the P key to reveal the Position property for the 3D Text layer. Change the Position values to 762, 240, 100.
6 Close any open properties in the Timeline panel, and choose File > Save. You’ve created 3D objects and assembled them in a virtual space. In Lesson 12, “Using 3D Features,” you’ll continue working on this project. For the final movie, you’ll add lights, adjust surface properties, and animate the camera.
|
|
|
|
|
Дата добавления: 2014-11-20; Просмотров: 318; Нарушение авторских прав?; Мы поможем в написании вашей работы!