КАТЕГОРИИ:
Архитектура-(3434)Астрономия-(809)Биология-(7483)Биотехнологии-(1457)Военное дело-(14632)Высокие технологии-(1363)География-(913)Геология-(1438)Государство-(451)Демография-(1065)Дом-(47672)Журналистика и СМИ-(912)Изобретательство-(14524)Иностранные языки-(4268)Информатика-(17799)Искусство-(1338)История-(13644)Компьютеры-(11121)Косметика-(55)Кулинария-(373)Культура-(8427)Лингвистика-(374)Литература-(1642)Маркетинг-(23702)Математика-(16968)Машиностроение-(1700)Медицина-(12668)Менеджмент-(24684)Механика-(15423)Науковедение-(506)Образование-(11852)Охрана труда-(3308)Педагогика-(5571)Полиграфия-(1312)Политика-(7869)Право-(5454)Приборостроение-(1369)Программирование-(2801)Производство-(97182)Промышленность-(8706)Психология-(18388)Религия-(3217)Связь-(10668)Сельское хозяйство-(299)Социология-(6455)Спорт-(42831)Строительство-(4793)Торговля-(5050)Транспорт-(2929)Туризм-(1568)Физика-(3942)Философия-(17015)Финансы-(26596)Химия-(22929)Экология-(12095)Экономика-(9961)Электроника-(8441)Электротехника-(4623)Энергетика-(12629)Юриспруденция-(1492)Ядерная техника-(1748)
Adding a transition effect
|
|
|
|
Currently, the brush stroke is present throughout the composition. You’ll add a transition effect to change the way the brush stroke arrives on the scene.
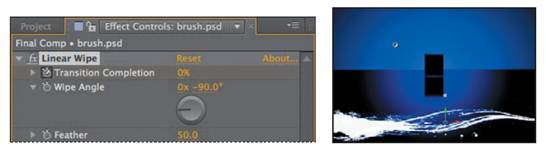
1 With the brush.psd layer selected, choose Effect > Transition > Linear Wipe.
2 In the Effect Controls panel, change Transition Completion to 100%, Wipe Angle to -90 degrees, and Feather to 50.
3 In the Effect Controls panel, click the stopwatch icon for the Transition Completion property to create an initial keyframe.

4 Go to 0:15.
5 Change the Transition Completion value to 0%. The brush stroke will be revealed from left to right on the screen.
6 In the Timeline panel, hide all the properties for the brush.psd layer.
7 Select the brush.psd layer, and then press Ctrl+D (Windows) or Command+D (Mac OS) to duplicate the layer.
8 With the duplicate layer selected, press P to display the Position property, and then enter a new position of -238, 383, -523.
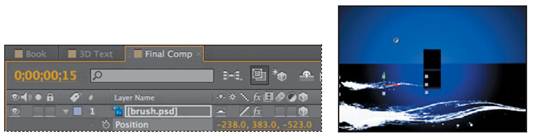
9 Press P to hide the Position property.
There are two brush strokes on the screen, one in the foreground and one further back. You’ll create two more brush strokes, flipped so that they arrive from the right.
10 Select the lowest brush.psd layer (the original layer) in the Timeline panel, and press Ctrl+D (Windows) or Command+D (Mac OS) to duplicate it.
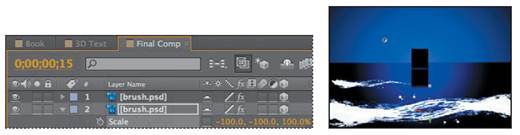
11 With the middle brush.psd layer selected, press the S key to display the Scale property.
12 Click the Constrain Proportions icon () to unlink the values, and then change the x-axis and y-axis values to -100%.
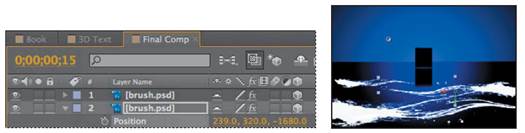
13 Press the P key to reveal the Position property for the layer, and change the values to 239, 320, -1680. Press the P key again to hide the Position property.
14 With the middle brush.psd layer selected, press Ctrl+D (Windows) or Command+D (Mac OS) to duplicate it.
15 Move the newest duplicate layer to the top of the layer stack.
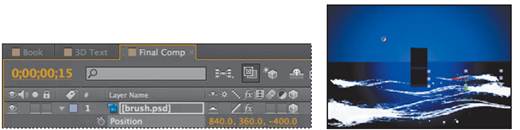
16 With the top layer selected, press the P key to reveal the Position layer. Then change the position to 840, 360, -400.
17 Hide all layer properties, and choose File > Save.
|
|
|
|
|
Дата добавления: 2014-11-20; Просмотров: 371; Нарушение авторских прав?; Мы поможем в написании вашей работы!