КАТЕГОРИИ:
Архитектура-(3434)Астрономия-(809)Биология-(7483)Биотехнологии-(1457)Военное дело-(14632)Высокие технологии-(1363)География-(913)Геология-(1438)Государство-(451)Демография-(1065)Дом-(47672)Журналистика и СМИ-(912)Изобретательство-(14524)Иностранные языки-(4268)Информатика-(17799)Искусство-(1338)История-(13644)Компьютеры-(11121)Косметика-(55)Кулинария-(373)Культура-(8427)Лингвистика-(374)Литература-(1642)Маркетинг-(23702)Математика-(16968)Машиностроение-(1700)Медицина-(12668)Менеджмент-(24684)Механика-(15423)Науковедение-(506)Образование-(11852)Охрана труда-(3308)Педагогика-(5571)Полиграфия-(1312)Политика-(7869)Право-(5454)Приборостроение-(1369)Программирование-(2801)Производство-(97182)Промышленность-(8706)Психология-(18388)Религия-(3217)Связь-(10668)Сельское хозяйство-(299)Социология-(6455)Спорт-(42831)Строительство-(4793)Торговля-(5050)Транспорт-(2929)Туризм-(1568)Физика-(3942)Философия-(17015)Финансы-(26596)Химия-(22929)Экология-(12095)Экономика-(9961)Электроника-(8441)Электротехника-(4623)Энергетика-(12629)Юриспруденция-(1492)Ядерная техника-(1748)
Positioning the track points
Creating the composition
Importing the footage
You need to import one footage item to start this project.
1 Double-click an empty area of the Project panel to open the Import File dialog box.
2 Navigate to the AECS5_CIB/Lessons/Lesson13/Assets folder. Select the flowers.mov file, and then click Open.
Now, you will create the composition.
1 Choose Composition > New Composition.
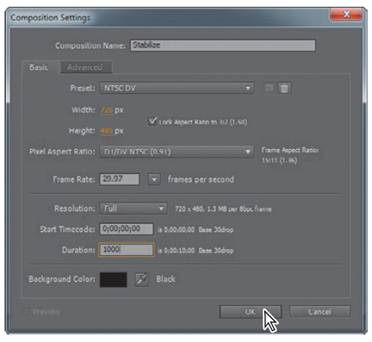
2 In the Composition Settings dialog box, type Stabilize for the name.
3 Choose NTSC DV from the Preset pop-up menu. This automatically sets the width, height, pixel aspect ratio, and frame rate for the composition.
4 In the Duration field, type 1000 to specify 10 seconds, which matches the length of the flowers.mov file, and then click OK.
5 Drag the flowers.mov item from the Project panel to the Timeline panel. The flowers movie appears in the Composition panel.
6 Drag the current-time indicator across the time ruler to manually preview the footage. This clip was shot with a handheld camera in the late afternoon. A slight breeze rustles the vegetation, and the camera moves unsteadily.
After Effects tracks motion by matching pixels from a selected area in a frame to pixels in each succeeding frame. You specify the area to track by using track points. A track point contains a feature region, a search region, and an attach point. After Effects displays the track point in the Layer panel as it tracks.
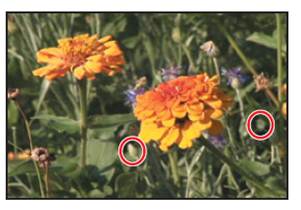
To stabilize this footage, you need to identify areas in the shot that are stationary within the context of the frame. These areas are called the feature regions. This figure shows two feature regions that will work for this project.
It’s important to locate feature regions carefully. For the smoothest tracking, select areas that:
Are visible for the entire shot.
Have a contrasting color from the surrounding area.
Have a distinct shape (at least within the search region).
Have a consistent shape and color throughout the shot.
You’ll open the Tracking Controls panel and apply track points to the clip.
_ Note: The motion tracking will be based on the frame where the current-time indicator is positioned.
1 Press the Home key, or move the current-time indicator to the beginning of the time ruler.
2 Choose Window > Tracker to open the Tracker panel. The Tracker panel is where you specify your motion source and motion target layers, the type of tracking you want to use, and other tracking options.
3 Click the Stabilize Motion button in the Tracker panel, and make sure that flowers.mov appears in the Motion Source pop-up menu. This tells After Effects that you want to stabilize the motion in the flowers layer. When you set these options, the Layer panel opens. In the Tracker panel, the Current Track pop-up menu shows Tracker 1, and the Track Type is set to Stabilize.
When you manually previewed the footage, you may have noticed that the camera not only moved left, right, up, and down, but also rotated slightly. So you need to stabilize the shot’s rotation as well as its position.
4 Select Position and Rotation in the Tracker panel. You should see two track point indicators in the Layer panel.
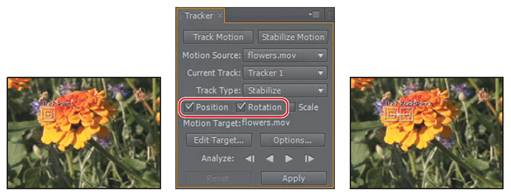
Notice that Motion Target is the flowers.mov layer. When you stabilize a shot, the resulting data can be applied to the original layer, as specified here, or you can select another layer by clicking the Edit Target button. Leave it set to flowers.mov. Now you’re ready to set your track points.
|
|
Дата добавления: 2014-11-20; Просмотров: 390; Нарушение авторских прав?; Мы поможем в написании вашей работы!