КАТЕГОРИИ:
Архитектура-(3434)Астрономия-(809)Биология-(7483)Биотехнологии-(1457)Военное дело-(14632)Высокие технологии-(1363)География-(913)Геология-(1438)Государство-(451)Демография-(1065)Дом-(47672)Журналистика и СМИ-(912)Изобретательство-(14524)Иностранные языки-(4268)Информатика-(17799)Искусство-(1338)История-(13644)Компьютеры-(11121)Косметика-(55)Кулинария-(373)Культура-(8427)Лингвистика-(374)Литература-(1642)Маркетинг-(23702)Математика-(16968)Машиностроение-(1700)Медицина-(12668)Менеджмент-(24684)Механика-(15423)Науковедение-(506)Образование-(11852)Охрана труда-(3308)Педагогика-(5571)Полиграфия-(1312)Политика-(7869)Право-(5454)Приборостроение-(1369)Программирование-(2801)Производство-(97182)Промышленность-(8706)Психология-(18388)Религия-(3217)Связь-(10668)Сельское хозяйство-(299)Социология-(6455)Спорт-(42831)Строительство-(4793)Торговля-(5050)Транспорт-(2929)Туризм-(1568)Физика-(3942)Философия-(17015)Финансы-(26596)Химия-(22929)Экология-(12095)Экономика-(9961)Электроника-(8441)Электротехника-(4623)Энергетика-(12629)Юриспруденция-(1492)Ядерная техника-(1748)
Positioning the track point
|
|
|
|
Creating a shape layer
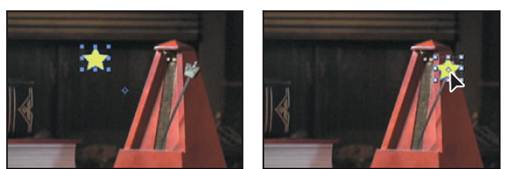
You’re going to attach a star to the end of the metronome. First, you need to create the star. You’ll use a shape layer.
1 Press the Home key, or move the current-time indicator to the beginning of the time ruler, and then click an empty area of the Timeline panel to deselectthe layer.
2 Select the Star tool (), hidden behind the Rectangle tool in the Tools panel.
3 Click the Fill Color swatch, and select a light yellow such as R=220, G=250, B=90. Click the word Stroke, select None in the Stroke Options dialog box, and click OK.

4 In the Composition panel, draw a small star.
5 Use the Selection tool to position the star over the weighted end of the pendulum arm.
6 Select Shape Layer 1 to see the layer’s anchor point. Use the Pan Behind tool to move the anchor point in the center of the star shape, if it isn’t already there.
You will track the metronome weight (the rhombus at the end of its arm) using the same tracking controls you used with the flowers. However, unlike motion stabilization, you need to place tracking regions around the area that you’ll track another layer to. With the star shape added to the Tracking composition, you are ready to position the track point.
1 Select the metronome.mov layer in the Timeline panel.
2 Choose Window > Tracker to open the Tracker panel, if it’s not already open.
3 Click the Track Motion button in the Tracker panel. The Layer panel opens, with a Track Point 1 indicator in the center of the image.
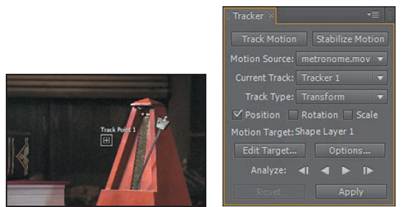
Notice the settings in the Tracker panel: The Motion Source is set to metronome.mov. The Current Track is Tracker 1, and the Motion Target is Shape Layer 1, because After Effects automatically sets the Motion Target to the layer immediately above the source layer.
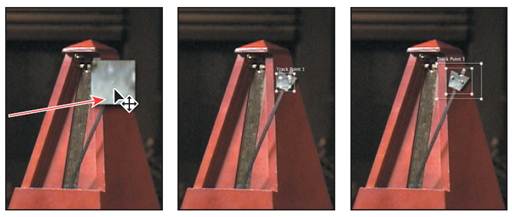
Now, you’ll position your track point.
4 Using the Selection tool (), move the Track Point 1 indicator (from the center) in the Layer panel over the metronome weight.
5 Enlarge the search region (the outer box) to encompass the area around the pendulum. Then adjust the feature region (the inner box) within the weight.
_ Note: In this exercise, you want the star to move atop the metronome weight. However, if you wanted an object to move in relationship to the tracked area but not on top of it, you could reposition the attach point accordingly.
|
|
|
|
|
Дата добавления: 2014-11-20; Просмотров: 353; Нарушение авторских прав?; Мы поможем в написании вашей работы!