КАТЕГОРИИ:
Архитектура-(3434)Астрономия-(809)Биология-(7483)Биотехнологии-(1457)Военное дело-(14632)Высокие технологии-(1363)География-(913)Геология-(1438)Государство-(451)Демография-(1065)Дом-(47672)Журналистика и СМИ-(912)Изобретательство-(14524)Иностранные языки-(4268)Информатика-(17799)Искусство-(1338)История-(13644)Компьютеры-(11121)Косметика-(55)Кулинария-(373)Культура-(8427)Лингвистика-(374)Литература-(1642)Маркетинг-(23702)Математика-(16968)Машиностроение-(1700)Медицина-(12668)Менеджмент-(24684)Механика-(15423)Науковедение-(506)Образование-(11852)Охрана труда-(3308)Педагогика-(5571)Полиграфия-(1312)Политика-(7869)Право-(5454)Приборостроение-(1369)Программирование-(2801)Производство-(97182)Промышленность-(8706)Психология-(18388)Религия-(3217)Связь-(10668)Сельское хозяйство-(299)Социология-(6455)Спорт-(42831)Строительство-(4793)Торговля-(5050)Транспорт-(2929)Туризм-(1568)Физика-(3942)Философия-(17015)Финансы-(26596)Химия-(22929)Экология-(12095)Экономика-(9961)Электроника-(8441)Электротехника-(4623)Энергетика-(12629)Юриспруденция-(1492)Ядерная техника-(1748)
Using Timewarp
Importing the footage and creating the composition
You need to import one footage item for this exercise.
1 Double-click an empty area of the Project panel to open the Import File dialog box.
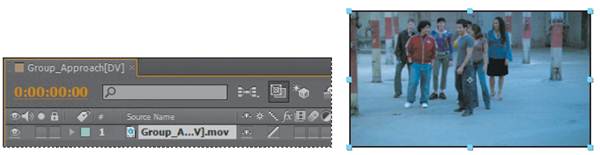
2 Navigate to the AECS5_CIB/Lessons/Lesson13/Assets folder on your hard disk, select the Group_Approach[DV].mov, and click Open.
3 Click OK in the Interpret Footage dialog box. Now, you’ll create a new composition based on the footage item’s aspect ratio and duration.
4 Drag the Group_Approach[DV].mov file onto the Create A New Composition button () at the bottom of the Project panel. After Effects creates a new composition named for the source file and displays it in the Composition and Timeline panels.
5 Choose File > Save to save your work.
In the source footage, a group of young people approaches the camera at a steady pace. At around 2 seconds, the director would like the motion to begin to slow down to 10%, and then ramp back up to full speed at 7:00.
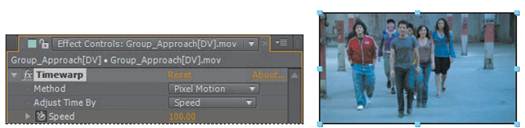
1 With the Group_Approach [DV] layer selected in the Timeline panel, choose Effect > Time > Timewarp.
2 In the Timewarp area of the Effect Controls panel, choose Pixel Motion from the Method menu. This instructs Timewarp to create new frames by analyzing the pixel movement in nearby frames and creating motion vectors. Also, choose Speed from the Adjust Time By menu, to control the time adjustment by percentage rather than by a specific frame.
3 Go to 2:00.
4 In the Effect Controls panel, set the Speed to 100, and click the stopwatch () to set a keyframe. This tells Timewarp to keep the speed of the clip at 100% until the 2-second mark.
5 Go to 5:00, and change the Speed to 10. After Effects adds a keyframe.
6 Go to 7:00, and set the Speed to 100. After Effects adds a keyframe.
7 Press the Home key, or move the current-time indicator to the beginning of the time ruler, and then watch a RAM preview of the effect.
You will see that the speed adjustments are rather abrupt—not the smooth, slowmotion curve you would expect to see in a professional effect. This is because the keyframes are linear instead of curved. You’ll fix that next.
8 Press the spacebar to stop playback when you’re ready.
9 With the Group_Approach[DV] layer selected in the Timeline panel, press the U key to see the animated Timewarp Speed property.
_ Note: Be patient. The RAM preview might take some time to calculate, but it will provide a more accurate playback than a spacebar preview.
10 Click the Graph Editor button () in the Timeline panel so you can see the Graph Editor instead of the layer bars. The Graph Editor displays the graph for the Speed property name for the Group_Approach[DV] layer.
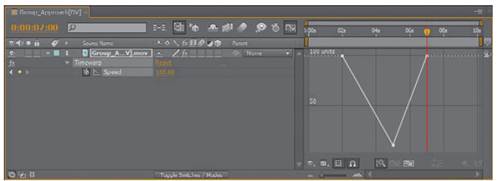
11 Click to select the first Speed keyframe (at 2:00), and then click the Easy Ease icon () at the bottom of the Graph Editor. This adjusts the influence into and out of the keyframe to smooth out sudden changes.
12 Repeat step 11 for the other two Speed keyframes in the motion graph, at 5:00 and 7:00.

_ Tip: Close columns in the Timeline panel to see more icons in the Graph Editor. You can also apply an Easy Ease adjustment by pressing the F9 key.
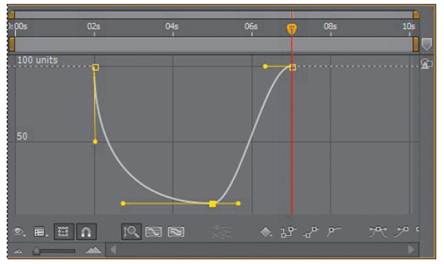
The motion graph is now smoother, but you can tweak it even more by dragging the Bezier handles.
13 Using the Bezier handles for the keyframes at 2:00 and 5:00, adjust the curve so that it resembles the following image.
14 Watch another RAM preview. Now, the slow-motion Timewarp effect looks professional.
15 Choose File > Save to save the project, and then choose File > Close Project. You’ve now experimented with some of the advanced features in After Effects, including motion stabilization, motion tracking, particle systems, and the Timewarp effect. To render and export any or all of the projects you completed in this lesson, see Lesson 14, “Rendering and Outputting,” for instructions.
_ Note: If you need a refresher on using Bezier handles, see Lesson 7, “Working with Masks.”
|
|
Дата добавления: 2014-11-20; Просмотров: 406; Нарушение авторских прав?; Мы поможем в написании вашей работы!