КАТЕГОРИИ:
Архитектура-(3434)Астрономия-(809)Биология-(7483)Биотехнологии-(1457)Военное дело-(14632)Высокие технологии-(1363)География-(913)Геология-(1438)Государство-(451)Демография-(1065)Дом-(47672)Журналистика и СМИ-(912)Изобретательство-(14524)Иностранные языки-(4268)Информатика-(17799)Искусство-(1338)История-(13644)Компьютеры-(11121)Косметика-(55)Кулинария-(373)Культура-(8427)Лингвистика-(374)Литература-(1642)Маркетинг-(23702)Математика-(16968)Машиностроение-(1700)Медицина-(12668)Менеджмент-(24684)Механика-(15423)Науковедение-(506)Образование-(11852)Охрана труда-(3308)Педагогика-(5571)Полиграфия-(1312)Политика-(7869)Право-(5454)Приборостроение-(1369)Программирование-(2801)Производство-(97182)Промышленность-(8706)Психология-(18388)Религия-(3217)Связь-(10668)Сельское хозяйство-(299)Социология-(6455)Спорт-(42831)Строительство-(4793)Торговля-(5050)Транспорт-(2929)Туризм-(1568)Физика-(3942)Философия-(17015)Финансы-(26596)Химия-(22929)Экология-(12095)Экономика-(9961)Электроника-(8441)Электротехника-(4623)Энергетика-(12629)Юриспруденция-(1492)Ядерная техника-(1748)
Maintenance Procedure. ○The fluid level must be checked often during the bleeding operation and replenished with fresh brake fluid as necessary
|
|
|
|
NOTE
○The fluid level must be checked often during the bleeding operation and replenished with fresh brake fluid as necessary. If the fluid in the reservoir runs almost out any time during bleeding operation, the bleeding operation must be done over again from the beginning since air will have entered the line.
○Tap the brake hose lightly from the caliper to the reservoir for easier bleeding.
2-48 Периодический ремонт
|
|
• Install the reservoir cap.
• Remove the rubber cap from the bleed valve on the caliper.
• Attach a clear plastic hose to the bleed valve on the caliper, and run the other end of the hose into a container.
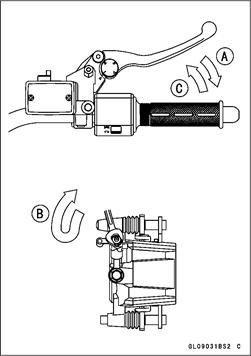
• Bleed the air from the caliper as follows:
• Repeat this operation until no more air can be seen coming out into the plastic hose.
1. Pump the brake lever until it becomes hard, and apply the brake and hold it [A].
2. Quickly open and close [B] the bleed valve while holding the brake applied.
3. Release the brake [C].
Detach the clear plastic hose from the bleed valve. Tighten the bleed valve to the specified torque, and install the rubber cap.
Torque -Caliper Bleed Valve: 7.8 N-m (0.80 kgf-m, 69 in-lb)
Check the fluid level.
After bleeding is done, check the brake for good braking
power, no brake drag, and no fluid leakage.
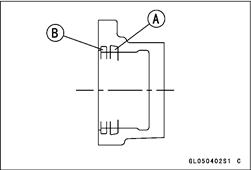
Caliper Rubber Parts Replacement Disassembly the calipers (see Brakes chapter). Replace the fluid seal [A] under any of the following conditions.
OFluid leakage around the pad.
OBrakes overheat.
OThere is a large difference in left and right pad wear.
OThe seal is stuck to the piston.
• If the fluid seal is replaced, replace the dust seal as well.
• After finishing the replacement, check the brake effectiveness.
• Replace the dust seal [B] when it is cracked, worm, swollen and otherwise damaged.
Master Cylinder Rubber Parts Replacement
• Remove the master cylinders (see Master Cylinder Removal in the Brakes chapter).
• Disassemble the master cylinder (see Master Cylinder Disassembly in the Brake System).
• Replace the piston assembly to renew the primary and secondary cups.
• After finishing the replacement, check the brake effectiveness.
Периодический ремонт 2-49
|
|
|
|
|
Дата добавления: 2014-12-23; Просмотров: 331; Нарушение авторских прав?; Мы поможем в написании вашей работы!