КАТЕГОРИИ:
Архитектура-(3434)Астрономия-(809)Биология-(7483)Биотехнологии-(1457)Военное дело-(14632)Высокие технологии-(1363)География-(913)Геология-(1438)Государство-(451)Демография-(1065)Дом-(47672)Журналистика и СМИ-(912)Изобретательство-(14524)Иностранные языки-(4268)Информатика-(17799)Искусство-(1338)История-(13644)Компьютеры-(11121)Косметика-(55)Кулинария-(373)Культура-(8427)Лингвистика-(374)Литература-(1642)Маркетинг-(23702)Математика-(16968)Машиностроение-(1700)Медицина-(12668)Менеджмент-(24684)Механика-(15423)Науковедение-(506)Образование-(11852)Охрана труда-(3308)Педагогика-(5571)Полиграфия-(1312)Политика-(7869)Право-(5454)Приборостроение-(1369)Программирование-(2801)Производство-(97182)Промышленность-(8706)Психология-(18388)Религия-(3217)Связь-(10668)Сельское хозяйство-(299)Социология-(6455)Спорт-(42831)Строительство-(4793)Торговля-(5050)Транспорт-(2929)Туризм-(1568)Физика-(3942)Философия-(17015)Финансы-(26596)Химия-(22929)Экология-(12095)Экономика-(9961)Электроника-(8441)Электротехника-(4623)Энергетика-(12629)Юриспруденция-(1492)Ядерная техника-(1748)
Fit the crankshaft angle sensor plate with the B mark (4ZZ-FE) or F mark (3ZZ-FE) facing outwards (arrowed)
|
|
|
|
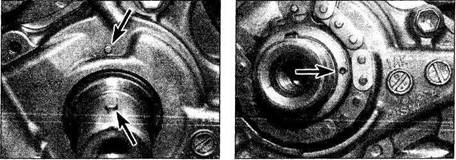
Align the yellow link of the timing chain with the mark on the crankshaft sprocket (arrowed)
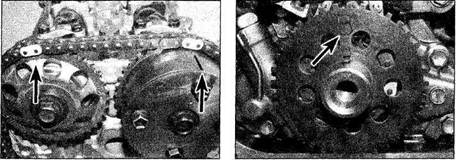
Align the marks on the sprockets (arrowed) with the yellow links on the timing chain
(upright). If necessary, temporarily insert the crankshaft pulley bolt and turn the crankshaft slightly to this position (see illustration).
29 There are three yellow-coloured links on the timing chain - two close together that correspond with the camshaft sprockets, and one which corresponds with the crankshaft sprocket. Engage the crankshaft sprocket with the timing chain, aligning the mark on the sprocket with the yellow-coloured link, then slide the sprocket over the end of the crankshaft, ensuring the locating key in the crankshaft aligns with the corresponding slot in the sprocket (see illustration). If necessary, using a tubular spacer (deep socket) and a hammer, tap the sprocket fully into position.
30 Engage the timing chain with the camshaft sprockets, ensuring the yellow-coloured links
align with the marks on the sprockets (see illustration).
31 Refit the timing chain guide and tighten the bolts to the specified torque.
32 Refit the tensioner slipper and tighten the retaining bolt to the specified torque.
33 Refit the crankshaft angle sensor plate with the B mark (4ZZ-FE) or F mark (3ZZ-FE) facing outwards (see illustration).
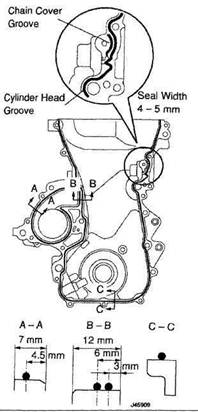
34 Thoroughly clean the timing chain cover and engine block/cylinder gasket surfaces, removing all traces of the old sealant. Take the opportunity to renew the crankshaft oil seal in the timing chain cover as described in Section 8.
35 Apply a thin bead of sealant (Toyota part no 08826-00080 or equivalent) to the timing cover gasket surfaces as shown, then fit the timing chain cover, and tighten the bolts/nuts to the specified torques (see illustration).
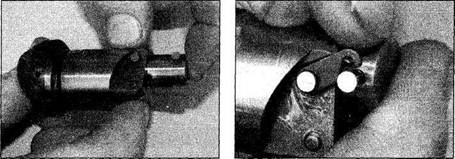
36 Press in the top of the locking pawl to disengage it from the chain tensioner plunger, then use a finger to press the plunger fully into the tensioner housing, and retain it in place with the hook (see illustrations).
bCheck the condition of the tensioner housing O-ring seal and renew if necessary. Fit the housing to the timing chain cover, taking care not to disturb the plunger hook. If the hook is disturbed and the plunger released, remove the housing and reset the plunger as previously described. Tighten the housing retaining bolts to the specified torque.
38 Refit the crankshaft pulley and tighten the retaining bolt to the specified torque. Prevent the crankshaft from rotating using the same method employed during removal.
39 Rotate the crankshaft anti-clockwise a few degrees to release the hook retaining the tensioner plunger, then rotate it clockwise and check that the tensioner slipper is pushed against the chain by the plunger. If it isn't, use your finger or a screwdriver to push the slipper against the tensioner plunger and release the hook (see illustration).
40 Turn the crankshaft clockwise until the notch in the crankshaft pulley is aligned with the 0 on the timing plate located at the front of the engine, and check that the marks on the camshaft sprockets align with the top of the cylinder head (see illustrations 3.6 and 3.7b).
41 Fit a new O-ring seal to the coolant pump
|
|
|
|
|
Дата добавления: 2014-12-23; Просмотров: 1706; Нарушение авторских прав?; Мы поможем в написании вашей работы!