КАТЕГОРИИ:
Архитектура-(3434)Астрономия-(809)Биология-(7483)Биотехнологии-(1457)Военное дело-(14632)Высокие технологии-(1363)География-(913)Геология-(1438)Государство-(451)Демография-(1065)Дом-(47672)Журналистика и СМИ-(912)Изобретательство-(14524)Иностранные языки-(4268)Информатика-(17799)Искусство-(1338)История-(13644)Компьютеры-(11121)Косметика-(55)Кулинария-(373)Культура-(8427)Лингвистика-(374)Литература-(1642)Маркетинг-(23702)Математика-(16968)Машиностроение-(1700)Медицина-(12668)Менеджмент-(24684)Механика-(15423)Науковедение-(506)Образование-(11852)Охрана труда-(3308)Педагогика-(5571)Полиграфия-(1312)Политика-(7869)Право-(5454)Приборостроение-(1369)Программирование-(2801)Производство-(97182)Промышленность-(8706)Психология-(18388)Религия-(3217)Связь-(10668)Сельское хозяйство-(299)Социология-(6455)Спорт-(42831)Строительство-(4793)Торговля-(5050)Транспорт-(2929)Туризм-(1568)Физика-(3942)Философия-(17015)Финансы-(26596)Химия-(22929)Экология-(12095)Экономика-(9961)Электроника-(8441)Электротехника-(4623)Энергетика-(12629)Юриспруденция-(1492)Ядерная техника-(1748)
Non-VVT-i engines
|
|
|
|
Crankshaft oil seal
Oil control valve filter
Oil control valve
Undo the bolt and withdrawn the oil control valve from the cylinder head
Camshaft VVT-i unit
Refitting
Oil control valve filter
Oil control valve
6 Disconnect the wiring plug from the control valve, and connect an ohmmeter to the valve terminals. The resistance should be 6.9 to 7.9Ohms. If the resistance is not as specified the valve may be defective.
7 Clean the filter and ensure it's free from debris and damage.
8 As the VVT-i unit is integral with the intake
camshaft sprocket, refitting is described in Section 6.
9 Check the condition of the O-ring seal on the valve and renew if necessary.
10 Insert the valve into the cylinder head and tighten the retaining bolt to the specified torque. Reconnect the wiring plug.
11 Insert the filter into the cylinder head.
12 Check the condition of the plug sealing washer and renew if necessary. Refit the plug and tighten it to the specified torque.
- renewal

1 Remove the timing belt and crankshaft sprocket (see Section 5).
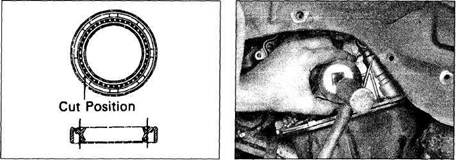
2 Note how far the seal is recessed in the bore, then carefully pry it out of the oil pump housing with a screwdriver or seal removal tool
(see illustration). Don't scratch the housingbore or damage the crankshaft in the process (if the crankshaft is damaged, the new seal will end up leaking). Note: The seal may be easier to remove if the old seal lip is cut with a sharp utility knife first (see illustration).
3 Clean the bore in the housing and coat the outer edge of the new seal with engine oil or multi-purpose grease. Apply a little grease to the seal lip.
|
|
|
|
|
Дата добавления: 2014-12-23; Просмотров: 430; Нарушение авторских прав?; Мы поможем в написании вашей работы!