КАТЕГОРИИ:
Архитектура-(3434)Астрономия-(809)Биология-(7483)Биотехнологии-(1457)Военное дело-(14632)Высокие технологии-(1363)География-(913)Геология-(1438)Государство-(451)Демография-(1065)Дом-(47672)Журналистика и СМИ-(912)Изобретательство-(14524)Иностранные языки-(4268)Информатика-(17799)Искусство-(1338)История-(13644)Компьютеры-(11121)Косметика-(55)Кулинария-(373)Культура-(8427)Лингвистика-(374)Литература-(1642)Маркетинг-(23702)Математика-(16968)Машиностроение-(1700)Медицина-(12668)Менеджмент-(24684)Механика-(15423)Науковедение-(506)Образование-(11852)Охрана труда-(3308)Педагогика-(5571)Полиграфия-(1312)Политика-(7869)Право-(5454)Приборостроение-(1369)Программирование-(2801)Производство-(97182)Промышленность-(8706)Психология-(18388)Религия-(3217)Связь-(10668)Сельское хозяйство-(299)Социология-(6455)Спорт-(42831)Строительство-(4793)Торговля-(5050)Транспорт-(2929)Туризм-(1568)Физика-(3942)Философия-(17015)Финансы-(26596)Химия-(22929)Экология-(12095)Экономика-(9961)Электроника-(8441)Электротехника-(4623)Энергетика-(12629)Юриспруденция-(1492)Ядерная техника-(1748)
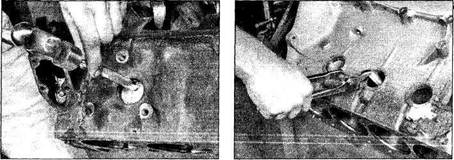
B Pull the core plugs from the block with pliers
|
|
|
|
the holes retapped. Use new plugs when the engine is reassembled.
5 If the engine is extremely dirty, it should be steam cleaned.
6 After the block is returned, clean all oil holes and oil galleries one more time. Brushes specifically designed for this purpose are available at most automotive accessory retailers. Flush the passages with warm water until the water runs clear, dry the block thoroughly and wipe all machined surfaces with a light, rust preventive oil. If you have access to compressed air, use it to speed the drying process and to blow out all the oil holes and galleries.

Warning: Wear eye protection when using compressed air.
7 If the block isn't extremely dirty or sludged up, you can do an adequate cleaning job with hot soapy water and a stiff brush. Take plenty of time and do a thorough job. Regardless of the cleaning method used, be sure to clean all oil holes and galleries very thoroughly, dry the block completely and coat all machined surfaces with light oil.
8 The threaded holes in the block must be clean to ensure accurate torque readings during reassembly. Run the proper size tap into each of the holes to remove rust, corrosion, thread sealant or sludge and restore damaged threads (see illustration). If possible, use compressed air to clear the holes of debris produced by this operation. Now is a good time to clean the threads on the head bolts and the main bearing cap bolts as well.
9 Reinstall the main bearing caps and tighten the bolts finger tight.

10 After coating the sealing surfaces of the new core plugs with sealant, install them in the engine block (see illustration). Make sure they're driven in straight and seated properly or leakage could result. Special tools are available for this purpose, but a large socket, with an outside diameter that will just slip into the core plug, a 1/2-inch drive extension and a hammer will work just as well.
11 Apply non-hardening sealant to the new oil gallery plugs and thread them into the holes in the block. Make sure they're tightened securely.
12 If the engine isn't going to be reassembled right away, cover it with a large plastic bag to keep it clean.
14 Engine block -inspection

1 Before the block is inspected, it should be cleaned as described in Section 13.
2 Visually check the block for cracks, rust and corrosion. Look for stripped threads in the threaded holes. It's also a good idea to have the block checked for hidden cracks by an engine overhaul specialist that has the equipment to do this type of work, especially if the vehicle had a history of overheating or using coolant. If defects are found, have the block repaired, if possible, or renewed.
3 If in any doubt as to the condition of the cylinder block, have it inspected and measured by an engine reconditioning specialist. If the bores are worn or damaged, they will be able to carry out any necessary reboring, and supply appropriate oversized pistons, etc.
15 Pistons/connecting rods
- inspection

1 Before the inspection process can be carried out, the piston/connecting rod assemblies must be cleaned and the original piston rings removed from the pistons. Note:
Always use new piston rings when the engine is reassembled.
2 Carefully expand the old rings over thetop of the pistons. The use of two or three
|
|
|
|
|
Дата добавления: 2014-12-23; Просмотров: 530; Нарушение авторских прав?; Мы поможем в написании вашей работы!