КАТЕГОРИИ:
Архитектура-(3434)Астрономия-(809)Биология-(7483)Биотехнологии-(1457)Военное дело-(14632)Высокие технологии-(1363)География-(913)Геология-(1438)Государство-(451)Демография-(1065)Дом-(47672)Журналистика и СМИ-(912)Изобретательство-(14524)Иностранные языки-(4268)Информатика-(17799)Искусство-(1338)История-(13644)Компьютеры-(11121)Косметика-(55)Кулинария-(373)Культура-(8427)Лингвистика-(374)Литература-(1642)Маркетинг-(23702)Математика-(16968)Машиностроение-(1700)Медицина-(12668)Менеджмент-(24684)Механика-(15423)Науковедение-(506)Образование-(11852)Охрана труда-(3308)Педагогика-(5571)Полиграфия-(1312)Политика-(7869)Право-(5454)Приборостроение-(1369)Программирование-(2801)Производство-(97182)Промышленность-(8706)Психология-(18388)Религия-(3217)Связь-(10668)Сельское хозяйство-(299)Социология-(6455)Спорт-(42831)Строительство-(4793)Торговля-(5050)Транспорт-(2929)Туризм-(1568)Физика-(3942)Философия-(17015)Финансы-(26596)Химия-(22929)Экология-(12095)Экономика-(9961)Электроника-(8441)Электротехника-(4623)Энергетика-(12629)Юриспруденция-(1492)Ядерная техника-(1748)
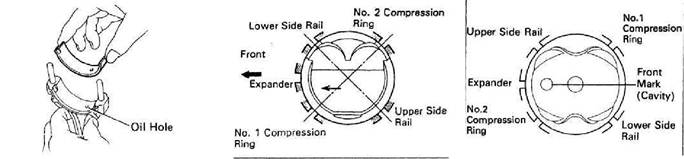
Align the hole in the bearing with the oil hole in the rod
|
|
|
|
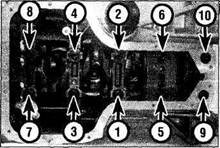
Main bearing ladder bolt tightening sequence - 4ZZ-FE and 3ZZ-FE VVT-i engines
All engines
13 Rotate the crankshaft a number of times by hand to check for any obvious binding.
2B•12 Engine removal and overhaul procedures
14 Check the crankshaft endfloat with a feeler gauge or a dial indicator as described in Section 12. The endfloat should be correct if the crankshaft thrust faces aren't worn or damaged and new thrustwashers have been installed.
15 Install a new main oil seal, then bolt the retainer to the block (where applicable) - see
Part A of this Chapter.
21 Pistons/connecting rods
- refitting

1 Before installing the piston/connecting rod assemblies, the cylinder walls must be perfectly clean, the top edge of each cylinder must be chamfered, and the crankshaft must be in place.
2 Remove the cap from the end of the number one connecting rod (refer to the marks made during removal). Remove the original bearing shells and wipe the bearing surfaces of the connecting rod and cap with a clean, lint-free cloth. They must be kept spotlessly clean.
3 Clean the back side of the new upper bearing shell, then lay it in place in the connecting rod. Make sure the tab on the bearing fits into the recess in the rod so the oil holes line up (see illustration). Don't hammer the bearing insertinto place and be very careful not to nick or gouge the bearing face.
4 Clean the back side of the other bearing shell and install it in the rod cap. Again, make sure the tab on the bearing fits into the recess
|
|
|
|
|
Дата добавления: 2014-12-23; Просмотров: 431; Нарушение авторских прав?; Мы поможем в написании вашей работы!