КАТЕГОРИИ:
Архитектура-(3434)Астрономия-(809)Биология-(7483)Биотехнологии-(1457)Военное дело-(14632)Высокие технологии-(1363)География-(913)Геология-(1438)Государство-(451)Демография-(1065)Дом-(47672)Журналистика и СМИ-(912)Изобретательство-(14524)Иностранные языки-(4268)Информатика-(17799)Искусство-(1338)История-(13644)Компьютеры-(11121)Косметика-(55)Кулинария-(373)Культура-(8427)Лингвистика-(374)Литература-(1642)Маркетинг-(23702)Математика-(16968)Машиностроение-(1700)Медицина-(12668)Менеджмент-(24684)Механика-(15423)Науковедение-(506)Образование-(11852)Охрана труда-(3308)Педагогика-(5571)Полиграфия-(1312)Политика-(7869)Право-(5454)Приборостроение-(1369)Программирование-(2801)Производство-(97182)Промышленность-(8706)Психология-(18388)Религия-(3217)Связь-(10668)Сельское хозяйство-(299)Социология-(6455)Спорт-(42831)Строительство-(4793)Торговля-(5050)Транспорт-(2929)Туризм-(1568)Физика-(3942)Философия-(17015)Финансы-(26596)Химия-(22929)Экология-(12095)Экономика-(9961)Электроника-(8441)Электротехника-(4623)Энергетика-(12629)Юриспруденция-(1492)Ядерная техника-(1748)
VVT-i engines
|
|
|
|
Non-VVT-i engines
Renewal
5 Drain the coolant from the radiator (see Chapter 1).
6 Disconnect the cooling fan temperature switch connector from the thermostat cover located at the left end of the cylinder head
(see illustration).
7 Detach the thermostat cover from the housing. Be prepared for some coolant to spill as the gasket seal is broken. The radiator hose can be left attached to the cover, unless the cover itself is to be renewed.
8 Remove the thermostat, noting the direction in which it was fitted in the cover or housing, and thoroughly clean the sealing surfaces
(see illustration).
9 Fit a new gasket onto the thermostat (see illustration). Make sure it is evenly fitted allthe way around.
10 On 4A-FE engines, install the thermostat and the cover, positioning the jiggle pin at the highest point. On 4E-FE engines, position the thermostat in the cover with the jiggle pin aligned with the raised projection on the cover, then install the cover and thermostat.
11 Tighten the cover fasteners to the torque listed in this Chapter's Specifications and reinstall the remaining components in the reverse order of removal.
12 Remove the alternator as described in
Chapter 5A.
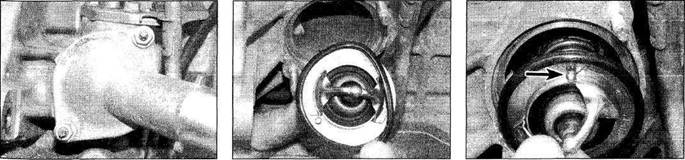
13 Undo the two nuts and remove the thermostat cover (see illustration).
14 Remove the thermostat. Discard the seal, a new one must be fitted (see illustration).
15 Fit a new seal to the thermostat, and fit it into position on the engine block, with the jiggle pin at the 12 o'clock position (see illustration).
16 Refit the thermostat cover and tighten the nuts to the specified torque.
17 Refit the alternator as described in Chapter 5A.
|
|
|
|
|
Дата добавления: 2014-12-23; Просмотров: 449; Нарушение авторских прав?; Мы поможем в написании вашей работы!