КАТЕГОРИИ:
Архитектура-(3434)Астрономия-(809)Биология-(7483)Биотехнологии-(1457)Военное дело-(14632)Высокие технологии-(1363)География-(913)Геология-(1438)Государство-(451)Демография-(1065)Дом-(47672)Журналистика и СМИ-(912)Изобретательство-(14524)Иностранные языки-(4268)Информатика-(17799)Искусство-(1338)История-(13644)Компьютеры-(11121)Косметика-(55)Кулинария-(373)Культура-(8427)Лингвистика-(374)Литература-(1642)Маркетинг-(23702)Математика-(16968)Машиностроение-(1700)Медицина-(12668)Менеджмент-(24684)Механика-(15423)Науковедение-(506)Образование-(11852)Охрана труда-(3308)Педагогика-(5571)Полиграфия-(1312)Политика-(7869)Право-(5454)Приборостроение-(1369)Программирование-(2801)Производство-(97182)Промышленность-(8706)Психология-(18388)Религия-(3217)Связь-(10668)Сельское хозяйство-(299)Социология-(6455)Спорт-(42831)Строительство-(4793)Торговля-(5050)Транспорт-(2929)Туризм-(1568)Физика-(3942)Философия-(17015)Финансы-(26596)Химия-(22929)Экология-(12095)Экономика-(9961)Электроника-(8441)Электротехника-(4623)Энергетика-(12629)Юриспруденция-(1492)Ядерная техника-(1748)
Structure of Plotter holder and items of components
|
|
|
|
Installation and adjustment of blade
Installation of tool
Installation and connction
Chap. 3 Basic operation
1 Place the machine in a plane and roomy place
2 Connect the signal cable to the COM1,COM2 /USB port of the computer
3 Check voltage of the power source and whether it is grounded, do not connect the power utill all are in a good condition
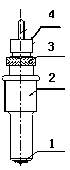 3-2.1 Structure of cutter holder and items of components
Rotate the cutter ajusting screw to adjust the out-stretching length of the cutter as to ensure that it doesnЎЇt cut off the bottom layer of stickiness.
1. Cutter (diameter is 2mm)
2. Cutter holder shell
3. Cutter ajusting screw
4. Cutter holder body
1.Before installing the cutter, you must carefully clean the cutter holder body, the cutter and your hands. Even very slight dirt can affect the performance of the cutter. Use a flexible plastic or rubber grip to hold the blade in your hand. Carefully insert the blade into the cutter holder body and it should magnetically attach.
2 Rotate the shell of the cutter holder and make the out-stretching length of the blade tip not longer than the thickness of the sticker
3. Don't touch the blade top with your finger to prevent injury
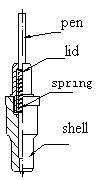 Fit the the ball pen into the plotter holder, the structure is as
shows in the following drawing.
1. Rotate the lid.
2. Insert a ballpoint pen and let the pen tip out of proper length.
3. Cover the pen with the lid then rotate them into the shell
|
|
|
|
|
Дата добавления: 2014-12-23; Просмотров: 356; Нарушение авторских прав?; Мы поможем в написании вашей работы!