КАТЕГОРИИ:
Архитектура-(3434)Астрономия-(809)Биология-(7483)Биотехнологии-(1457)Военное дело-(14632)Высокие технологии-(1363)География-(913)Геология-(1438)Государство-(451)Демография-(1065)Дом-(47672)Журналистика и СМИ-(912)Изобретательство-(14524)Иностранные языки-(4268)Информатика-(17799)Искусство-(1338)История-(13644)Компьютеры-(11121)Косметика-(55)Кулинария-(373)Культура-(8427)Лингвистика-(374)Литература-(1642)Маркетинг-(23702)Математика-(16968)Машиностроение-(1700)Медицина-(12668)Менеджмент-(24684)Механика-(15423)Науковедение-(506)Образование-(11852)Охрана труда-(3308)Педагогика-(5571)Полиграфия-(1312)Политика-(7869)Право-(5454)Приборостроение-(1369)Программирование-(2801)Производство-(97182)Промышленность-(8706)Психология-(18388)Религия-(3217)Связь-(10668)Сельское хозяйство-(299)Социология-(6455)Спорт-(42831)Строительство-(4793)Торговля-(5050)Транспорт-(2929)Туризм-(1568)Физика-(3942)Философия-(17015)Финансы-(26596)Химия-(22929)Экология-(12095)Экономика-(9961)Электроника-(8441)Электротехника-(4623)Энергетика-(12629)Юриспруденция-(1492)Ядерная техника-(1748)
Measuring tools and devices
|
|
|
|
Exercises
I. Use the following words and phrases in sentences of your own:
nut, to screw, to maintain, to unscrew, to assemble, to disassemble, nut wrench, adjustable wrench, socket wrench, to grip, plumber, electrician, fitter
II. Answer the following questions:
l. What operations are applied in maintenance and repair of machines? 2. What instruments are used for disassembling and assembling machine parts? 3. How are wrenches subdivided? 4 What is a nut wrench used for? 5. When are adjustable wrenches applied? 6. In what cases are socket wrenches used? 7. What wrenches are used for screwing and unscrewing nuts? 8. By whom are different wrenches used? 9. What other mechanical tools can be used in repairing?
III. Find in the text nouns for the following verbs:
to maintain, to operate, to construct, to fit, to assemble; to apply
IV. Supply antonyms for the following words:
disassembling, to screw, difficult, single-ended, accessible
V. Supply synonyms for the following words:
to locate, to grip, widely, different, dimensions
VI. State the functions of all the -ed forms and translate the following sentences into Russian:
1. Wrenches used to unscrew and screw nuts are known as adjustable wrenches. 2. Different wrenches are used to screw different types of machine parts, such as washers, bolts and shafts. 3. Locksmiths and fitters use special
instruments depending on the parts of machines to be disassembled and assembled. 4. Nut wrenches may be used for screwing different nuts. 5. Tools called "wrenches" are used for turning bolts and nuts. 6. Tools known as S-wrenches, angle wrenches, etc. are named so according to their shape. 7. The wrenches may also be named from the object on which they are used. 8. Adjustable wrenches are named so because they may be applied for screwing and unscrewing bolts and nuts of different sizes.
VII. Translate the following sentences into English:
1. Обычно механические ключи, используемые при ремонте разнообразных деталей, изготовляются из прочной стали. 2. Кусачки могут применяться для операций, выполняемых слесарями. 3. Торцовый ключ может применяться для завинчивания гаек, расположенных в углублениях. 4. Слесарь часто пользуется инструментами, называемыми разводными ключами. 5. Среди многих инструментов, применяемых электриками, есть круглогубцы.
A. MEASUREMENT
The size and shape of all machine parts should be in accordance with the corresponding drawing. The produced parts should be checked by means of measurement, which generally involves comparison either with some accepted standard or with a mating part. The significance of any measurement is determined by the degree of accuracy to which the parts may be measured.
|
|
|
Depending on measurements different measuring tools can be used such as rules, slide gauges, vernier calipers, depth gauges, dial indicators, micrometers, clearance gauges, inside and outside calipers, plug gauges, bevels, universal protractors, etc.
B. MEASURING TOOLS
When accurate measurement of the part is required, the vernier calipers, micrometers and slide gauges are used. When it is not so important to have an accurate measurement of the part, metal rules, inside calipers and outside calipers will do.

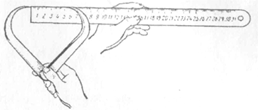
Fig. 11. Steel Rule

Fig. 12.Calipers:
a-inside; b-spring; c- outside
Steel rules (Fig. 11) serve for determining the length and sometimes the depth of the part to be measured. Steel rules are graduated in millimeters, but in the USA and England they are graduated in thirty-seconds and sixty-fourths of an inch1.
The outside (Fig. 12) calipers are the simplest instruments for measuring external diameters of the part. The outside caliper consists essentially of two curved legs.
The inside calipers are used for determining the internal diameters of the part. Its construction is almost similar to that of the outside calipers. Sometimes the outside calipers may be used for measuring internal diameters of the part. The outside and inside caliper measurements may be read by placing the legs of the calipers on a rule and placing one leg and the end of the rule against a flat surface as shown in Fig. 11.

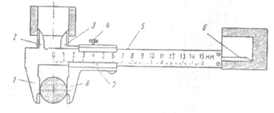
Fig. 13. Vernier Calipers:
1, 2, 3, 8 -jaws; 4 - adjusting screw; 5 - primary scale; 6 - depth rod;
7 - frame with vernier

Fig. 14. Micrometer:
1 - frame; 2 - anvil; 8 - spindle; 4 - lock nut; 5 - barrel;
6 - thimble; 7 - ratchet thimble
Vernier calipers (Fig. 13) can be used for measuring both external and internal sizes of a part. By using vernier calipers measurements up to.001" may be
determined. Vernier calipers consist of a primary steel scale and four jaws. Jaws 1 and 2 are integral with the scale. Jaws 8 and 8 are attached to the frame sliding along the scale. The frame may be clamped on the scale in any position by means of an adjusting screw. External surfaces may be measured with jaws 1 and 8, while internal surfaces are measured with jaws 2 and 8. The depth of recesses is measured with a depth rod 6. A vernier on the frame 7 serves for measuring fractional parts of a millimeter.
The micrometer (Fig. 14) is an instrument for precise measurement of length and thickness of a part to one ten thousandth of an inch. The principle of operation is similar to that of vernier calipers. A graduated thimble serves as the primary scale. The scale on the barrel of the micrometer is used for the vernier reading. The part to be measured is placed between the anvil and micrometer screw, which is called a "movable spindle". By rotating the thimble, the spindle is removed or approached to the anvil. By rotating the ratchet thimble the spindle is moved and thus the part is pressed to the anvil. Thereupon the rotation of the ratchet thimble is discontinued, the micrometer opening is fixed by the lock nut and the reading is taken. The micrometer reading is the sum total of the barrel divisions, the thimble divisions with respect to the axial line on the barrel, and the vernier reading.
|
|
|

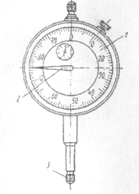
Fig. 15. Dial Indicator: I - dial; 2 - indicator pointer; 3 - test point
Fig. 15 shows a dial indicator. The dial indicator is a gauge with a graduated dial and an indicator pointer connected to a test point by a system of levers. Any movement of the test point is magnified by the indicator pointer. The dial indicator is used to check the shape of a part., the precision of its machining, as well as for checking the accuracy of cutting machines.

Fig. 16. Go and No-Go Plug Gauge:
1 - go plug gauge; 2 - handle; 3 - no-go plug gauge
Thread plug gauges or internal gauges, being of "go" and "no-go" type (Fig. 16), are generally used for testing threads or tapped holes.

Fig. 17. Depth Gauge:
1 - primary scale; 2 - frame; 3 - vernier; 4 – screw
Depth gauges are used for measuring the depth of grooves and holes. Their principle of operation is similar to that of vernier calipers. A primary scale sliding in a frame may be locked in any position by a screw. The depth of a groove or a hole is measured by means of the primary scale and a vernier as shown in Fig. 17. Conical surfaces are measured with control gauges.

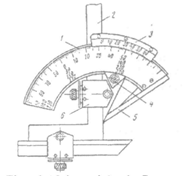
Fig. 18. Universal Angle Gauge:
1 - base; 2 - triangle; 3 - vernier; 4 -quadrant; 5 - detachable rule; 6 - holder
A universal angle gauge for measuring internal and external angles is shown in Fig. 18. The universal angle gauge consists of a base with a primary scale attached to the base. A quadrant with a vernier may be moved along the arc of the base. A triangle may be attached to the quadrant by means of a holder. In its turn a detachable rule is attached to the triangle. The triangle and the detachable rule can be moved along the face of the quadrant. Angles can be measured within the range of 0° to 320° by means of the universal angle gauge.

1. they are graduated in thirty-seconds and sixty-fourths of an inch - они градуируются в тридцать вторых или шестьдесят четвёртых дюйма.
|
|
|
|
|
Дата добавления: 2014-12-27; Просмотров: 937; Нарушение авторских прав?; Мы поможем в написании вашей работы!