КАТЕГОРИИ:
Архитектура-(3434)Астрономия-(809)Биология-(7483)Биотехнологии-(1457)Военное дело-(14632)Высокие технологии-(1363)География-(913)Геология-(1438)Государство-(451)Демография-(1065)Дом-(47672)Журналистика и СМИ-(912)Изобретательство-(14524)Иностранные языки-(4268)Информатика-(17799)Искусство-(1338)История-(13644)Компьютеры-(11121)Косметика-(55)Кулинария-(373)Культура-(8427)Лингвистика-(374)Литература-(1642)Маркетинг-(23702)Математика-(16968)Машиностроение-(1700)Медицина-(12668)Менеджмент-(24684)Механика-(15423)Науковедение-(506)Образование-(11852)Охрана труда-(3308)Педагогика-(5571)Полиграфия-(1312)Политика-(7869)Право-(5454)Приборостроение-(1369)Программирование-(2801)Производство-(97182)Промышленность-(8706)Психология-(18388)Религия-(3217)Связь-(10668)Сельское хозяйство-(299)Социология-(6455)Спорт-(42831)Строительство-(4793)Торговля-(5050)Транспорт-(2929)Туризм-(1568)Физика-(3942)Философия-(17015)Финансы-(26596)Химия-(22929)Экология-(12095)Экономика-(9961)Электроника-(8441)Электротехника-(4623)Энергетика-(12629)Юриспруденция-(1492)Ядерная техника-(1748)
Г. Лесной 2012 г
Переведите тексты на русский язык
How to check a spark plug
1 Remove the cover.
2 Place the spanner over the spark plug.
3 Rotate the plug anti-clockwise until it is loose.
4 Remove the plug from the socket.
5 Examine the gap and check that it is clean.
6 Insert the gauge in the gap.
7 Check that the gap is between 0.65 and 1.00 mm wide.
8 Replace the plug in the socket.
9 Rotate the plug clockwise until it is hand-tight.
10 Place the spanner over the plug and give a quarter turn clockwise.
11 CAUTION: DO NOT OVERTIGHTEN THE PLUG.
12 Replace the cover.
1 
What are these objects called? (Look at the words in italics in the passage.)
How to put up a shelf
1 Draw a horizontal straight line on the wall.
2 Place the shelf on the line.
3 Place the brackets under the shelf.
4 Mark holes on'the wall and on the shelf.
5 Make holes in the wall and in the shelf. Use a drill.
6 Insert plugs in the holes in the wall.
7 Screw the brackets to the wall.
8 CAUTION: DO NOT OVERTIGHTEN THE SCREWS.
9 Place the shelf on the brackets.
10 Move the shelf from side to side until the holes in the bracket are under the holes in the shelf.
11 Screw the shelf on to the brackets.
12 Check that the shelf is tight.
1 What are these objects called? Example:
(a) This is called a bracket
How to drill a hole in a steel plate
(NOTE: Before you touch the drilling machine, check that the power is off.) First, you insert the key in the chuck. Then you rotate the key clockwise until the yaws are open. Next, you insert the bit between the jaws. Finally, you rotate the key anticlockwise until the jaws are closed. Before you use the drill, make sure that the bit is tight.
В 1 Mark the hole on the plate.
2 Put the plate into a vice on the table.
3 Move the table and the vice until the bit is over the mark.
4 Tighten the table and the vice.
5 Switch on the power
6 Lower the bit and drill the hole carefully.
How to prepare a foundation for a brick wall
1 Mark out the trench with lines and pegs.
2 Dig out the trench with a pickaxe and shovel until it is about 150 mm deep and 300 mm wide.
3 Check that the floor of the trench is horizontal using a plumb and-level.
4 Make sure that the sides of the trench are vertical.
5 Place pegs in the floor of the trench and stretch a line between them.
6 Check that the line is horizontal.
7 Fill up the trench evenly with concrete until it is level with the line.
8 Leave the concrete until it is hard.
9 Build the wall on the concrete.
1 What are these objects called? (Look at the words in italics in the passage.)
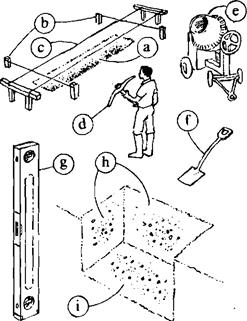
Example: (a) This is called a trench.
Fuel warning light
Many cars have a fuel warning light. When the level of fuel (petrol) in the tank is very low, this light switches on and the driver can see that he needs more petrol. How does this light work?
 |
When the driver sees the fuel warning light, he puts more petrol into the tank. This makes the fuel level rise and pushes the float upwards. When the float rises, it makes the arm move upwards and this causes the lever to move upwards also. The fuel warning light then switches off.
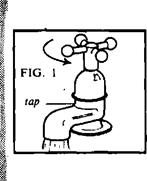
Water tap
 When you turn the handle of a water tap clockwise, the water stops. When you turn it anti-clockwise, the water pours out of the tap again. How does this work?
\
Look at FIG. 2. The tap has a handle on the top, and inside there is a bolt, and a washer. The washer is over a hole.
When you turn the handle clockwise, this makes the bolt move downwards. The washer then covers the hole and stops the water.
When you turn the handle anticlockwise, the bolt moves upwards and the washer uncovers the hole again. This lets the water flow through the tap again.
|
|
Дата добавления: 2015-07-13; Просмотров: 755; Нарушение авторских прав?; Мы поможем в написании вашей работы!