КАТЕГОРИИ:
Архитектура-(3434)Астрономия-(809)Биология-(7483)Биотехнологии-(1457)Военное дело-(14632)Высокие технологии-(1363)География-(913)Геология-(1438)Государство-(451)Демография-(1065)Дом-(47672)Журналистика и СМИ-(912)Изобретательство-(14524)Иностранные языки-(4268)Информатика-(17799)Искусство-(1338)История-(13644)Компьютеры-(11121)Косметика-(55)Кулинария-(373)Культура-(8427)Лингвистика-(374)Литература-(1642)Маркетинг-(23702)Математика-(16968)Машиностроение-(1700)Медицина-(12668)Менеджмент-(24684)Механика-(15423)Науковедение-(506)Образование-(11852)Охрана труда-(3308)Педагогика-(5571)Полиграфия-(1312)Политика-(7869)Право-(5454)Приборостроение-(1369)Программирование-(2801)Производство-(97182)Промышленность-(8706)Психология-(18388)Религия-(3217)Связь-(10668)Сельское хозяйство-(299)Социология-(6455)Спорт-(42831)Строительство-(4793)Торговля-(5050)Транспорт-(2929)Туризм-(1568)Физика-(3942)Философия-(17015)Финансы-(26596)Химия-(22929)Экология-(12095)Экономика-(9961)Электроника-(8441)Электротехника-(4623)Энергетика-(12629)Юриспруденция-(1492)Ядерная техника-(1748)
Scaling the layer
|
|
|
|
You’ve stabilized the footage, but there’s still a problem. The tracking was applied to the Anchor Point and Rotation properties of the layer, but the entire layer is movingand rotating. This means you can see the edge of the shot and the empty space around it in some frames. An easy way to fix this is to scale the layer.
1 Go to the beginning of the time ruler.
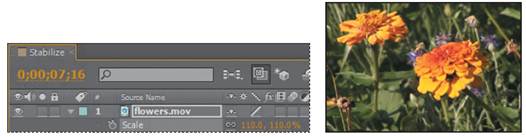
2 With the flowers layer selected in the Timeline panel, press the S key to display its Scale property.
3 Drag the current-time indicator across the time ruler until you find the frame where the layer displacement is the greatest (around 7:16).
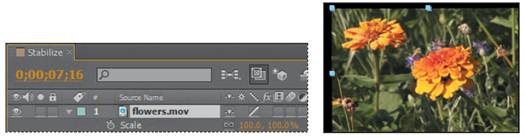
4 Increase the Scale values to 110, 110%. The clip fills the frame completely.
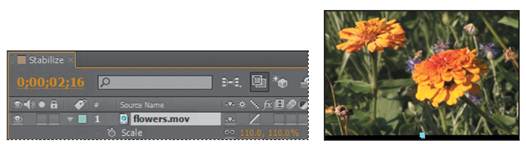
5 Go to 2:16, where you can still see some of the empty area outside of the shot. Because the tracking data is applied to the anchor point of the layer, you can reposition the entire layer without destabilizing it.
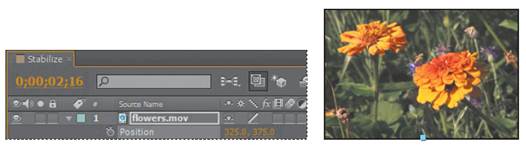
6 With the flowers layer selected in the Timeline panel, press P to reveal its Position property. The tracker added an initial Position keyframe to the layer. You don’t need it, so click the stopwatch icon () to delete the keyframe.
7 Change the Position values to 325, 375.
8 Manually preview the clip once more to check for additional edge slips. You may need to scale the layer another percentage or two. When you’re done, go to 0:00.
_ Note: The larger you scale the layer, the more the image qualitywill degrade—so keep the scale operation to a minimum.
9 Watch another RAM preview. The shot should now look rock-steady, with the only movement being caused by the wind rustling the flowers.
10 Press the spacebar to stop playback when you’re done.
11 Close the properties for the flowers layer in the Timeline panel, and choose File > Save to save your work.
12 Choose File > Close Project.
As you have discovered, stabilizing a shot is not without its drawbacks. To compensate for the movement or rotation data applied to the layer, you need to adjust the Scale and Position properties, which could ultimately degrade the footage. If you really need to use the shot in your production, this may be the best compromise.
Using single-point motion tracking
With the increase in the number of productions that incorporate digital elements into final shots, compositors need an easy way to synchronize computer-generated effects with film or video backgrounds. After Effects lets you do this with the capability to follow, or track, a defined area in the shot, and to apply that movement to other layers. These layers can contain text, effects, images, or other footage. The resulting visual effect precisely matches the original moving footage.
When you track motion in an After Effects composition that contains multiple layers, the default tracking type is Transform. This type of motion tracking tracks position and/or rotation to apply to another layer. When tracking position, this option creates one track point, and generates Position keyframes. When tracking rotation, this option creates two track points, and produces Rotation keyframes. In this exercise, you will track a shape layer to the weighted arm of a metronome. This will be especially challenging because the camera operator chose not to use a tripod.
|
|
|
|
|
Дата добавления: 2014-11-20; Просмотров: 380; Нарушение авторских прав?; Мы поможем в написании вашей работы!