КАТЕГОРИИ:
Архитектура-(3434)Астрономия-(809)Биология-(7483)Биотехнологии-(1457)Военное дело-(14632)Высокие технологии-(1363)География-(913)Геология-(1438)Государство-(451)Демография-(1065)Дом-(47672)Журналистика и СМИ-(912)Изобретательство-(14524)Иностранные языки-(4268)Информатика-(17799)Искусство-(1338)История-(13644)Компьютеры-(11121)Косметика-(55)Кулинария-(373)Культура-(8427)Лингвистика-(374)Литература-(1642)Маркетинг-(23702)Математика-(16968)Машиностроение-(1700)Медицина-(12668)Менеджмент-(24684)Механика-(15423)Науковедение-(506)Образование-(11852)Охрана труда-(3308)Педагогика-(5571)Полиграфия-(1312)Политика-(7869)Право-(5454)Приборостроение-(1369)Программирование-(2801)Производство-(97182)Промышленность-(8706)Психология-(18388)Религия-(3217)Связь-(10668)Сельское хозяйство-(299)Социология-(6455)Спорт-(42831)Строительство-(4793)Торговля-(5050)Транспорт-(2929)Туризм-(1568)Физика-(3942)Философия-(17015)Финансы-(26596)Химия-(22929)Экология-(12095)Экономика-(9961)Электроника-(8441)Электротехника-(4623)Энергетика-(12629)Юриспруденция-(1492)Ядерная техника-(1748)
Creating a base frame
|
|
|
|
Creating a segmentation boundary
Creating the composition
You need to import three footage items for this exercise, and then create acomposition.
1 Double-click an empty area of the Project panel to open the Import File dialog box.
2 Navigate to the AECS5_CIB/Lessons/Lesson09/Assets folder. Shift-click to select the Flamingo.mov, Peacock.jpeg, and VO.mp3 files, and then click Open.
3 Drag the Flamingo.mov item onto the Create a New Composition button () at the bottom of the Project panel.
After Effects creates a composition named Flamingo, based on settings in the Flamingo.mov file. The composition is five seconds long and uses the NTSC DV preset. The Flamingo composition has one layer: Flamingo.mov.
4 Choose File > Save to save your work.
You use the Roto Brush tool to add foreground and background strokes to a base frame, so that After Effects can identify the foreground and background areas in the image. It creates a segmentation boundary between the foreground and background.
To use the Roto Brush tool to isolate a foreground object, you start by adding strokes to a base frame to identify foreground and background areas. You’ll use the first frame as the base frame, and then add the strokes that identify the flamingo as the foreground object.
1 Move the current-time indicator across the time ruler to preview the footage. At about 1:20, the flamingo’s head rises up to a striking pose. You’ll use the finalpose in the clip to create a logo for the Casa Luna Wildlife Sanctuary.
2 Press the Home key to move the current-time indicator to the beginning of the time ruler.
3 Select the Roto Brush tool () in the Tools Panel.
4 Double-click the Flamingo layer in the Timeline panel to open the clip in the Layer panel. This is where you will do all your Roto Brush work.
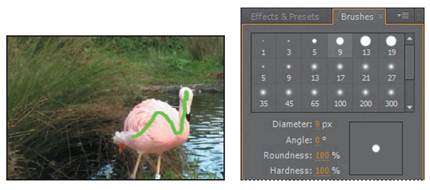
By default the Roto Brush tool creates green foreground strokes, so you’ll start by adding strokes to the foreground—the flamingo.
5 Choose Window > Brushes to open the Brushes panel. Then select a Hard Round 9-pixel brush, which is slightly smaller than the flamingo’s neck.
When you’re drawing strokes to define the foreground object, start in the center of the object. Unlike traditional rotoscoping, you don’t need to define a precise boundary around the object. After Effects extrapolates from the foreground stroke to determine where the boundary is supposed to be.
6 Draw a green stroke from the flamingo’s head, down its neck, and through the midsection of the body to the tail.
A pink outline identifies the boundary After Effects created for the foregroundobject. It’s pretty good, though it may be missing the tip of the beak, the legs, and some tail feathers. You’ll help After Effects find the boundary by adding some moreforeground strokes.
7 Select a hard 3-pixel brush in the Brushes panel, and then draw additional strokes over the beak, tail, and legs to include them in the foreground.
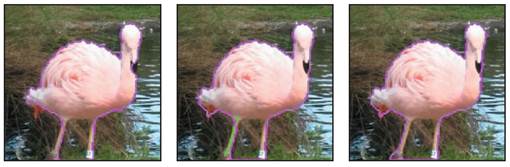
It can be tricky to get the legs and beak included without accidentally adding background as well. Adding background strokes will let you remove any extraneous areas in the matte.
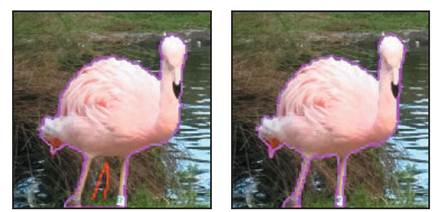
8 Press Alt (Windows) or Option (Mac OS) to switch to the red backgroundstroke brush.
9 Add red strokes to background areas you want to exclude from the matte. Switch back and forth between the foreground and background brushes to finetune the boundary.
You don’t have to follow the edge of the foreground element exactly to remove any errors in the selection. Getting close to the area to be removed and painting a background stroke may be all that is needed. Don’t worry about being exact with your brush strokes. Just make sure the mask is within 2 to 3 pixels of the edge of the foreground object. You will refine the matte later.
_ Note: By default, the Roto Brush Alpha view is Alpha Boundary, which displays the pink outline around the flamingo. If you are having difficulty seeing the color against the subject, you can change the color by clicking theAlpha Boundary ColorSwatch at the bottom ofthe Layer panel.
_ Tip: To increase or decrease the brush size quickly, press Ctrl (Windows) or Command (Mac OS) as you drag right to increase the brush size, or left to decrease the brush size.
_ Tip: For best results, leave the composition resolution set to Fullwhen using the Roto Brush tool. Switching between resolutions causes After Effects to recalculate all of the segmentation information.
10 Click the Toggle Alpha button () at the bottom of the Layer panel. The maskedarea is white against a black background, so you can see the matte clearly.
11 Click the Toggle Alpha Overlay button () at the bottom of the Layer panel. The foreground area appears in color, and the background has a red overlay.
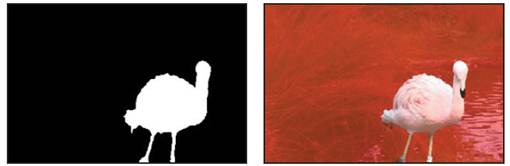
Click the Toggle Alpha button to display Click the Toggle Alpha Overlay button to the matte on a black background. display a red overlay.
12 Click the Toggle Alpha Boundary button () at the bottom of the Layer panel to see the outline around the flamingo again.
As you use the Roto Brush tool, the Alpha Boundary is the best way to see how accurate your boundary is, because you can see everything in the frame. However, the Alpha and Alpha Overlay options can be useful when you want to see the foreground without the distraction of the background.
|
|
|
|
|
Дата добавления: 2014-11-20; Просмотров: 513; Нарушение авторских прав?; Мы поможем в написании вашей работы!