КАТЕГОРИИ:
Архитектура-(3434)Астрономия-(809)Биология-(7483)Биотехнологии-(1457)Военное дело-(14632)Высокие технологии-(1363)География-(913)Геология-(1438)Государство-(451)Демография-(1065)Дом-(47672)Журналистика и СМИ-(912)Изобретательство-(14524)Иностранные языки-(4268)Информатика-(17799)Искусство-(1338)История-(13644)Компьютеры-(11121)Косметика-(55)Кулинария-(373)Культура-(8427)Лингвистика-(374)Литература-(1642)Маркетинг-(23702)Математика-(16968)Машиностроение-(1700)Медицина-(12668)Менеджмент-(24684)Механика-(15423)Науковедение-(506)Образование-(11852)Охрана труда-(3308)Педагогика-(5571)Полиграфия-(1312)Политика-(7869)Право-(5454)Приборостроение-(1369)Программирование-(2801)Производство-(97182)Промышленность-(8706)Психология-(18388)Религия-(3217)Связь-(10668)Сельское хозяйство-(299)Социология-(6455)Спорт-(42831)Строительство-(4793)Торговля-(5050)Транспорт-(2929)Туризм-(1568)Физика-(3942)Философия-(17015)Финансы-(26596)Химия-(22929)Экология-(12095)Экономика-(9961)Электроника-(8441)Электротехника-(4623)Энергетика-(12629)Юриспруденция-(1492)Ядерная техника-(1748)
Adding a lens flare
|
|
|
|
Lighting the darkness
Since the sun is bright, it should illuminate the surrounding darkness.
1 Make sure the current-time indicator is still at 0:07.
2 Press Ctrl+Y (Windows) or Command+Y (Mac OS) to create a new solid layer.
3 In the Solid Settings dialog box, name the layer Background, click the Make Comp Size button to make the layer the same size as the composition, and then click OK to create the layer.
4 In the Timeline panel, drag the Background layer to the bottom of the layer stack.
5 With the Background layer selected in the Timeline panel, choose Effect > Generate > Ramp.
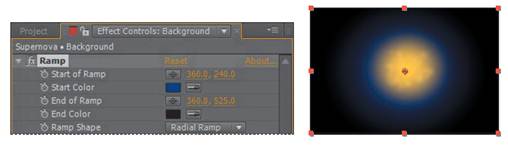
The Ramp effect creates a color gradient, blending it with the original image. You can create linear or radial ramps, and vary the position and colors of the ramp over time. Use the Start Of Ramp and End Of Ramp settings to specify the start and end positions. Use the Ramp Scatter setting to disperse the ramp colors and eliminate banding.
6 In the Ramp area of the Effect Controls panel, do the following:
Change Start Of Ramp to 360, 240 and End Of Ramp to 360, 525.
Choose Radial Ramp from the Ramp Shape menu.
Click the Start Color swatch, and set the start color to dark blue (R= 0, G= 25, B= 135).
Set the End Color to black (R= 0, G= 0, B= 0).
7 Press Alt+[ (Windows) or Option+[ (Mac OS) to set the In point of the layer to the current time.
To tie all the elements together, add a lens flare to simulate an explosion.
1 Press the Home key, or move the current-time indicator to the beginning of the time ruler.
2 Press Ctrl+Y (Windows) or Command+Y (Mac OS) to create a new solid layer.
3 In the Solid Settings dialog box, name the layer Nova, click the Make Comp Size button to make the layer the same size as the composition, set the Color to black (R= 0, G= 0, B= 0), and then click OK. The Nova layer should be at the top of the layer stack in the Timeline panel.
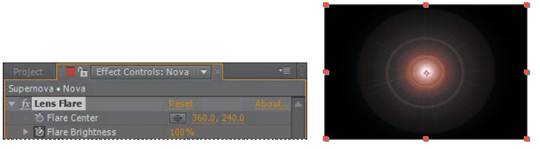
4 With the Nova layer selected in the Timeline panel, choose Effect > Generate > Lens Flare.
5 In the Lens Flare area of the Effect Controls panel, do the following:
Change Flare Center to 360, 240.
Choose 50–300mm Zoom from the Lens Type menu.
Decrease Flare Brightness to 0%, and then click the Flare Brightness stopwatch icon () to create an initial keyframe.
6 Go to 0:10.
7 Increase the Flare Brightness to 240%.
8 Go to 1:04, and decrease the Flare Brightness to 100%.
9 With the Nova layer selected in the Timeline panel, press the U key to see the animated Lens Flare property.
10 Right-click (Windows) or Control-click (Mac OS) the ending Flare Brightness keyframe, and choose Keyframe Assistant > Easy Ease In.
11 Right-click (Windows) or Control-click (Mac OS) the beginning Flare Brightness keyframe, and choose Keyframe Assistant > Easy Ease Out. Finally, you need to make the layers under the Nova layer visible in the composition.

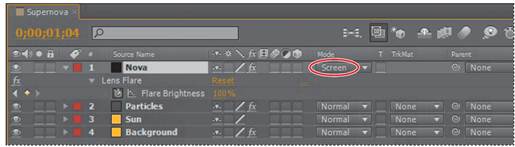
12 Press F2 to deselect all layers, and choose Columns > Modes from the Timeline panel menu. Then choose Screen from the Mode menu for the Nova layer.
|
|
|
13 Watch a RAM preview. When you’re done, press the spacebar to stop the preview.
14 Choose File > Save, and then choose File > Close Project.
|
|
|
|
|
Дата добавления: 2014-11-20; Просмотров: 398; Нарушение авторских прав?; Мы поможем в написании вашей работы!