КАТЕГОРИИ:
Архитектура-(3434)Астрономия-(809)Биология-(7483)Биотехнологии-(1457)Военное дело-(14632)Высокие технологии-(1363)География-(913)Геология-(1438)Государство-(451)Демография-(1065)Дом-(47672)Журналистика и СМИ-(912)Изобретательство-(14524)Иностранные языки-(4268)Информатика-(17799)Искусство-(1338)История-(13644)Компьютеры-(11121)Косметика-(55)Кулинария-(373)Культура-(8427)Лингвистика-(374)Литература-(1642)Маркетинг-(23702)Математика-(16968)Машиностроение-(1700)Медицина-(12668)Менеджмент-(24684)Механика-(15423)Науковедение-(506)Образование-(11852)Охрана труда-(3308)Педагогика-(5571)Полиграфия-(1312)Политика-(7869)Право-(5454)Приборостроение-(1369)Программирование-(2801)Производство-(97182)Промышленность-(8706)Психология-(18388)Религия-(3217)Связь-(10668)Сельское хозяйство-(299)Социология-(6455)Спорт-(42831)Строительство-(4793)Торговля-(5050)Транспорт-(2929)Туризм-(1568)Физика-(3942)Философия-(17015)Финансы-(26596)Химия-(22929)Экология-(12095)Экономика-(9961)Электроника-(8441)Электротехника-(4623)Энергетика-(12629)Юриспруденция-(1492)Ядерная техника-(1748)
Animating text opacity
|
|
|
|
Customizing the tracking animation preset
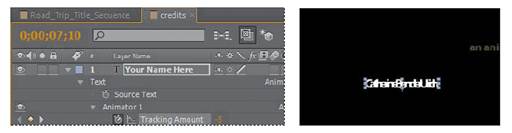
The text expands, but you want the letters to be so close initially that they’re on top of each other, and then to expand to a reasonable, readable distance apart. The animation should also occur faster. You’ll adjust the Tracking Amount to achieve both goals.
1 Select the Your Name Here layer in the Timeline panel, and press UU to reveal the properties that were modified.
2 Go to 7:10.
3 Under Animator 1, change the Tracking Amount to -5 so that the letters are squeezed together.
4 Click the Go To Next Keyframe arrow () for the Tracking Amount property, and then change the value to 0.
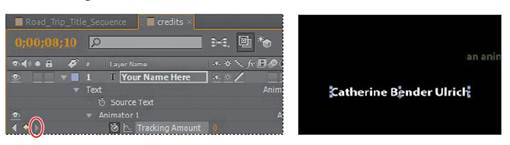
5 Drag the current-time indicator across the time ruler between 7:10 and 8:10. The letters expand as they appear onscreen, and stop animating at the last keyframe.
You’ll take the animation of the director’s name a little further by having it fade onscreen as the letters expand. To do this, you’ll animate the layer’s Opacity property.
1 Select the Your Name Here layer in the Credits timeline.
2 Press T to reveal only the layer’s Opacity property.
3 Go to 7:10, and set the Opacity to 0%. Then click the stopwatch icon () to set an Opacity keyframe.
4 Go to 7:20, and set the Opacity to 100%. After Effects adds a second keyframe. Now, the letters of the director’s name should fade in as they expand onscreen.

5 Drag the current-time indicator across the time ruler between 7:10 and 8:10 to see the letters of the director’s name fade in as they spread out.

6 Right-click (Windows) or Control-click (Mac OS) the ending Opacity keyframe, and choose Keyframe Assistant > Easy Ease In.
7 Choose File > Save.
|
|
|
|
|
Дата добавления: 2014-11-20; Просмотров: 399; Нарушение авторских прав?; Мы поможем в написании вашей работы!