КАТЕГОРИИ:
Архитектура-(3434)Астрономия-(809)Биология-(7483)Биотехнологии-(1457)Военное дело-(14632)Высокие технологии-(1363)География-(913)Геология-(1438)Государство-(451)Демография-(1065)Дом-(47672)Журналистика и СМИ-(912)Изобретательство-(14524)Иностранные языки-(4268)Информатика-(17799)Искусство-(1338)История-(13644)Компьютеры-(11121)Косметика-(55)Кулинария-(373)Культура-(8427)Лингвистика-(374)Литература-(1642)Маркетинг-(23702)Математика-(16968)Машиностроение-(1700)Медицина-(12668)Менеджмент-(24684)Механика-(15423)Науковедение-(506)Образование-(11852)Охрана труда-(3308)Педагогика-(5571)Полиграфия-(1312)Политика-(7869)Право-(5454)Приборостроение-(1369)Программирование-(2801)Производство-(97182)Промышленность-(8706)Психология-(18388)Религия-(3217)Связь-(10668)Сельское хозяйство-(299)Социология-(6455)Спорт-(42831)Строительство-(4793)Торговля-(5050)Транспорт-(2929)Туризм-(1568)Физика-(3942)Философия-(17015)Финансы-(26596)Химия-(22929)Экология-(12095)Экономика-(9961)Электроника-(8441)Электротехника-(4623)Энергетика-(12629)Юриспруденция-(1492)Ядерная техника-(1748)
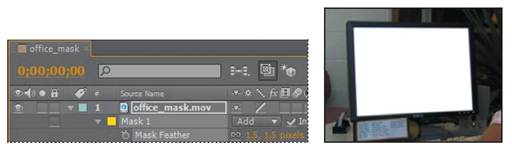
Feathering the edges of a mask
|
|
|
|
Creating a Bezier mask
You used the Convert Vertex tool to change a corner vertex to a smooth point with Bezier handles, but you could have created a Bezier mask in the first place.
To do so, click in the Composition panel with the Pen tool where you want to place the first vertex. Then click where you want to place the next vertex, and drag in the direction you want to create a curve. When you are satisfied with the curve, release the mouse button. Continue to add points until you’ve created the shape you want.
Close the mask by either clicking on the first vertex or double-clicking the last vertex. Then switch to the Selection tool to refine the mask.
The mask looks good, but you need to soften the edges a bit.
1 Choose Composition > Composition Settings.
2 Click the Background Color box, and choose white for the background color (R= 255, G= 255, B= 255). Then click OK to close the Color Picker, and OK again to close the Composition Settings dialog box.

The white background allows you to see that the edge of the monitor screen looks a little too sharp and unrealistic. To address this, you’ll feather, or soften, the edges.
3 Select the office_mask layer in the Timeline panel, and press the F key to display the Mask Feather property for the mask.
4 Increase the Mask Feather amount to 1.5, 1.5 pixels.
5 Hide the properties for the office_mask layer, and then choose File > Save to save your work.
|
|
|
|
|
Дата добавления: 2014-11-20; Просмотров: 401; Нарушение авторских прав?; Мы поможем в написании вашей работы!