КАТЕГОРИИ:
Архитектура-(3434)Астрономия-(809)Биология-(7483)Биотехнологии-(1457)Военное дело-(14632)Высокие технологии-(1363)География-(913)Геология-(1438)Государство-(451)Демография-(1065)Дом-(47672)Журналистика и СМИ-(912)Изобретательство-(14524)Иностранные языки-(4268)Информатика-(17799)Искусство-(1338)История-(13644)Компьютеры-(11121)Косметика-(55)Кулинария-(373)Культура-(8427)Лингвистика-(374)Литература-(1642)Маркетинг-(23702)Математика-(16968)Машиностроение-(1700)Медицина-(12668)Менеджмент-(24684)Механика-(15423)Науковедение-(506)Образование-(11852)Охрана труда-(3308)Педагогика-(5571)Полиграфия-(1312)Политика-(7869)Право-(5454)Приборостроение-(1369)Программирование-(2801)Производство-(97182)Промышленность-(8706)Психология-(18388)Религия-(3217)Связь-(10668)Сельское хозяйство-(299)Социология-(6455)Спорт-(42831)Строительство-(4793)Торговля-(5050)Транспорт-(2929)Туризм-(1568)Физика-(3942)Философия-(17015)Финансы-(26596)Химия-(22929)Экология-(12095)Экономика-(9961)Электроника-(8441)Электротехника-(4623)Энергетика-(12629)Юриспруденция-(1492)Ядерная техника-(1748)
Oil Pump
ENGINE LUBRICATION SYSTEM 7-13
|
|
Oil Pump Installation
• Fill the pump with engine oil turning the pump shaft before installation.
• Apply a non-permanent locking agent to the threads of the oil pump mounting bolts and tighten them.
Torque-Oil Pump Mounting Bolts: 11 N-m (1.1 kgf-m, 95 in-lb)
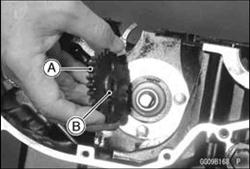
• Install the oil pump gear [A] so that the projection [B] side faces inward.
• Install a new circlip.
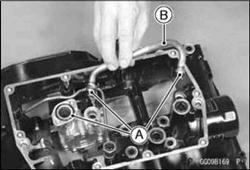
• Be sure to install the oil pump and outer oil pipe O-rings [A], and apply engine oil to them.
• Install the oil pump outer oil pipe [B] and oil screen.
OApply a non-permanent locking agent to the oil pipe bolt
and tighten it.
Torque - Oil Pump Outer Oil Pipe Bolt: 11 N-m (1.1 kgf-m, 95 in-lb)

|
• Install:
Upper Crank Case Mounting Bolts Starter Motor (see Starter Motor Installation in the Electrical System chapter)
Chain Guide (see Primary Chain Guide Wear in the Crankshaft/Transmission chapter) Alternator Cover with Gear Change Link and Pedal (see Alternator Rotor/Starter Clutch Installation in the Electrical System chapter)
Clutch Cover (see Clutch Cover Installation in the Clutch chapter)
Water Pump (see Water Pump Installation in the Cooling System chapter)
Engine (see Engine Installation in the Engine Removal/Installation chapter)
• Fill the engine oil (see Engine Oil Change in the Periodic Maintenance chapter).
• Fill the coolant (see Coolant Filling in the Periodic Maintenance chapter).
Special Tool - Kawasaki Bond (Silicone Sealant): 56019 -120
Oil Pump Disassembly
• Remove the oil pump from the lower case.
• Take off the oil pump cover screws.
• Remove the oil pump cover.
• Drop the outer rotor [A] and inner rotor [B] out of the oil pump body [C].
|
|
Дата добавления: 2014-12-23; Просмотров: 383; Нарушение авторских прав?; Мы поможем в написании вашей работы!