КАТЕГОРИИ:
Архитектура-(3434)Астрономия-(809)Биология-(7483)Биотехнологии-(1457)Военное дело-(14632)Высокие технологии-(1363)География-(913)Геология-(1438)Государство-(451)Демография-(1065)Дом-(47672)Журналистика и СМИ-(912)Изобретательство-(14524)Иностранные языки-(4268)Информатика-(17799)Искусство-(1338)История-(13644)Компьютеры-(11121)Косметика-(55)Кулинария-(373)Культура-(8427)Лингвистика-(374)Литература-(1642)Маркетинг-(23702)Математика-(16968)Машиностроение-(1700)Медицина-(12668)Менеджмент-(24684)Механика-(15423)Науковедение-(506)Образование-(11852)Охрана труда-(3308)Педагогика-(5571)Полиграфия-(1312)Политика-(7869)Право-(5454)Приборостроение-(1369)Программирование-(2801)Производство-(97182)Промышленность-(8706)Психология-(18388)Религия-(3217)Связь-(10668)Сельское хозяйство-(299)Социология-(6455)Спорт-(42831)Строительство-(4793)Торговля-(5050)Транспорт-(2929)Туризм-(1568)Физика-(3942)Философия-(17015)Финансы-(26596)Химия-(22929)Экология-(12095)Экономика-(9961)Электроника-(8441)Электротехника-(4623)Энергетика-(12629)Юриспруденция-(1492)Ядерная техника-(1748)
Removal. C On VVT-i engines, the oil pressure switch is above the oil filter location
|
|
|
|
C On VVT-i engines, the oil pressure switch is above the oil filter location
Align the flats on the crankshaft with the flats on the pump rotor
Engine in-car repair procedures 2A•21
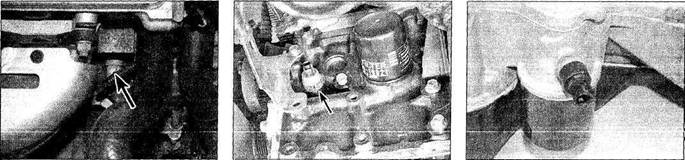
| 14.2a On 1.3 litre Non-VVT -i engines, the | 14.2b On 1.6 litre Non-VVT-i engines, the |
| oil pressure switch is located at the left- | oil pressure switch is at the right-hand end |
| hand end of the cylinder block (arrowed) | of the cylinder block (arrowed) |
3 Unscrew the switch from the engine block. Be prepared for oil spillage.
4 Prior to refitting, apply a little Loctite Three Bond 1344 (or similar) to the threads of the switch.
5 Refit the switch and tighten it to the specified torque.
6 Reconnect the wiring plug.
15 Flywheel/driveplate -
 removal and refitting
1 Remove the transmission as described in Chapter 7A or 7B.
2 Remove the pressure plate and clutch disc (Chapter 6) (manual transmission vehicles).
3 Use a centre punch or paint to make alignment marks on the flywheel/driveplate and crankshaft to ensure correct alignment during refitting (see illustration).
4 Remove the bolts that secure the flywheel/driveplate to the crankshaft. If the crankshaft turns, wedge a screwdriver in the ring gear teeth to jam the flywheel, or use a tool to lock the flywheel in position (see illustration).
5 Remove the flywheel/driveplate from the crankshaft. Since the flywheel is fairly heavy, be sure to support it while removing the last bolt. Some automatic transmission equipped vehicles have spacers on both sides of the driveplate (see illustration). Keep them with the driveplate.
Warning: The ring gear teeth may be sharp, wear gloves to protect your hands.

|
|
|
|
|
Дата добавления: 2014-12-23; Просмотров: 431; Нарушение авторских прав?; Мы поможем в написании вашей работы!