КАТЕГОРИИ:
Архитектура-(3434)Астрономия-(809)Биология-(7483)Биотехнологии-(1457)Военное дело-(14632)Высокие технологии-(1363)География-(913)Геология-(1438)Государство-(451)Демография-(1065)Дом-(47672)Журналистика и СМИ-(912)Изобретательство-(14524)Иностранные языки-(4268)Информатика-(17799)Искусство-(1338)История-(13644)Компьютеры-(11121)Косметика-(55)Кулинария-(373)Культура-(8427)Лингвистика-(374)Литература-(1642)Маркетинг-(23702)Математика-(16968)Машиностроение-(1700)Медицина-(12668)Менеджмент-(24684)Механика-(15423)Науковедение-(506)Образование-(11852)Охрана труда-(3308)Педагогика-(5571)Полиграфия-(1312)Политика-(7869)Право-(5454)Приборостроение-(1369)Программирование-(2801)Производство-(97182)Промышленность-(8706)Психология-(18388)Религия-(3217)Связь-(10668)Сельское хозяйство-(299)Социология-(6455)Спорт-(42831)Строительство-(4793)Торговля-(5050)Транспорт-(2929)Туризм-(1568)Физика-(3942)Философия-(17015)Финансы-(26596)Химия-(22929)Экология-(12095)Экономика-(9961)Электроника-(8441)Электротехника-(4623)Энергетика-(12629)Юриспруденция-(1492)Ядерная техника-(1748)
Adding Deform pins
|
|
|
|
Deform pins are the main component of the Puppet effect. Where you place those pins and how you position them determine how the objects move on the screen.
You’ll place Deform pins and display the mesh that After Effects creates to determine the area of influence for each pin.
When you select the Puppet Pin tool, the Tools panel displays the Puppet tool options. Each pin has its own properties in the Timeline panel, and After Effects automatically creates an initial keyframe for each pin.
1 Select the Puppet Pin tool () in the Tools panel.
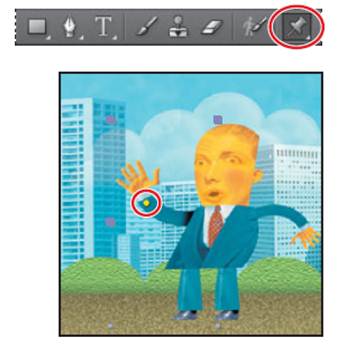
2 In the Composition panel, place a Deform wrist. You may find it helpful to zoom in to see the character more clearly. A yellow dot representing the Deform pin appears in the Composition panel.
If at this point you were to use the Selection tool () to move the Deform pin, the entire character would move with it. You need more pins to keep the other parts of the mesh in place.
3 Using the Puppet Pin tool, place another Deform pin in the left arm near the wrist. Now you can move the right hand with the Selection tool. The more pins you place, the smaller the area of influence for each pin, and the less each area willstretch. Undo any stretching by pressing Ctrl+Z (Windows) or Command+Z (Mac OS).
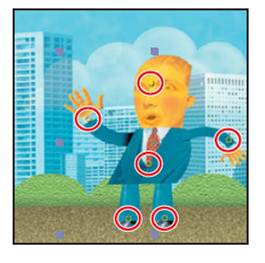
4 Place additional Deform pins in the man’s rightand left legs (near the ankles), torso (near the bottom of the tie), and forehead.
_ Note: Be careful! The character’s right arm is on the left side of the image, and vice versa. Pin the character according to his left and right, not yours!
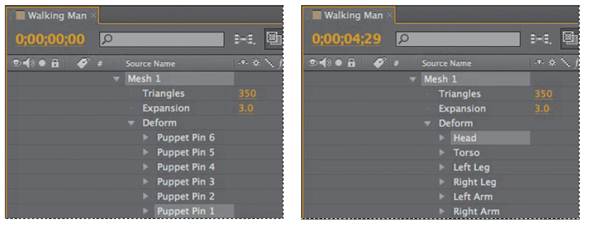
5 In the Timeline panel, expand the Mesh 1 > Deform properties. Each Deform pin is listed. To keep track of each pin, you’ll rename them.
6 Select Puppet Pin 1, press Enter or Return, and rename the pin Right Arm. Press Enter or Return again to accept the new name.
7 Rename the remaining pins (Puppet Pin 2 through Puppet Pin 6) Left Arm, Right Leg, Left Leg, Torso, and Head, respectively.
8 Select Show in the options section of the Tools panel to display the distortion mesh.
9 Change the Triangles value in the options section of the Tools panel to 300. This setting determines how many triangles are included in the mesh. Increasing the number of triangles results in a smoother animation, but also increases rendering time.
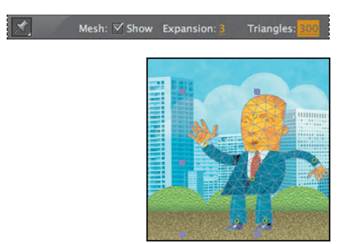
_ Tip: You can extend the mesh beyond the outline of the layer in order to ensure a stroke is included in the deformation. To expand the mesh, increase the Expansion property in the options section of the Tools panel.
|
|
|
|
|
Дата добавления: 2014-11-20; Просмотров: 462; Нарушение авторских прав?; Мы поможем в написании вашей работы!