КАТЕГОРИИ:
Архитектура-(3434)Астрономия-(809)Биология-(7483)Биотехнологии-(1457)Военное дело-(14632)Высокие технологии-(1363)География-(913)Геология-(1438)Государство-(451)Демография-(1065)Дом-(47672)Журналистика и СМИ-(912)Изобретательство-(14524)Иностранные языки-(4268)Информатика-(17799)Искусство-(1338)История-(13644)Компьютеры-(11121)Косметика-(55)Кулинария-(373)Культура-(8427)Лингвистика-(374)Литература-(1642)Маркетинг-(23702)Математика-(16968)Машиностроение-(1700)Медицина-(12668)Менеджмент-(24684)Механика-(15423)Науковедение-(506)Образование-(11852)Охрана труда-(3308)Педагогика-(5571)Полиграфия-(1312)Политика-(7869)Право-(5454)Приборостроение-(1369)Программирование-(2801)Производство-(97182)Промышленность-(8706)Психология-(18388)Религия-(3217)Связь-(10668)Сельское хозяйство-(299)Социология-(6455)Спорт-(42831)Строительство-(4793)Торговля-(5050)Транспорт-(2929)Туризм-(1568)Физика-(3942)Философия-(17015)Финансы-(26596)Химия-(22929)Экология-(12095)Экономика-(9961)Электроника-(8441)Электротехника-(4623)Энергетика-(12629)Юриспруденция-(1492)Ядерная техника-(1748)
Creating the composition. Importing the footage
|
|
|
|
Importing the footage
Setting up the project
Start by launching After Effects and creating a new project.
1 If it’s not already open, start After Effects. Press Ctrl+Alt+Shift (Windows) or Command+Option+Shift (Mac OS) as you start it to restore default preferences. Click OK when asked whether you want to delete your preferences file, and click Close to close the Welcome screen.
After Effects opens to display an empty, untitled project.
2 Choose File > Save As.
3 In the Save As dialog box, navigate to the AECS5_CIB/Lessons/Lesson13/ Finished_Projects folder.
4 Name the project Lesson13_Multipoint.aep, and then click Save.
You need to import two footage items for this exercise.
1 Double-click an empty area of the Project panel to open the Import File dialog box.
2 Navigate to the AECS5_CIB/Lessons/Lesson13/Assets folder.
3 Ctrl-click (Windows) or Command-click (Mac OS) to select the majorspoilers.mov and multipoint_tracking.mov files, and then click Open.
Now, you’ll create a new composition.
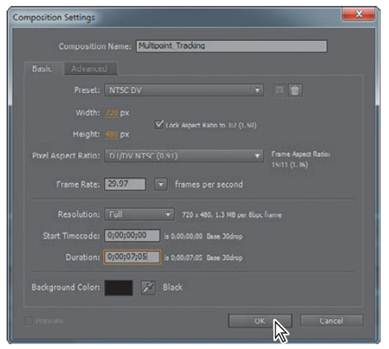
1 Press Ctrl+N (Windows) or Command+N (Mac OS).
2 In the Composition Settings dialog box, type Multipoint_Tracking in the Composition Name field.
3 Make sure the Preset pop-up menu is set to NTSC DV. This automatically sets the width, height, pixel aspect ratio, and frame rate for the composition.
4 Set the Duration to 7:05, which matches the length of the majorspoilers.mov file, and then click OK.
You will now add the footage items to the Timeline panel, one at a time.
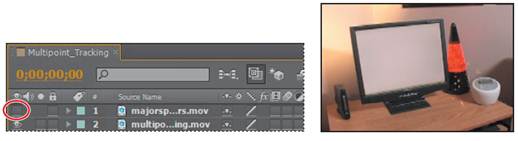
5 Drag the multipoint_tracking.mov item from the Project panel to the Timeline panel. It automatically appears in the Composition panel.
6 Manually preview the footage, which is shaky because it was shot with a handheld camera.
Because you’re positioning the majorspoilers.mov layer on the computer monitor, it will be fairly easy to place tracking markers on the flat plane. By default, the tracker tracks by luminance, so you will use the areas around the screen that have high contrast differences for tracking.
7 Press the Home key, or move the current-time indicator to the beginning of the time ruler.
8 Drag the majorspoilers.mov footage item from the Project panel to the Timeline panel, placing it at the top of the layer stack.
9 To make it easier to see the underlying movie as you place the tracking points, turn off the Video switch for the majorspoilers.mov layer in the Timeline panel.
|
|
|
|
|
Дата добавления: 2014-11-20; Просмотров: 408; Нарушение авторских прав?; Мы поможем в написании вашей работы!