КАТЕГОРИИ:
Архитектура-(3434)Астрономия-(809)Биология-(7483)Биотехнологии-(1457)Военное дело-(14632)Высокие технологии-(1363)География-(913)Геология-(1438)Государство-(451)Демография-(1065)Дом-(47672)Журналистика и СМИ-(912)Изобретательство-(14524)Иностранные языки-(4268)Информатика-(17799)Искусство-(1338)История-(13644)Компьютеры-(11121)Косметика-(55)Кулинария-(373)Культура-(8427)Лингвистика-(374)Литература-(1642)Маркетинг-(23702)Математика-(16968)Машиностроение-(1700)Медицина-(12668)Менеджмент-(24684)Механика-(15423)Науковедение-(506)Образование-(11852)Охрана труда-(3308)Педагогика-(5571)Полиграфия-(1312)Политика-(7869)Право-(5454)Приборостроение-(1369)Программирование-(2801)Производство-(97182)Промышленность-(8706)Психология-(18388)Религия-(3217)Связь-(10668)Сельское хозяйство-(299)Социология-(6455)Спорт-(42831)Строительство-(4793)Торговля-(5050)Транспорт-(2929)Туризм-(1568)Физика-(3942)Философия-(17015)Финансы-(26596)Химия-(22929)Экология-(12095)Экономика-(9961)Электроника-(8441)Электротехника-(4623)Энергетика-(12629)Юриспруденция-(1492)Ядерная техника-(1748)
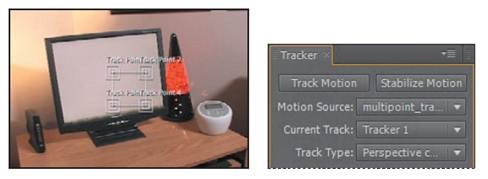
Positioning the track points. You’re ready to add the track points to the multipoint_tracking.mov layer
|
|
|
|
You’re ready to add the track points to the multipoint_tracking.mov layer.
1 Select the multipoint_tracking.mov layer in the Timeline panel.
2 Choose Window > Tracker to open the Tracker panel if it isn’t open.
3 In the Tracker panel, choose multipoint_tracking.mov from the Motion Source menu.
4 Select the multipoint_tracking.mov layer again, and then click Track Motion. The desk scene opens in the Layer panel, with a track point indicator in the center of the image. However, you will be tracking four points in order to attach the animated movie to the computer screen.
5 Choose Perspective Corner Pin from the Track Type menu. Three more track point indicators appear in the Layer panel.
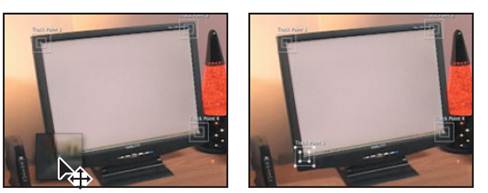
6 Drag the track points to four different high-contrast areas of the image. The four corners of the computer screen provide excellent contrast. Use the following image as a guide. (Because the areas of high contrast are also where you want to attach the majorspoilers layer, you don’t need to move the attach points.)
_ Tip: Refer to the sidebar, “Moving and resizing the trackpoints,” for help moving the track point regions.
_ Tip: It may be helpful to zoom in when placing and adjusting the track points. Zoom out again when you have finished.
Applying the multipoint tracker
You’re ready to analyze the data and apply the tracker.
1 Click the Analyze Forward button () in the Tracker panel. Then, when the analysis is complete, click the Apply button to calculate the tracking.
2 Notice the results in the Timeline panel: You can see the Corner Pin and Position property keyframes for the majorspoilers layer and the track point data for the motion_tracking layer.
3 Make the majorspoilers layer visible again, move the current-time indicator to the beginning of the timeline, and watch a RAM preview to see the results of the tracker.
_ Note: If the composition doesn’t appear in the Composition panel, click in the Timeline window to move the current-time indicator and refresh the display.
4 When you’re done watching the preview, press the spacebar to stop playback. If you don’t like the results, return to the Tracker panel, click the Reset button, and try again. With practice, you will become adept at identifying good feature regions.
5 Hide the layer properties to keep the Timeline panel neat, and choose File > Save to save your work.
6 Choose File > Close Project.
|
|
|
|
|
Дата добавления: 2014-11-20; Просмотров: 388; Нарушение авторских прав?; Мы поможем в написании вашей работы!