КАТЕГОРИИ:
Архитектура-(3434)Астрономия-(809)Биология-(7483)Биотехнологии-(1457)Военное дело-(14632)Высокие технологии-(1363)География-(913)Геология-(1438)Государство-(451)Демография-(1065)Дом-(47672)Журналистика и СМИ-(912)Изобретательство-(14524)Иностранные языки-(4268)Информатика-(17799)Искусство-(1338)История-(13644)Компьютеры-(11121)Косметика-(55)Кулинария-(373)Культура-(8427)Лингвистика-(374)Литература-(1642)Маркетинг-(23702)Математика-(16968)Машиностроение-(1700)Медицина-(12668)Менеджмент-(24684)Механика-(15423)Науковедение-(506)Образование-(11852)Охрана труда-(3308)Педагогика-(5571)Полиграфия-(1312)Политика-(7869)Право-(5454)Приборостроение-(1369)Программирование-(2801)Производство-(97182)Промышленность-(8706)Психология-(18388)Религия-(3217)Связь-(10668)Сельское хозяйство-(299)Социология-(6455)Спорт-(42831)Строительство-(4793)Торговля-(5050)Транспорт-(2929)Туризм-(1568)Физика-(3942)Философия-(17015)Финансы-(26596)Химия-(22929)Экология-(12095)Экономика-(9961)Электроника-(8441)Электротехника-(4623)Энергетика-(12629)Юриспруденция-(1492)Ядерная техника-(1748)
Blending shapes with the background
|
|
|
|
Rotating shapes
The suns should rotate on the background. You’ll animate the Rotation property for the original shape, and the changes will automatically apply to the duplicated shapes.
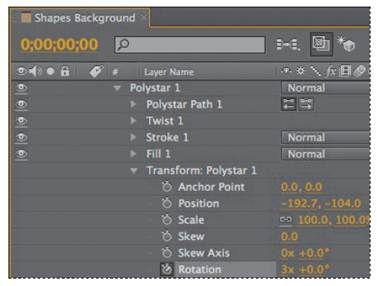
1 In the Timeline panel, expand Shape Layer 1 > Contents > Polystar 1 > Transform: Polystar 1.
2 Press the Home key, or drag the current-time indicator to the beginning of the timeline.
3 Click the stopwatch () next to the Rotation property to create an initial
keyframe for the layer.
4 Press the End key, or drag the current-time indicator to the end of the timeline.
5 Change the Rotation to 3x+0 degrees. This setting causes the shape to rotate three times in 10 seconds.
6 Hide the properties for Shape Layer 1.
7 Drag the current-time indicator across the timeline to preview the rotation.
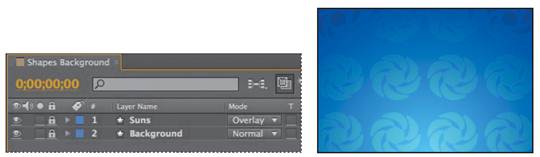
The rotating suns look good, but they contrast with the background too much. You want the character in the main video file to be the focus of attention. You’ll change the blending mode and opacity for the shape layer to make the background more subtle.
1 Click Toggle Switches/Modes at the bottom of the Timeline panel.
2 Choose Overlay from the Mode pop-up menu for the Shape Layer 1 layer.

3 Select Shape Layer 1, and then press T to display the Opacity property for the layer.
4 Change the Opacity to 25%.
5 Press T to hide the Opacity property.
6 Select Shape Layer 1, press Enter or Return, and type Suns for the layer name. Press Enter or Return again to accept the new name.
7 Lock the layer to prevent accidental changes to it.
_ Note: Instead of changing the opacity for the entire layer, you could change the opacity for the original shape. The value would apply to all the duplicates as well.
|
|
|
|
|
Дата добавления: 2014-11-20; Просмотров: 348; Нарушение авторских прав?; Мы поможем в написании вашей работы!