КАТЕГОРИИ:
Архитектура-(3434)Астрономия-(809)Биология-(7483)Биотехнологии-(1457)Военное дело-(14632)Высокие технологии-(1363)География-(913)Геология-(1438)Государство-(451)Демография-(1065)Дом-(47672)Журналистика и СМИ-(912)Изобретательство-(14524)Иностранные языки-(4268)Информатика-(17799)Искусство-(1338)История-(13644)Компьютеры-(11121)Косметика-(55)Кулинария-(373)Культура-(8427)Лингвистика-(374)Литература-(1642)Маркетинг-(23702)Математика-(16968)Машиностроение-(1700)Медицина-(12668)Менеджмент-(24684)Механика-(15423)Науковедение-(506)Образование-(11852)Охрана труда-(3308)Педагогика-(5571)Полиграфия-(1312)Политика-(7869)Право-(5454)Приборостроение-(1369)Программирование-(2801)Производство-(97182)Промышленность-(8706)Психология-(18388)Религия-(3217)Связь-(10668)Сельское хозяйство-(299)Социология-(6455)Спорт-(42831)Строительство-(4793)Торговля-(5050)Транспорт-(2929)Туризм-(1568)Физика-(3942)Философия-(17015)Финансы-(26596)Химия-(22929)Экология-(12095)Экономика-(9961)Электроника-(8441)Электротехника-(4623)Энергетика-(12629)Юриспруденция-(1492)Ядерная техника-(1748)
Adding audio and video files
|
|
|
|
Incorporating video and audio layers
Rotating shapes
You’ve rotated the stars around the anchor point for the layer. Now you want to animate each star to rotate around its own axis. To achieve this, you’ll animate the Rotation property for the polystar shape itself, not the layer or the Repeater.
1 Expand Polystar 1 > Transform: Polystar 1.
2 Press the Home key, or drag the current-time indicator to the beginning of the timeline.
3 Click the stopwatch icon () for the Rotation property to create an initial keyframe.
4 Press the End key, or drag the current-time indicator to the end of the timeline.
5 Change the Rotation to 180 degrees.
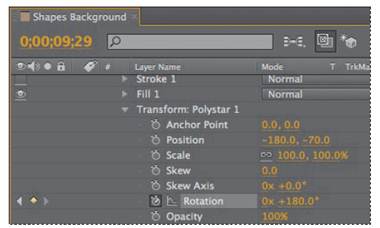
6 Manually preview the composition by dragging the current-time indicator along the timeline. After you confirm that everything is rotating, collapse the layer.
7 Rename the Shape Layer 1 layer Stars, and press Enter or Return to accept the layer name.
8 Lock the Stars layer.
The background is in place. Now you can add the video of the DJ and the audio track that accompanies it.
You imported files at the beginning of the lesson. Now you’ll add them to the composition.
The DJ.mov clip has no background and was rendered with a premultiplied alpha channel, so the underlying layers are visible. You’ll learn about keying footage in Lesson 9, “Using the Roto Brush Tool”
1 Press Home, or drag the current-time indicator to the beginning of the composition.
2 Open the Assets folder in the Project panel.
3 Drag the DJ.mov footage item to the Timeline panel, placing it above the other layers.
4 Drag the gc_adobe_dj.mp3 item from the Project panel to the Timeline panel, placing it beneath the other layers.
5 Lock the audio layer that you just added to the Timeline panel so that you can’t accidentally select and move it later. Then choose File > Save.
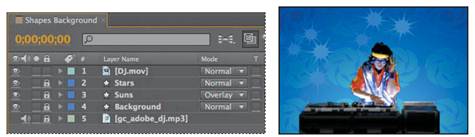
_ Note: You can place an audio layer anywhere in the layer stack, but moving it to the bottom keeps it out of the way while you work.
|
|
|
|
|
Дата добавления: 2014-11-20; Просмотров: 383; Нарушение авторских прав?; Мы поможем в написании вашей работы!