КАТЕГОРИИ:
Архитектура-(3434)Астрономия-(809)Биология-(7483)Биотехнологии-(1457)Военное дело-(14632)Высокие технологии-(1363)География-(913)Геология-(1438)Государство-(451)Демография-(1065)Дом-(47672)Журналистика и СМИ-(912)Изобретательство-(14524)Иностранные языки-(4268)Информатика-(17799)Искусство-(1338)История-(13644)Компьютеры-(11121)Косметика-(55)Кулинария-(373)Культура-(8427)Лингвистика-(374)Литература-(1642)Маркетинг-(23702)Математика-(16968)Машиностроение-(1700)Медицина-(12668)Менеджмент-(24684)Механика-(15423)Науковедение-(506)Образование-(11852)Охрана труда-(3308)Педагогика-(5571)Полиграфия-(1312)Политика-(7869)Право-(5454)Приборостроение-(1369)Программирование-(2801)Производство-(97182)Промышленность-(8706)Психология-(18388)Религия-(3217)Связь-(10668)Сельское хозяйство-(299)Социология-(6455)Спорт-(42831)Строительство-(4793)Торговля-(5050)Транспорт-(2929)Туризм-(1568)Физика-(3942)Философия-(17015)Финансы-(26596)Химия-(22929)Экология-(12095)Экономика-(9961)Электроника-(8441)Электротехника-(4623)Энергетика-(12629)Юриспруденция-(1492)Ядерная техника-(1748)
Drawing a star
|
|
|
|
Creating stars
The Star tool is similar to the Polygon tool. A polygon is simply a star without an Inner Radius or Inner Roundness property; both tools create shapes called polystars.
You’ll use the Star tool to draw a star for the background, and then use the Pucker & Bloat operation to change the star’s shape. Then you’ll duplicate the star and rotate the stars around the layer’s anchor point.
The Star tool is grouped with the other shape tools. To draw a star, drag the Star tool in the Composition panel.
1 Select the Star tool (), which is hidden beneath the Polygon tool ().
2 Change the fill and stroke settings for the shape before you draw the star:
Click the Fill Color box, and select a medium blue. (We used R=75, G=120, B=200.) Then click OK.
Click the word Stroke, and click None () in the Stroke Options dialog box. Click OK.
3 Draw a star near the center of the composition. After Effects adds a shape layer named Shape Layer 1 to the Timeline panel.
4 In the Timeline panel, expand Shape Layer 1 > Polystar 1 > Polystar Path 1.
5 Change the Points to 6 and the Rotation to 150 degrees.
6 Change the Inner Radius to 50 and the Outer Radius to 90. The radius values change the shape of the star.
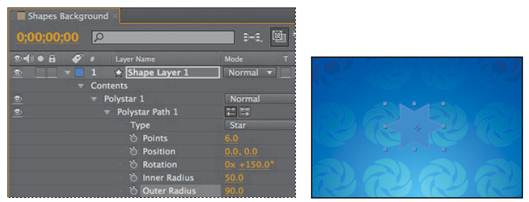
7 Expand the Transform: Polystar 1 properties.
8 Change the Position to -180, -70.
9 Collapse the Polystar 1 properties to hide them.
_ Note: If you have trouble seeing the star in front of the background, you can temporarily hide the Suns and Background layers by clicking the video switches (eye icons) for the layers in the Timeline panel.
Applying Pucker & Bloat
After Effects includes a powerful path operation called Pucker & Bloat. You can pucker a shape by pulling the path’s vertices outward while curving segments inward, or bloat a shape by pulling the vertices inward while curving segments outward. Negative values pucker a shape; positive values bloat it. You’ll pucker the star to give it a distinctive look.
1 Select Shape Layer 1.
2 Choose Pucker & Bloat from the Add pop-up menu.
3 Expand Pucker & Bloat 1.
4 Change the Amount to -125 to pucker the star.
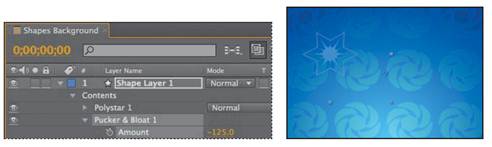
This star shape will go well in the background. Now you can duplicate and animate it.
|
|
|
|
|
Дата добавления: 2014-11-20; Просмотров: 351; Нарушение авторских прав?; Мы поможем в написании вашей работы!