КАТЕГОРИИ:
Архитектура-(3434)Астрономия-(809)Биология-(7483)Биотехнологии-(1457)Военное дело-(14632)Высокие технологии-(1363)География-(913)Геология-(1438)Государство-(451)Демография-(1065)Дом-(47672)Журналистика и СМИ-(912)Изобретательство-(14524)Иностранные языки-(4268)Информатика-(17799)Искусство-(1338)История-(13644)Компьютеры-(11121)Косметика-(55)Кулинария-(373)Культура-(8427)Лингвистика-(374)Литература-(1642)Маркетинг-(23702)Математика-(16968)Машиностроение-(1700)Медицина-(12668)Менеджмент-(24684)Механика-(15423)Науковедение-(506)Образование-(11852)Охрана труда-(3308)Педагогика-(5571)Полиграфия-(1312)Политика-(7869)Право-(5454)Приборостроение-(1369)Программирование-(2801)Производство-(97182)Промышленность-(8706)Психология-(18388)Религия-(3217)Связь-(10668)Сельское хозяйство-(299)Социология-(6455)Спорт-(42831)Строительство-(4793)Торговля-(5050)Транспорт-(2929)Туризм-(1568)Физика-(3942)Философия-(17015)Финансы-(26596)Химия-(22929)Экология-(12095)Экономика-(9961)Электроника-(8441)Электротехника-(4623)Энергетика-(12629)Юриспруденция-(1492)Ядерная техника-(1748)
Getting started. This lesson picks up where the previous lesson left off
|
|
|
|
This lesson picks up where the previous lesson left off. In Lesson 11, “Building 3D Objects,” you created the first half of an animation promoting a book. So far, a 3D representation of the book and 3D text are positioned in 3D space. In this lesson, you will complete the project by adding lights, effects, reflections, and other elements to the composition. In doing so, you’ll learn how to use additional 3D features available in Adobe After Effects.
Begin with the Lesson12_Start.aep project file provided with this book, or, if you completed Lesson 11, you can use the project file that you saved at the end of that lesson. The two files should be equivalent.
1 Make sure the following files are in the AECS5_CIB/Lessons/Lesson12 folder on your hard disk, or copy them from the Adobe After Effects CS5 Classroom in a Book DVD now:
In the Assets folder: AEBack.jpg, AEFront.jpg, AESpine.jpg, brush.psd
In the Sample_Movie folder: Lesson12.mov
In the Start_Project folder: Lesson12_Start.aep
2 Open and play the Lesson12.mov file to see what you will create in this lesson. When you are done, quit QuickTime Player. You may delete this sample movie from your hard disk if you have limited storage space.
When you begin this lesson, restore the default application settings for After Effects. See “Restoring default preferences” on page 3.
3 Press Ctrl+Alt+Shift (Windows) or Command+Option+Shift (Mac OS) while starting After Effects. When asked whether you want to delete your preferences file, click OK. Click Close to close the Welcome screen.
4 Choose File > Open Project.
5 Do one of the following:
Navigate to the AECS5_CIB/Lessons/Lesson12/Start_Project folder, select the Lesson12_Start.aep file, and click Open.
Navigate to the AECS5_CIB/Lessons/Lesson11/Finished_Project folder, select the Lesson11_Finished.aep file, and click Open.
6 Choose File > Import > File, and then navigate to the AECS5_CIB/Lessons/ Lesson12/Assets folder.
7 Select the brush.psd file, and click Open.
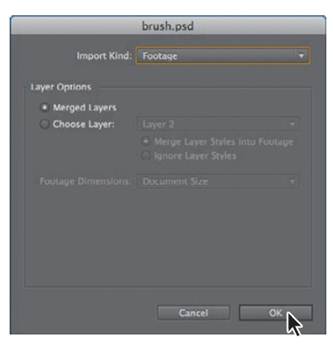
8 In the Brush.psd dialog box, select Footage from the Import Kind menu, select Merged Layers, and click OK.
9 Choose File > Save As.
10 Navigate to the AECS5_CIB/ Lessons/Lesson12/Finished_Project folder on your hard disk. Name the project Lesson12_Finished.aep, and then click Save.
|
|
|
|
|
Дата добавления: 2014-11-20; Просмотров: 394; Нарушение авторских прав?; Мы поможем в написании вашей работы!