КАТЕГОРИИ:
Архитектура-(3434)Астрономия-(809)Биология-(7483)Биотехнологии-(1457)Военное дело-(14632)Высокие технологии-(1363)География-(913)Геология-(1438)Государство-(451)Демография-(1065)Дом-(47672)Журналистика и СМИ-(912)Изобретательство-(14524)Иностранные языки-(4268)Информатика-(17799)Искусство-(1338)История-(13644)Компьютеры-(11121)Косметика-(55)Кулинария-(373)Культура-(8427)Лингвистика-(374)Литература-(1642)Маркетинг-(23702)Математика-(16968)Машиностроение-(1700)Медицина-(12668)Менеджмент-(24684)Механика-(15423)Науковедение-(506)Образование-(11852)Охрана труда-(3308)Педагогика-(5571)Полиграфия-(1312)Политика-(7869)Право-(5454)Приборостроение-(1369)Программирование-(2801)Производство-(97182)Промышленность-(8706)Психология-(18388)Религия-(3217)Связь-(10668)Сельское хозяйство-(299)Социология-(6455)Спорт-(42831)Строительство-(4793)Торговля-(5050)Транспорт-(2929)Туризм-(1568)Физика-(3942)Философия-(17015)Финансы-(26596)Химия-(22929)Экология-(12095)Экономика-(9961)Электроника-(8441)Электротехника-(4623)Энергетика-(12629)Юриспруденция-(1492)Ядерная техника-(1748)
Metric screw-thread
|
|
|
|
CLASSIFICATION OF THREADS
Threads are divided into: standard (metrical, pipe (cylinder and conical), one inch conical, trapezoidal and buttress), special and non-standard after the degree of parameters normalization. Standard threads are the most widespread.
For all standard and some special threads conventional denotations are foreseen. They consist of a letter, that marks a thread and nominal thread diameter, denotation of the tolerance zone or accuracy class of a thread. For a single-start thread a pitch is reflected additionally, and for a multiple-start thread – lead and pitch is marked by the letter Р in handles, for example, 3 (Р 1.5). Denotation of the left-hand thread is two letters LH.
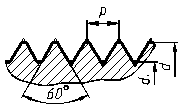
A metric thread is the basic type of a fastener thread. The sizes of a metric thread are regulated by State Standard 9150- 2002, their profile (figure 4.2) – State Standard 9150-81, pitches –State Standard 8724-2002. The letter M is included in the conventional designation of a metric thread.


Figure 4.2 - Profile of a metric thread
The true form a screw thread is helical and it would take considerable time and labour to draw it. In actual practice, screw threads are shown by conventional methods.
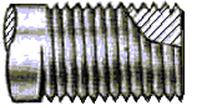
External Threads—these threads in outside view are shown by means of two continuous thin lines drawn parallel to the axis, thus indicating minor diameter of the threads. The limit of the length of the thread is shown by a continuous thick line drawn perpendicular to the axis and up to the major or outside diameter of the threads. The run out of the thread is shown by lines drawn at an angle of 45° or 30° to the axis. Fig 4.3(a) shows an external thread conventionally. In the side view of the external threads, the minor diameter is represented by a part of a thin line circle about three quarters of the circumference.
Internal threads in section (Fig. 4.3 (b)) are shown by continuous thick and thin lines indicating respectively the minor and major diameters. The hatching lines are drawn crossing the thin lines.

а) b)
Figure 4.3 - Conventional representation of a metric thread:
a) on the bolt; b) in the opening.
Examples of conventional designation of metric thread with the nominal diameter of 24mm:
1. M24 – 6g – external, right-hand, with a coarse pitch and tolerance zone 6g;
2. M24x2-6H – internal, right-hand, by a fine pitch and tolerance zone 6H;
3. M24x3 (P1.5) LH- 6H – internal, double-start, with the fine pitch 1,5mm and 3 mm thread lead, left-hand, tolerance zone 6H.
Diameters and pitches of a metric cylinder thread of the general setting are shown in a table 4.1. Thread diameters of the first row have more advantages.
Table 4.1 - Diameters and pitches of metric cylinder thread of general application
| Diameter of thread, mm | Pitch, mm | ||
| 1th row | 2th row | coarse | fine |
| - | 0,75; 0,5 | ||
| - | 1,25 | 1; 0,75; 0,5 | |
| - | 1,5 | 1,25; 1; 0,75; 0,5 | |
| - | 1,75 | 1,5; 1,25; 1; 0,75; 0,5 | |
| - | 1,5; 1,25; 1; 0,75; 0,5 | ||
| - | 1,5; 1; 0,75; 0,5 | ||
| - | 2,5 | 2; 1,5; 1; 0,75; 0,5 | |
| - | 2,5 | 2; 1,5; 1; 0,75; 0,5 | |
| - | 2,5 | 2; 1,5; 1; 0,75; 0,5 | |
| - | 2; 1,5; (1) | ||
| - | 2; 1,5; 1; 0,75 | ||
| - | 3,5 | (3); 2; 1,5; 1; 0,75 | |
| - | 3,5 | (3); 2; 1,5; 1; 0,75 | |
| - | 3; 2; 1,5; 1 | ||
| - | 3; 2; 1,5; 1 | ||
| - | 4,5 | (4); 3; 2; 1,5; 1 | |
| - | 4,5 | (4); 3; 2; 1,5; 1 | |
| - | (4); 3; 2; 1,5; 1 | ||
| - | (4); 3; 2; 1,5; 1 | ||
| - | 5,5 | 4; 3; 2; 1,5; 1 | |
| (5,5) | 4; 3; 2; 1,5; 1 | ||
| - | 4; 3; 2; 1,5; 1 |
|
|
|
|
|
Дата добавления: 2014-10-15; Просмотров: 454; Нарушение авторских прав?; Мы поможем в написании вашей работы!