КАТЕГОРИИ:
Архитектура-(3434)Астрономия-(809)Биология-(7483)Биотехнологии-(1457)Военное дело-(14632)Высокие технологии-(1363)География-(913)Геология-(1438)Государство-(451)Демография-(1065)Дом-(47672)Журналистика и СМИ-(912)Изобретательство-(14524)Иностранные языки-(4268)Информатика-(17799)Искусство-(1338)История-(13644)Компьютеры-(11121)Косметика-(55)Кулинария-(373)Культура-(8427)Лингвистика-(374)Литература-(1642)Маркетинг-(23702)Математика-(16968)Машиностроение-(1700)Медицина-(12668)Менеджмент-(24684)Механика-(15423)Науковедение-(506)Образование-(11852)Охрана труда-(3308)Педагогика-(5571)Полиграфия-(1312)Политика-(7869)Право-(5454)Приборостроение-(1369)Программирование-(2801)Производство-(97182)Промышленность-(8706)Психология-(18388)Религия-(3217)Связь-(10668)Сельское хозяйство-(299)Социология-(6455)Спорт-(42831)Строительство-(4793)Торговля-(5050)Транспорт-(2929)Туризм-(1568)Физика-(3942)Философия-(17015)Финансы-(26596)Химия-(22929)Экология-(12095)Экономика-(9961)Электроника-(8441)Электротехника-(4623)Энергетика-(12629)Юриспруденция-(1492)Ядерная техника-(1748)
About timecode and duration
|
|
|
|
Animating text with animation presets
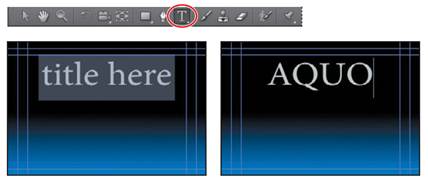
You’ll start by replacing the placeholder text with real text. Then you’ll animate it.
1 Select the Horizontal Type tool () in the Tools panel, and drag over the placeholder text in the Composition panel to select it. Then type AQUO.
_ Note: After Effects offers robust character and paragraph formatting controls, but the default settings—whatever typeface appears when you type—should be fine for this project. You’ll learn more about type in Lesson 3, “Animating Text.”
2 Select the Title Here layer in the Timeline panel again, and make sure you’re at the first frame of the animation by doing one of the following:
Drag the current-time indicator all the way to the left of the time ruler, to 0:00.
Press the Home key on your keyboard.
The primary concept related to time is duration, or length. Each footage item, layer, and composition in a project has its own duration, which is reflected in the beginning and ending times displayed in the time rulers in the Composition, Layer, and Timeline panels.
The way you view and specify time in After Effects depends on the display style, or unit of measure, that you use to describe time. By default, After Effects displays time in Society of Motion Picture and Television Engineers (SMPTE) timecode: hours, minutes, seconds, and frames. Note that the figures are separated by semicolons in the After Effects interface, representing drop-frame timecode (which adjusts for the real-time frame rate), but this book uses a colon to represent non-drop-frame timecode.
To learn when and how to change to another system of time display, such as frames, or feet and frames of film, see After Effects Help.
3 Select the Effects & Presets tab to display the panel. Then type bubble in the search box.
4 Select the Zoom-Bubble effect in the Transitions-Movement category, and drag it onto the AQUO text in the Composition panel.
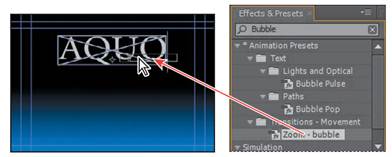
After Effects adds the effect, and displays its settings in the Effect Controls panel.
You can change effect settings in this panel or in the Timeline panel. You’ll add keyframes in the Timeline panel.
5 In the Timeline panel, expand the Title Here layer, and then expand Effects > Zoom-bubble to reveal the Transition Completion setting.
The stopwatch icon () next to Transition Completion is selected, and the value is 0%. A diamond appears in the Transition Completion bar for the layer in the time graph, indicating the keyframe that After Effects created when you added the effect.
6 Go to 1:00 in the timeline, and then change the Transition Completion value to 100%.
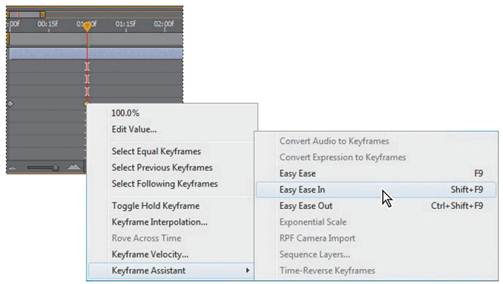
Even though this is a simple animation, you’ll learn good animation practices right away by adding ease-in controls using the Easy Ease feature. Easing into (and out of) animations keeps the motion from appearing to be too sudden or robotic.
7 Right-click or Control-click the keyframe at 1:00, and choose Keyframe Assistant > Easy Ease In.
_ Tip: To see greater detail in the Timeline panel, move the time zoom slider at the bottom of the panel.
Keyframes are used to create and control animation, effects, audio properties, and many other kinds of changes that occur over time. A keyframe marks the point in time where you specify a value, such as spatial position, opacity, or audio volume.
Values between keyframes are interpolated. When you use keyframes to create a change over time, you must use at least two keyframes—one for the state at the beginning of the change, and one for the state at the end of the change.
8 Manually preview the effect by moving the current-time indicator from 0 to 1:00.
|
|
|
|
|
Дата добавления: 2014-11-20; Просмотров: 483; Нарушение авторских прав?; Мы поможем в написании вашей работы!