КАТЕГОРИИ:
Архитектура-(3434)Астрономия-(809)Биология-(7483)Биотехнологии-(1457)Военное дело-(14632)Высокие технологии-(1363)География-(913)Геология-(1438)Государство-(451)Демография-(1065)Дом-(47672)Журналистика и СМИ-(912)Изобретательство-(14524)Иностранные языки-(4268)Информатика-(17799)Искусство-(1338)История-(13644)Компьютеры-(11121)Косметика-(55)Кулинария-(373)Культура-(8427)Лингвистика-(374)Литература-(1642)Маркетинг-(23702)Математика-(16968)Машиностроение-(1700)Медицина-(12668)Менеджмент-(24684)Механика-(15423)Науковедение-(506)Образование-(11852)Охрана труда-(3308)Педагогика-(5571)Полиграфия-(1312)Политика-(7869)Право-(5454)Приборостроение-(1369)Программирование-(2801)Производство-(97182)Промышленность-(8706)Психология-(18388)Религия-(3217)Связь-(10668)Сельское хозяйство-(299)Социология-(6455)Спорт-(42831)Строительство-(4793)Торговля-(5050)Транспорт-(2929)Туризм-(1568)Физика-(3942)Философия-(17015)Финансы-(26596)Химия-(22929)Экология-(12095)Экономика-(9961)Электроника-(8441)Электротехника-(4623)Энергетика-(12629)Юриспруденция-(1492)Ядерная техника-(1748)
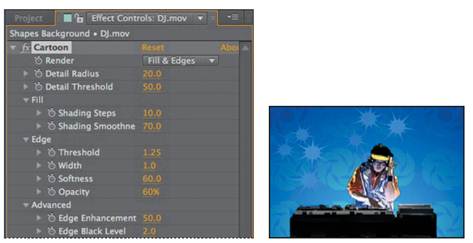
Applying a Cartoon effect
|
|
|
|
Trimming the work area
The DJ.mov clip is only 5 seconds long, but the composition is 10 seconds. If you rendered this movie now, the DJ would disappear halfway through the movie. To fix the problem, you’ll move the work area end point to the 5-second mark. Then only the first 5 seconds will render.
1 Move the current-time indicator to the 5-second mark. You can drag the current-time indicator in the Timeline panel, or click the Current Time box and then type 500.
2 Press N to move the work area end point to the current time.
_ Note: Alternatively, if you do not want to keep the last five seconds of the composition, you can change the duration of the composition to 5 seconds. To do so, choose Composition > Composition Settings, and then type 5.00 in the Duration box.
After Effects includes a Cartoon effect, which makes it easy to create a stylized look for your video. Since this intro for the DJ Quad Master reality series is very different from other reality series, the Cartoon effect will work perfectly here.
The Cartoon effect performs best on systems with video cards that support OpenGL. If you’re not using OpenGL, you can choose to skip this exercise and continue with “Adding a title bar.”
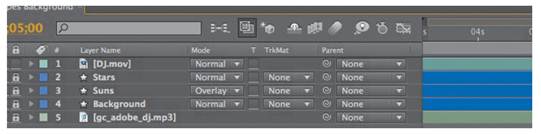
1 Select the DJ.mov layer in the Timeline panel.
2 Choose Effect > Stylize > Cartoon.
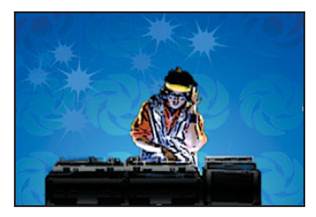
The Cartoon effect performs three operations on a layer. First, it smooths the layer, removing a great deal of detail. Therefore, it works best on video footage rather than a graphic layer, such as the background in this project. Next, the Cartoon effect emphasizes the edges of shapes, based on their brightness values. Finally, it simplifies the color in the layer.
The default settings do a pretty good job, but you’ll fine-tune them in the Effect Controls panel.
_ Tip: For interesting results, try changing the Cartoon Render options from Fill & Edges to Fill (for a color-only effect) or Edges (for black-andwhite line art).
3 In the Effect Controls panel, choose Fill from the Render pop-up menu.
For this project, you’re selecting Fill only temporarily so that you can more easily see the results of the Fill settings as you make adjustments.
4 Change the Detail Radius amount to 20 and the Detail Threshold amount to 50. These settings control how much detail is removed and how it is smoothed. Higher values remove more detail.
5 In the Fill area, change the Shading Steps value to 10, and make sure the Shading Smoothness value is 70.
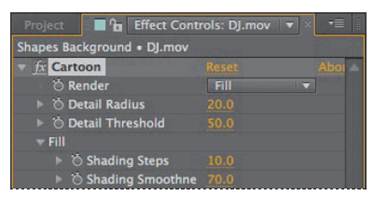
These settings determine how color is reduced and how gradients are preserved. In this project, changing these values reduces the number of colors in the DJ’s shirt, creating a simpler design.
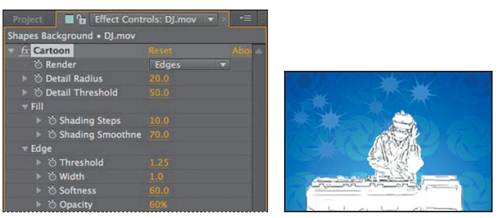
6 Choose Edges from the Render pop-up menu so you can focus on the edge controls. The layer becomes black and white temporarily.
7 In the Edge area, change the Threshold to 1.25 and the Width to 1. These settings reduce the number of black lines on the subject.
8 Leave the Softness value at its current setting (60), but lower the Opacity to 60% to make the lines more subtle.
9 Choose Fill & Edges from the Render pop-up menu to restore the color.
10 Expand Advanced to see the advanced controls, which give you precise control over the edges.
11 Change the Edge Enhancement value to 50 to sharpen the edges of the layer.
12 Change the Edge Black Level to 2 to fill in more areas of the image with solid black. This makes the image even more cartoonish.
13 Lock the DJ.mov layer to ensure you don’t accidentally make changes to it as you continue the project.
|
|
|
|
|
Дата добавления: 2014-11-20; Просмотров: 456; Нарушение авторских прав?; Мы поможем в написании вашей работы!