КАТЕГОРИИ:
Архитектура-(3434)Астрономия-(809)Биология-(7483)Биотехнологии-(1457)Военное дело-(14632)Высокие технологии-(1363)География-(913)Геология-(1438)Государство-(451)Демография-(1065)Дом-(47672)Журналистика и СМИ-(912)Изобретательство-(14524)Иностранные языки-(4268)Информатика-(17799)Искусство-(1338)История-(13644)Компьютеры-(11121)Косметика-(55)Кулинария-(373)Культура-(8427)Лингвистика-(374)Литература-(1642)Маркетинг-(23702)Математика-(16968)Машиностроение-(1700)Медицина-(12668)Менеджмент-(24684)Механика-(15423)Науковедение-(506)Образование-(11852)Охрана труда-(3308)Педагогика-(5571)Полиграфия-(1312)Политика-(7869)Право-(5454)Приборостроение-(1369)Программирование-(2801)Производство-(97182)Промышленность-(8706)Психология-(18388)Религия-(3217)Связь-(10668)Сельское хозяйство-(299)Социология-(6455)Спорт-(42831)Строительство-(4793)Торговля-(5050)Транспорт-(2929)Туризм-(1568)Физика-(3942)Философия-(17015)Финансы-(26596)Химия-(22929)Экология-(12095)Экономика-(9961)Электроника-(8441)Электротехника-(4623)Энергетика-(12629)Юриспруденция-(1492)Ядерная техника-(1748)
To prevent damage to the crankpin surfaces, do not allow the big end cap bolts to bump against them
|
|
|
|
CAUTION
NOTE
○Mark and record locations of the connecting rods and their big end caps so that they can be reassembled in their original positions.
• Remove the connecting rod big end cap nuts, and take off
the rod and cap with the bearing inserts from the crank
shaft.
CRANKSHAFT/TRANSMISSION 9-17 Crankshaft/Connecting Rods
Connecting Rod Installation
CAUTION
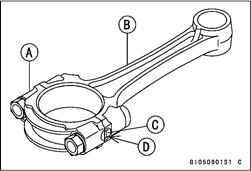
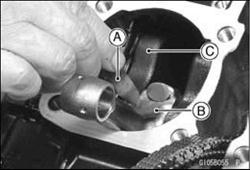
The connecting rod and the connecting rod big end cap are machined at the factory in the assembled state, so they must be replaced together as a set. To minimize vibration, the connecting rods should have the same weight mark. The weight mark is indicated by a capital letter, and is stamped on the connecting rod big end. If the connecting rods, bearing inserts, or crankshaft are replaced with new ones, select the bearing insert and check clearance with plastigage before assembling engine to be sure the correct bearing inserts are installed.
|
Big End Cap [A] Connecting Rod [B] Weight Mark, Alphabet [C] Diameter Mark [D]
|
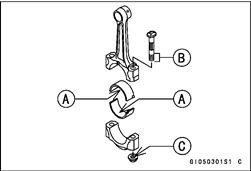
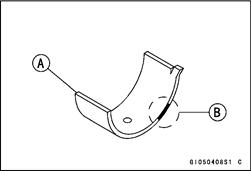
• Apply molybdenum disulfide oil to the inner surface of the upper and lower bearing inserts [A].
• Apply a small amount of engine oil to the threads [B] and seating surface [C] of the connecting rod big end cap nuts.
• Tighten the cap nuts.
Torque - Connecting Rod Big End Cap Nuts: 36 N·m (3.7 kgf·m, 27 ft·lb)
• Install the crankshaft (see Crankshaft Installation).
Crankshaft/Connecting Rod Cleaning
• After removing the connecting rods from the crankshaft clean them with a high flash-point solvent.
• Blow the crankshaft oil passages with compressed air to remove any foreign particles or residue that may have accumulated in the passages.
9-18 CRANKSHAFT/TRANSMISSION
Crankshaft/Connecting Rods
|
|
|
Connecting Rod Bend/Twist
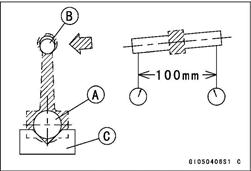
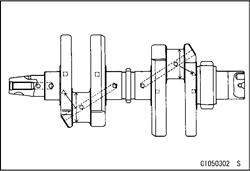
• Measure the connecting rod bend.
ORemove the connectin rod big end bearing inserts, and reinstall the connecting rod big end cap.
OSelect an arbor [A] of the same diameter as the connecting rod big end, and insert the arbor through the connecting rod big end.
OSelect an arbor of the same diameter as the piston pin and at least 100 mm (4 in.) long, and insert the arbor [B] through the connecting rod small end.
OOn a surface plate, set the big-end arbor on V blocks [C].
OWith the connecting rod held vertical, use a height gauge to measure the difference in the height of the arbor above the surface plate over a 100 mm (4 in.) length to determine the amount of connecting rod bend.
• If connecting rod bend exceeds the service limit, the con
necting rod must be replaced.
Connecting Rod Bend Service Limit: 0.2/100 mm (0.0079/4 in.)
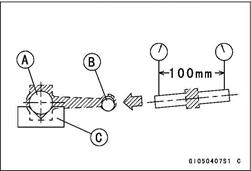
• Measure the connecting rod twist.
OWith the big-end arbor [A] still on V blocks [C], hold the connecting rod horizontal and measure the difference in the height of the arbor [B] above the surface plate over a 100 mm (4 in.) length of the arbor to determine the amount of connecting rod twist.
• If the connecting rod twist exceeds the service limit, the
connecting rod must be replaced.
Connecting Rod Twist Service Limit: 0.2/100 mm (0.0079/4 in.)
Connecting Rod Big End Side Clearance
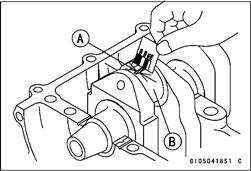
• Measure the connecting rod big end side clearance.
OInsert a thickness gaue [A] between the big end [B] and
either crank web [C] to determine the clearance.
Connecting Rod Big End Side Clearance
Standard: 0.13 ~ 0.38 mm (0.0051 ~ 0.0150 in.)
Service Limit: 0.50 mm (0.02 in.)
• If the clearance exceeds the service limit, replace the connecting rod with a new one and then check the clearance again. If the clearance is too large after connecting rod replacement, the crankshaft must be replaced.
CRANKSHAFT/TRANSMISSION 9-19 Crankshaft/Connecting Rods
Connecting Rod Big End Bearing Insert/Crankpin
Clearance
• Measure the bearing insert/crankpin clearance using a
plastigage. ORemove the connecting rod big end caps and wipe each
bearing insert and crankpin surface clean of oil. OCut strips of plastigage to bearing insert width, and place
a strip on the crankpin for each connecting rod parallel to
the crankshaft so that the plastigage will be compressed
between the crankpin and the bearing insert. Install the connecting rod big end caps and tighten the big end cap nuts to the specified torque.
Torque - Connecting Rod Big End Cap Nuts: 36 N·m (3.7 kgf·m, 27 ft·lb)
|
|
|
|
|
|
|
|
Дата добавления: 2014-12-23; Просмотров: 693; Нарушение авторских прав?; Мы поможем в написании вашей работы!