КАТЕГОРИИ:
Архитектура-(3434)Астрономия-(809)Биология-(7483)Биотехнологии-(1457)Военное дело-(14632)Высокие технологии-(1363)География-(913)Геология-(1438)Государство-(451)Демография-(1065)Дом-(47672)Журналистика и СМИ-(912)Изобретательство-(14524)Иностранные языки-(4268)Информатика-(17799)Искусство-(1338)История-(13644)Компьютеры-(11121)Косметика-(55)Кулинария-(373)Культура-(8427)Лингвистика-(374)Литература-(1642)Маркетинг-(23702)Математика-(16968)Машиностроение-(1700)Медицина-(12668)Менеджмент-(24684)Механика-(15423)Науковедение-(506)Образование-(11852)Охрана труда-(3308)Педагогика-(5571)Полиграфия-(1312)Политика-(7869)Право-(5454)Приборостроение-(1369)Программирование-(2801)Производство-(97182)Промышленность-(8706)Психология-(18388)Религия-(3217)Связь-(10668)Сельское хозяйство-(299)Социология-(6455)Спорт-(42831)Строительство-(4793)Торговля-(5050)Транспорт-(2929)Туризм-(1568)Физика-(3942)Философия-(17015)Финансы-(26596)Химия-(22929)Экология-(12095)Экономика-(9961)Электроника-(8441)Электротехника-(4623)Энергетика-(12629)Юриспруденция-(1492)Ядерная техника-(1748)
Antifreeze mixture
|
|
|
|
Cooling system filling
Engine flushing
10 To flush the engine, remove the thermostat (see Chapter 3).
11 With the bottom hose disconnected from the radiator, insert a garden hose into the coolant housing. Direct a clean flow of water through the engine, and continue flushing until clean water emerges from the radiator bottom hose.
12 When flushing is complete, refit the thermostat and reconnect the hoses (see Chapter 3).
13 Before attempting to fill the cooling system, make sure that all hoses and clips are in good condition, and that the clips are tight. Note that an antifreeze mixture must be used all year round, to prevent corrosion of the engine components (see following sub-Section).
14 Remove the radiator pressure cap, and ensure all drain taps/plugs are secured.
15 Place the heater temperature control in the maximum heat position.
16 Slowly add new coolant (50/50 mix of antifreeze and coolant) to the radiator until it's full. Add coolant to the reservoir up to the lower mark. Note that Toyota genuine antifreeze is normally supplied premixed.
17 Leave the radiator cap off, and run the engine in a well-ventilated area until the thermostat opens (coolant will begin flowing through the radiator and the upper hose will become hot).
18 Turn the engine off and let it cool. Add more coolant mixture to bring the level back to the lip of the radiator filler neck.
19 Squeeze the upper radiator hose to expel air, then add more coolant mixture if necessary. Refit the filler cap.
20 Start the engine, allow it to reach normal operating temperature and check for leaks.
21 The antifreeze should always be renewed at the specified intervals. This is necessary not only to maintain the antifreeze properties, but also to prevent corrosion which would otherwise occur as the corrosion inhibitors become progressively less effective.
22 Always use an ethylene-glycol based antifreeze which is suitable for use in mixed-metal cooling systems.
23 Before adding antifreeze, the cooling system should be completely drained, preferably flushed, and all hoses checked for condition and security.
24 After filling with antifreeze, a label should be attached to the expansion tank, stating the type and concentration of antifreeze used, and the date installed. Any subsequent topping-up should be made with the same type and concentration of antifreeze.
25 Do not use engine antifreeze in the windscreen/tailgate washer system, as it will damage the vehicle paintwork. A screenwash additive should be added to the washer system in the quantities stated on the bottle.
Maintenance procedures 1•19
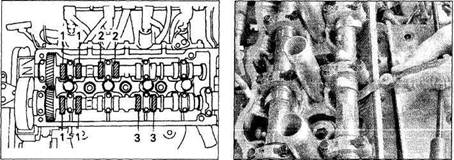
| 24.4a When the No 1 piston is at TDC | 24.4b Check the clearance for each |
| on the compression stroke, the valve | valve with a feeler gauge of the specified |
| clearance for the No 1 and No 3 cylinder | thickness - if the clearance is correct, you |
| exhaust valves and the No 1 and No 2 | should feel a slight drag on the gauge as |
| intake valves can be measured | you pull it out |

|
|
|
|
|
Дата добавления: 2014-12-23; Просмотров: 440; Нарушение авторских прав?; Мы поможем в написании вашей работы!