КАТЕГОРИИ:
Архитектура-(3434)Астрономия-(809)Биология-(7483)Биотехнологии-(1457)Военное дело-(14632)Высокие технологии-(1363)География-(913)Геология-(1438)Государство-(451)Демография-(1065)Дом-(47672)Журналистика и СМИ-(912)Изобретательство-(14524)Иностранные языки-(4268)Информатика-(17799)Искусство-(1338)История-(13644)Компьютеры-(11121)Косметика-(55)Кулинария-(373)Культура-(8427)Лингвистика-(374)Литература-(1642)Маркетинг-(23702)Математика-(16968)Машиностроение-(1700)Медицина-(12668)Менеджмент-(24684)Механика-(15423)Науковедение-(506)Образование-(11852)Охрана труда-(3308)Педагогика-(5571)Полиграфия-(1312)Политика-(7869)Право-(5454)Приборостроение-(1369)Программирование-(2801)Производство-(97182)Промышленность-(8706)Психология-(18388)Религия-(3217)Связь-(10668)Сельское хозяйство-(299)Социология-(6455)Спорт-(42831)Строительство-(4793)Торговля-(5050)Транспорт-(2929)Туризм-(1568)Физика-(3942)Философия-(17015)Финансы-(26596)Химия-(22929)Экология-(12095)Экономика-(9961)Электроника-(8441)Электротехника-(4623)Энергетика-(12629)Юриспруденция-(1492)Ядерная техника-(1748)
Framework
|
|
|
|
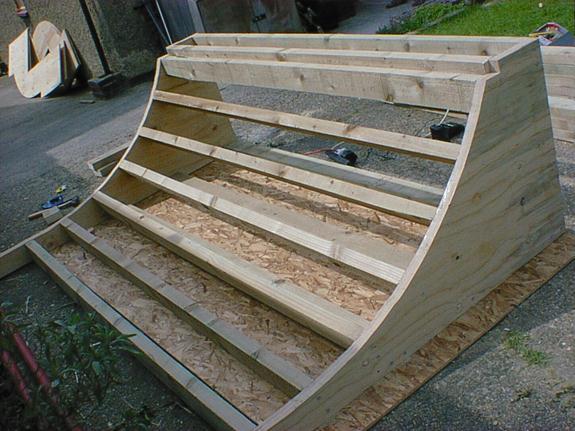
Figure 3 complete frame
- put the trannys together in pairs, so there are now 4 1½” trannys, and in the corner of the deck and the transition, cut a 1½” square
- screw in 1¼ pieces of OSB to the bottom of each tranny structure before you start,(this is for the base and the walls
- cut 1½’ off 28 2x4s and screw them in like in this diagram

- cut the leftover 2x4 1’ bits that you got from the 7’ frame work, and cut yourself 22 3” lengths.
- screw these in 6” apart between the top 2 2x4s (see diagram) and make sure that the 2” side of the 2x4s are facing up(this is the support for the deck
- cut the 8 ft coping down to 7ft
- tape the coping in place with masking tape
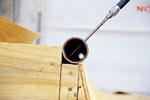
- use a 6.5mm metal drill bit, drill holes all the way through the coping (through both sides of the pipe) about 1-inch in on either end of the pipes, as well as in the middle of the pipes, so that both pieces of coping have three holes drilled all the way through them.
- On both pieces of coping, pick one side to be the front or back. On the sides you choose to be the front, use your 13mm metal drill bit to enlarge all three holes being careful not to enlarge the holes on the back.
- Take your long Phillips head screw driver bit and screw the coping into the 2x4s in the coping cradle notch.
- The enlarged holes in the front should allow the screw and the driver bit to get inside the pipe, while the smaller hole on the back should catch the head of the screw and keep it fastened to the 2x4s. Repeat for both sides of the ramp.
- remove the tape
- screw in half of a lock by the edge of each of the tranny walls, in the middle of the transition
|
|
|
|
|
Дата добавления: 2014-12-23; Просмотров: 344; Нарушение авторских прав?; Мы поможем в написании вашей работы!