
КАТЕГОРИИ:
Архитектура-(3434)Астрономия-(809)Биология-(7483)Биотехнологии-(1457)Военное дело-(14632)Высокие технологии-(1363)География-(913)Геология-(1438)Государство-(451)Демография-(1065)Дом-(47672)Журналистика и СМИ-(912)Изобретательство-(14524)Иностранные языки-(4268)Информатика-(17799)Искусство-(1338)История-(13644)Компьютеры-(11121)Косметика-(55)Кулинария-(373)Культура-(8427)Лингвистика-(374)Литература-(1642)Маркетинг-(23702)Математика-(16968)Машиностроение-(1700)Медицина-(12668)Менеджмент-(24684)Механика-(15423)Науковедение-(506)Образование-(11852)Охрана труда-(3308)Педагогика-(5571)Полиграфия-(1312)Политика-(7869)Право-(5454)Приборостроение-(1369)Программирование-(2801)Производство-(97182)Промышленность-(8706)Психология-(18388)Религия-(3217)Связь-(10668)Сельское хозяйство-(299)Социология-(6455)Спорт-(42831)Строительство-(4793)Торговля-(5050)Транспорт-(2929)Туризм-(1568)Физика-(3942)Философия-(17015)Финансы-(26596)Химия-(22929)Экология-(12095)Экономика-(9961)Электроника-(8441)Электротехника-(4623)Энергетика-(12629)Юриспруденция-(1492)Ядерная техника-(1748)
Common rules of draft shaping and finishing
|
|
|
|
GEOMETRICAL AND PROJECTING DRAWING
When shaping and finishing drafts it is obligatory keep strictly to demands of State Standards.
Formats State Standard 2.301-68*
The standard sizes of a drawing sheets are given in Table 1.1.
Table 1.1– Standard sizes of a drawing sheets
| Denotation | A0 | A1 | A2 | A3 | A4 |
| Sizes of sides, mm x mm | 841x1189 | 594x841 | 420x594 | 297x420 | 210x297 |
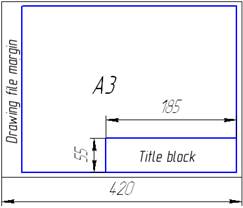
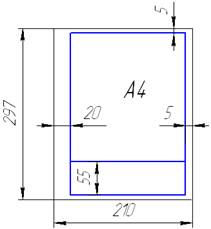
The layout of drawing sheet is shown in Fig. 1.1.
The title block takes place along longer or shorter side of format on all of formats (except for A4). Title block is stirred only along shorter side on the sheets of format of A4 (fig.1.1, b).
a b
Figure 1.1 - Title block
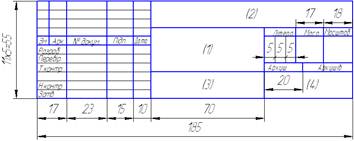
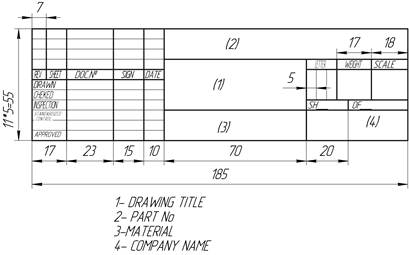
There are three forms of title block. Title block (form 1) is intended for all of cases of drawings and charts is shown in figure 1.2
a
b
Figure 1.2 – Form 1 of title block (a– in Ukraine, b – in English)
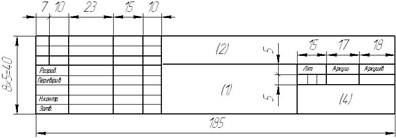
The title blocks (form 2 and form 2а) are used for the text document (specification) are shown in figure 1.3 (on the first sheets) and in figure 1.4 (on the next sheets).
 |
 |
Figure 1.3 – Form 2 of title block
Figure 1.4 – Form 2a of title block
Title blocks indicate: in column 1 is the name of the article; in column 2 is the denotation of a document; in column 3 is the denotation of part material; in a column 4 is the index of production.
Nonstandard title block can be used in doing home works in geometrical and projecting drawings (figure 1.5).

Figure 1.5 – Non-standard title block
Scales State Standard 2.302-68*
A scale is the correlation of linear sizes of the depiction to the actual sizes of the object.
The various types of scales used in machine drawing are:
1. Full scale
2. Reduced scales (scales of dimensions).
3. Enlarged scales (scales of augmentation).
The standard scales are given in Table 1.2.
Table 1.2 – Scales
| Reduced scale | 1:2; 1:2,5; 1:4; 1:5; 1:10, 1:15; 1:20; 1:25; 1:40; 1:50; 1:75; 1:100; 1:200; 1:400; 1:500; 1:800; 1:1000 |
| Full scale | 1:1 |
| Enlarged scale | 2:1; 2,5:1; 4:1; 5:1; 10:1; 20:1; 40:1; 50:1; 100:1 |
The scale is indicated in the proper column of title block on a drawing.
Lines State Standard 2.303-68*
National Ukrainian Standards established nine types of lines according to its graphical shape and thickness. All lines of the same type must have the same thickness. For this end they sharpen pencils in shape of cone or in shape of spade and they use the proper hardness of pencils. Thus lines of s/3 thickness are recommended to draw by pencils of T, 2T, 3T (H, 2H, 3H), and lines of s, s/2 or 1,5s thickness by pencils of MT, TM (HB, BH).
The types of lines are shown in a table 1.3.
Table 1.3 – Lines
| Name | Shape | Thickness of the line | Application |
| Continuous thick basic | 
| (S) 0,5... 1,4 mm | Working frame of format, lines of visible contour |
| Continuous thin | 
| S/3... S/2 | Lines are an extension, dimension, leader and shadings |
| Continuous waved | 
| S/3... S/2 | Break lines |
| Dashed (hidden) | 
| S/3... S/2 | These lines are used to show the hidden features of a part. |
| Dashed pointed (center) | 
| S/3... S/2 | Axial and central lines |
| Cutting plane line | 
| S... 1,5 S | Line of section |
Drawing Fonts State Standard 2.304-81*
Draft fonts are obligatory when lettering the drawings by hand. National Ukrainian Standards established such dimensions of fonts in millimetres: 1,8; 2,5; 3,5; 5; 7; 10; 14; 20, 28; 40. Font 1,8 is not recommended. Four types of font are established for Russian, Latin, Greek letters, Arabic and Roman numerals. Those types of font calls A and B, and each of them may be right (without inclination), and inclined fonts with angle of 75°. For each type of font its height h is defined by height of capital letters. Height of letters is measured in millimeters along a perpendicular to the base of an inscription. Width d of font lines is defined according to type of font. For A font type d=l/14h, and for E: d=l/10h. It is recommended to make up lettering E inclined font type. Base parameters of E font type are given in table 2.
For correct lettering an auxiliary grid should be drawn by thin lines. The vertical and horizontal grid step is equal to thickness of heavying in of the font.
The main requirements for lettering are
1. Legibility
2. Uniformity
3. Ease of writing
4. Rapidity of execution.
Single stroke letters meet these requirements and are universally used. Good lettering should conform to uniformity of thickness, style, scope, size and spacing.
Modern Roman — Refer to Fig. 1.6.
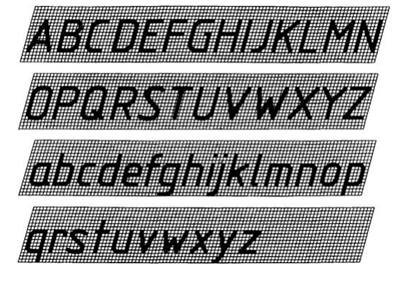

Figure 1.6 – Fonts
Conventional Representation of Materials State Standard 2.306-68*
A variety of materials are used for making machine components. It is therefore preferable to follow different conventions of section lining for different materials as given in Table 1.4.
Table 1.4 – Conventional Representation of Materials
| Material | Denotation |
| Metals and hard alloys | 
|
| Non-metal materials, after the exception of indicated below | 
|
| Wood | 
|
| Ceramics and silicate materials | 
|
| Glass and transparent materials | 
|
| Liquids | 
|
It is nesessaty to take the corner of 30°or 60° instead of 45° if the lines of shading coincide with the direction of the lines of contour. Narrow areas of cuts with a width less than 2 mm, allow to show blacken (figure 1.7).

Figure 1.7 – Examples of Conventional Representation of Materials
|
|
|
|
|
Дата добавления: 2014-10-15; Просмотров: 441; Нарушение авторских прав?; Мы поможем в написании вашей работы!