КАТЕГОРИИ:
Архитектура-(3434)Астрономия-(809)Биология-(7483)Биотехнологии-(1457)Военное дело-(14632)Высокие технологии-(1363)География-(913)Геология-(1438)Государство-(451)Демография-(1065)Дом-(47672)Журналистика и СМИ-(912)Изобретательство-(14524)Иностранные языки-(4268)Информатика-(17799)Искусство-(1338)История-(13644)Компьютеры-(11121)Косметика-(55)Кулинария-(373)Культура-(8427)Лингвистика-(374)Литература-(1642)Маркетинг-(23702)Математика-(16968)Машиностроение-(1700)Медицина-(12668)Менеджмент-(24684)Механика-(15423)Науковедение-(506)Образование-(11852)Охрана труда-(3308)Педагогика-(5571)Полиграфия-(1312)Политика-(7869)Право-(5454)Приборостроение-(1369)Программирование-(2801)Производство-(97182)Промышленность-(8706)Психология-(18388)Религия-(3217)Связь-(10668)Сельское хозяйство-(299)Социология-(6455)Спорт-(42831)Строительство-(4793)Торговля-(5050)Транспорт-(2929)Туризм-(1568)Физика-(3942)Философия-(17015)Финансы-(26596)Химия-(22929)Экология-(12095)Экономика-(9961)Электроника-(8441)Электротехника-(4623)Энергетика-(12629)Юриспруденция-(1492)Ядерная техника-(1748)
Animating the buildings
|
|
|
|
Animated buildings? You bet. You’ll animate a couple of buildings rising and “jumping” in the background as the artist cruises through downtown San Francisco. Once again, you’ll be working with a precomposition (full skyline), but you’ll open it to animate its nested layers individually.
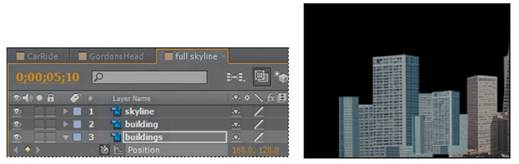
1 Double-click the full skyline composition in the Project panel to open it in its own Timeline and Composition panels. Notice that this composition has three layers: skyline, building, and buildings. You’ll start with the buildings layer.
2 Go to 5:10, select the buildings layer in the Timeline panel, and press P to reveal its Position property.
3 Click the stopwatch icon () to set a Position keyframe for the buildings layer at the default values (160, 120).
4 Go to 4:20, and, in the Composition panel, use the Selection tool () to drag the buildings layer down, off the bottom of the composition, until its y Position value is 350. Press Shift after you start to drag to constrain the horizontal axis. After Effects adds a keyframe.
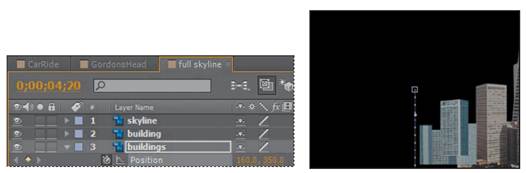
_ Tip: Dragging the layer into position is good practice, but youcan also directly enter the y coordinates in steps 4 and 5 if you don’t want to drag the layer in the Composition panel.
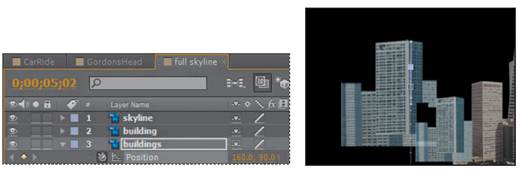
5 Go to 5:02, and drag the buildings layer up in the Composition panel until its y Position value is 90. After Effects adds a keyframe. Great. You’ve got your first animated building. Next, you’ll finesse the movement at the high point of the jump to make it more natural. (Naturally jumping buildings? Aw, come on. This is fun.)
|
|
|
|
|
Дата добавления: 2014-11-20; Просмотров: 423; Нарушение авторских прав?; Мы поможем в написании вашей работы!