КАТЕГОРИИ:
Архитектура-(3434)Астрономия-(809)Биология-(7483)Биотехнологии-(1457)Военное дело-(14632)Высокие технологии-(1363)География-(913)Геология-(1438)Государство-(451)Демография-(1065)Дом-(47672)Журналистика и СМИ-(912)Изобретательство-(14524)Иностранные языки-(4268)Информатика-(17799)Искусство-(1338)История-(13644)Компьютеры-(11121)Косметика-(55)Кулинария-(373)Культура-(8427)Лингвистика-(374)Литература-(1642)Маркетинг-(23702)Математика-(16968)Машиностроение-(1700)Медицина-(12668)Менеджмент-(24684)Механика-(15423)Науковедение-(506)Образование-(11852)Охрана труда-(3308)Педагогика-(5571)Полиграфия-(1312)Политика-(7869)Право-(5454)Приборостроение-(1369)Программирование-(2801)Производство-(97182)Промышленность-(8706)Психология-(18388)Религия-(3217)Связь-(10668)Сельское хозяйство-(299)Социология-(6455)Спорт-(42831)Строительство-(4793)Торговля-(5050)Транспорт-(2929)Туризм-(1568)Физика-(3942)Философия-(17015)Финансы-(26596)Химия-(22929)Экология-(12095)Экономика-(9961)Электроника-(8441)Электротехника-(4623)Энергетика-(12629)Юриспруденция-(1492)Ядерная техника-(1748)
Refitting. 9 Remove the bolts and detach the oil sump
|
|
|
|
All engines
9 Remove the bolts and detach the oil sump. If it's stuck, pry it loose very carefully with a putty knife (see illustration). Don't damage the mating surfaces of the sump and block or oil leaks could develop. Note: On VVT-i engines, pull down the plastic cover slotted into the left-hand end of the engine block to access the left-hand sump bolts (see illustration).
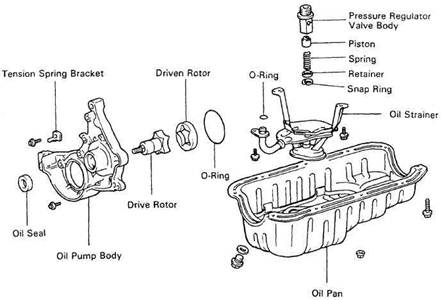
10 Unbolt the pick-up tube/oil strainer assembly and remove it for cleaning. Discard the pick-up pipe gasket, a new one must be fitted.
11 Use a scraper to remove all traces of old gasket material and sealant from the block and oil sump. Take great care not to gouge the mating surfaces. Clean the mating surfaces with brake cleaner.
12 Make sure the threaded bolt holes in the block are clean.
13 Check the oil sump flange for distortion, particularly around the bolt holes. On steel sumps, if necessary, place the oil sump on a wood block and use a hammer to flatten and restore the gasket surface.
14 Inspect the oil pump pick-up tube assembly for cracks and a blocked strainer. If the pick-up was removed, clean it thoroughly and install it now, using a new O-ring (non-VVT-i engines) or gasket (VVT-i engines). Tighten the nuts/bolts to the torque listed in this Chapter's Specifications.
15 Apply a 5 mm (approximately) wide bead of RTV sealant (steel sumps) or Toyota sealant No 08826-00080 (aluminium sumps) to the sump flange (see illustrations). Note:
Refitting must be completed within 5 minutes once the sealer has been applied.
16 Carefully position the oil sump on the engine block and install the bolts. Working from the centre out. Tighten the bolts to the torque listed in this Chapter's Specifications in three or four steps.
17 The remainder of refitting is the reverse of removal. Be sure to add oil and fit a new oil filter. Use new gasket/seals on the front exhaust pipe (Non-VVT-i engines).
18 Run the engine and check for oil pressure and leaks.
Engine in-car repair procedures 2A•19
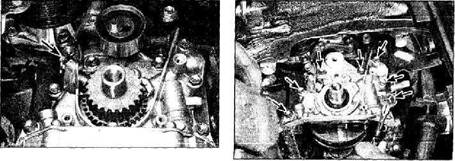
13 Oil pump -removal, inspection and refitting

| 13.3 Remove the bolt (arrowed) and | 13.4 Remove the oil pump body-to-block | |
| withdraw the crankshaft position sensor | ||
| from the oil pump body | bolts (arrowed) |
|
|
|
|
|
Дата добавления: 2014-12-23; Просмотров: 436; Нарушение авторских прав?; Мы поможем в написании вашей работы!