КАТЕГОРИИ:
Архитектура-(3434)Астрономия-(809)Биология-(7483)Биотехнологии-(1457)Военное дело-(14632)Высокие технологии-(1363)География-(913)Геология-(1438)Государство-(451)Демография-(1065)Дом-(47672)Журналистика и СМИ-(912)Изобретательство-(14524)Иностранные языки-(4268)Информатика-(17799)Искусство-(1338)История-(13644)Компьютеры-(11121)Косметика-(55)Кулинария-(373)Культура-(8427)Лингвистика-(374)Литература-(1642)Маркетинг-(23702)Математика-(16968)Машиностроение-(1700)Медицина-(12668)Менеджмент-(24684)Механика-(15423)Науковедение-(506)Образование-(11852)Охрана труда-(3308)Педагогика-(5571)Полиграфия-(1312)Политика-(7869)Право-(5454)Приборостроение-(1369)Программирование-(2801)Производство-(97182)Промышленность-(8706)Психология-(18388)Религия-(3217)Связь-(10668)Сельское хозяйство-(299)Социология-(6455)Спорт-(42831)Строительство-(4793)Торговля-(5050)Транспорт-(2929)Туризм-(1568)Физика-(3942)Философия-(17015)Финансы-(26596)Химия-(22929)Экология-(12095)Экономика-(9961)Электроника-(8441)Электротехника-(4623)Энергетика-(12629)Юриспруденция-(1492)Ядерная техника-(1748)
Retiming the composition
So far, you have created a straightforward time-lapse simulation. That’s fine, but After Effects offers more ways to play with time using the time-remapping feature.
Time remapping lets you dynamically speed up, slow down, stop, or reverse footage.
You can also use it to do things like create a freeze-frame result. The Graph Editor and the Layer panel are a big help when remapping time, as you’ll see in the following exercise, when you retime the project so that the time-lapse speed changes over the course of the movie.
_ Tip: You can get even finer control with the Timewarp effect, which you’ll use in Lesson 13.
For this exercise, you’ll use the movie that you just imported as the basis of a new composition, which will be easier to remap than the original.
1 Drag the Lesson06_retime movie onto the Create A New Composition button () at the bottom of the Project panel. After Effects creates a new composition named Lesson06_retime, and displays it in the Timeline andComposition panels. Now you can remap all of the elements of the project at once.
2 With the Lesson06_retime layer selected in the Timeline panel, choose Layer > Time > Enable Time Remapping. After Effects adds two keyframes, at the first and last frames of the layer, visible in the time ruler. A Time Remap property also appears under the layer name in the Timeline panel; this property lets you control which frame is displayed at a given point in time.

3 Double-click the Lesson06_retime layer name in the Timeline panel to open it in the Layer panel. The Layer panel provides a visual reference of the frames you change when you remap time. It displays two time rulers: The time ruler at the bottom of the panel displays the current time. The Source Time ruler, just above the time ruler, has a remap-time marker that indicates which frame is playing at the current time.
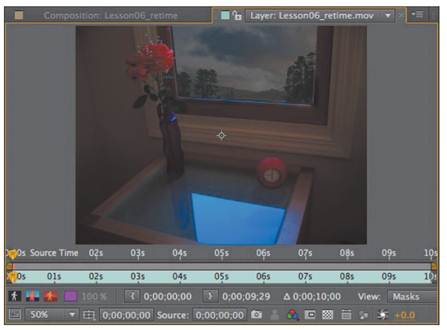
4 Drag the current-time indicator across the time ruler in the Timeline panel, and notice that the source-time and current-time markers in the two Layer panel rulers are synchronized. That will change as you remap time.
5 Go to 4:00, and change the Time Remap value to 2:00. This remaps time so that frame 2:00 plays at 4:00. In other words, the composition now plays back at halfspeed for the first 4 seconds of the composition.

6 Press the spacebar to preview the animation. The composition now runs at half-speed until 4:00, and at a regular speed thereafter. Press the spacebar again when you have finished previewing the animation.
|
|
Дата добавления: 2014-11-20; Просмотров: 390; Нарушение авторских прав?; Мы поможем в написании вашей работы!