КАТЕГОРИИ:
Архитектура-(3434)Астрономия-(809)Биология-(7483)Биотехнологии-(1457)Военное дело-(14632)Высокие технологии-(1363)География-(913)Геология-(1438)Государство-(451)Демография-(1065)Дом-(47672)Журналистика и СМИ-(912)Изобретательство-(14524)Иностранные языки-(4268)Информатика-(17799)Искусство-(1338)История-(13644)Компьютеры-(11121)Косметика-(55)Кулинария-(373)Культура-(8427)Лингвистика-(374)Литература-(1642)Маркетинг-(23702)Математика-(16968)Машиностроение-(1700)Медицина-(12668)Менеджмент-(24684)Механика-(15423)Науковедение-(506)Образование-(11852)Охрана труда-(3308)Педагогика-(5571)Полиграфия-(1312)Политика-(7869)Право-(5454)Приборостроение-(1369)Программирование-(2801)Производство-(97182)Промышленность-(8706)Психология-(18388)Религия-(3217)Связь-(10668)Сельское хозяйство-(299)Социология-(6455)Спорт-(42831)Строительство-(4793)Торговля-(5050)Транспорт-(2929)Туризм-(1568)Физика-(3942)Философия-(17015)Финансы-(26596)Химия-(22929)Экология-(12095)Экономика-(9961)Электроника-(8441)Электротехника-(4623)Энергетика-(12629)Юриспруденция-(1492)Ядерная техника-(1748)
Using the Graph Editor to remap time
|
|
|
|
Viewing time remapping in the Graph Editor
Using the Graph Editor, you can view and manipulate all aspects of effects and animations, including effect property values, keyframes, and interpolation. The Graph Editor displays changes in effects and animations as a two-dimensional graph, with playback time represented horizontally (from left to right). In layer bar mode, in contrast, the time ruler represents only the horizontal time element, without a graphical display of changing values.
Make sure the Time Remap property is selected for the Lesson06_retime layer in the Timeline panel, and then click the Graph Editor button () to display the Graph Editor.
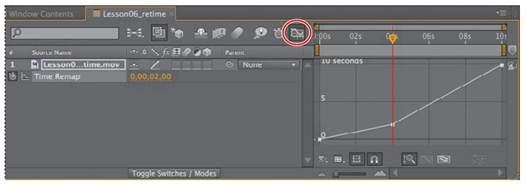
The Graph Editor displays a time-remap graph that shows a white line connecting the keyframes at 0:00, 4:00, and 10:00. The angle of the line is shallow up to 4:00, and then becomes steeper. The steeper the line, the faster the playback time.
When remapping time, you can use the values in the time-remap graph to determine and control which frame of the movie plays at which point in time. Each Time Remap keyframe has a time value associated with it that corresponds to a specific frame in the layer; this value is represented vertically on the time-remap graph.
When you enable time remapping for a layer, After Effects adds a Time Remap keyframe at the start and end points of the layer. These initial Time Remap keyframes have vertical time values equal to their horizontal position.
By setting additional Time Remap keyframes, you can create complex motion effects. Every time you add a Time Remap keyframe, you create another point at which you can change the playback speed or direction. As you move the keyframe up or down in the time-remap graph, you adjust which frame of the video is set to play at the current time.
Have some fun with the timing of this project.
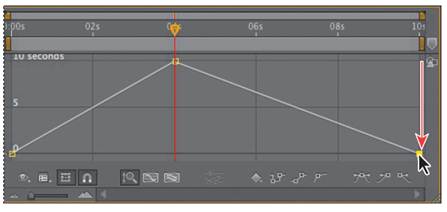
1 In the time-remap graph, drag the middle keyframe vertically from 2 up to 10 seconds.
_ Tip: Watch the Info panel as you drag to see more information as you adjust the keyframe.
2 Drag the last keyframe down to 0 seconds.
3 Go to 0:00, and then press the spacebar to preview the results. Watch the time ruler and Source Time ruler in the Layer panel to see which frames are playing at any given point in time. Now the animation progresses rapidly over the first 4 seconds of the composition, and then plays in reverse for the rest of the composition.
4 Press the spacebar to stop the preview. Having fun yet? Keep going.
5 Ctrl-click (Windows) or Command-click (Mac OS) the last keyframe to delete it. The composition is still in fast-forward mode for the first 4 seconds, but now it holds on a single frame (the last frame) for the rest of the composition.
6 Press the Home key, or move the current-time indicator to the beginning of the time ruler, and then press the spacebar to preview the animation. Press the spacebar again when you’re done.
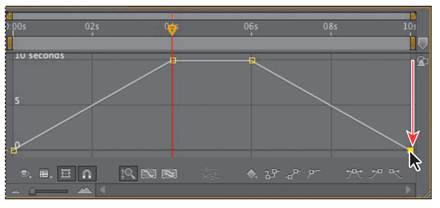
7 Ctrl-click (Windows) or Command-click (Mac OS) the dotted line at 6:00 to add a keyframe at 6:00 with the same value as the keyframe at 4:00.
_ Note: Pressing Ctrl or Command temporarily activates the Add Vertex tool.
8 Ctrl-click (Windows) or Command-click (Mac OS) at 10:00 to add another keyframe, and then drag it down to 0 seconds. Now the animation progresses rapidly, holds for two seconds on the last frame, and then runs in reverse.
9 Go to the beginning of the composition, and then press the spacebar to preview the change. Press the spacebar again when you’re done.
|
|
|
|
|
Дата добавления: 2014-11-20; Просмотров: 350; Нарушение авторских прав?; Мы поможем в написании вашей работы!