КАТЕГОРИИ:
Архитектура-(3434)Астрономия-(809)Биология-(7483)Биотехнологии-(1457)Военное дело-(14632)Высокие технологии-(1363)География-(913)Геология-(1438)Государство-(451)Демография-(1065)Дом-(47672)Журналистика и СМИ-(912)Изобретательство-(14524)Иностранные языки-(4268)Информатика-(17799)Искусство-(1338)История-(13644)Компьютеры-(11121)Косметика-(55)Кулинария-(373)Культура-(8427)Лингвистика-(374)Литература-(1642)Маркетинг-(23702)Математика-(16968)Машиностроение-(1700)Медицина-(12668)Менеджмент-(24684)Механика-(15423)Науковедение-(506)Образование-(11852)Охрана труда-(3308)Педагогика-(5571)Полиграфия-(1312)Политика-(7869)Право-(5454)Приборостроение-(1369)Программирование-(2801)Производство-(97182)Промышленность-(8706)Психология-(18388)Религия-(3217)Связь-(10668)Сельское хозяйство-(299)Социология-(6455)Спорт-(42831)Строительство-(4793)Торговля-(5050)Транспорт-(2929)Туризм-(1568)Физика-(3942)Философия-(17015)Финансы-(26596)Химия-(22929)Экология-(12095)Экономика-(9961)Электроника-(8441)Электротехника-(4623)Энергетика-(12629)Юриспруденция-(1492)Ядерная техника-(1748)
Creating a walking cycle
|
|
|
|
Animating pin positions
Stiffening an area
The character’s arms and legs should move as he walks, but his torso should stay fairly firm. You’ll use the Puppet Starch tool to add Starch pins where you want the character to be stiffer.
1 Select the Puppet Starch tool (), hidden behind the Puppet Overlap tool in the Tools panel.
2 Select Show in the options area of the Tools panel to display the distortion mesh.
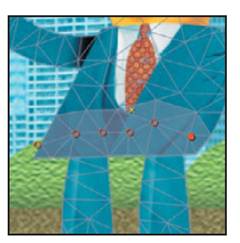
3 Place Starch pins in the lower half of the torso, asin this image.
4 Hide the properties for the man.psd layer in the Timeline panel.
5 Choose File > Save to save your work so far.
_ Note: The Amount value determines how rigid the area will be. Typically, a low value is fine; higher values make the area more rigid. You can also use negative numbers to reduce the rigidity of another pin.
The Deform, Overlap, and Starch pins are in place. Now you can change the Deform pin positions to animate the character. The Overlap pins keep the front areas in the front, and the Starch pins keep specific areas (in this case, the torso) from moving too much.
Initially, the character should be walking across the screen. To create a realistic walking cycle, keep in mind that as humans walk, wave patterns develop in the motion path. You’ll create a wave pattern in the pin positions. However, the values will vary slightly to add a bit of randomness, and to keep the character from looking too much like a robot.
1 Select the man.psd layer in the Timeline panel, and then press U to display all the keyframes for the layer.
2 Press Home, or move the current-time indicator to the beginning of the timeline.
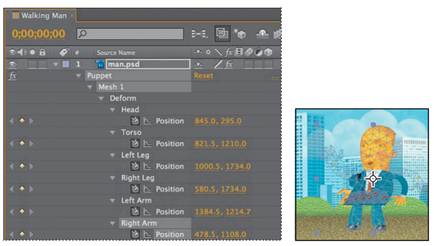
3 In the Timeline panel, change the position of the Deform pins as follows:
Head: 845, 295
Torso: 821.5, 1210
Left Leg: 1000.5, 1734
Right Leg: 580.5, 1734
Left Arm: 1384.5, 1214.7
Right Arm: 478.5, 1108
_ Note: After Effects automatically creates keyframes when you place Deform pins, so you don’t need to click the stopwatch for each pin before setting its initial position.
4 To complete the walking cycle, move the pins to the following positions at the times indicated in the chart below, even if they represent a pin’s current position.
|
|
|
|
|
Дата добавления: 2014-11-20; Просмотров: 413; Нарушение авторских прав?; Мы поможем в написании вашей работы!