КАТЕГОРИИ:
Архитектура-(3434)Астрономия-(809)Биология-(7483)Биотехнологии-(1457)Военное дело-(14632)Высокие технологии-(1363)География-(913)Геология-(1438)Государство-(451)Демография-(1065)Дом-(47672)Журналистика и СМИ-(912)Изобретательство-(14524)Иностранные языки-(4268)Информатика-(17799)Искусство-(1338)История-(13644)Компьютеры-(11121)Косметика-(55)Кулинария-(373)Культура-(8427)Лингвистика-(374)Литература-(1642)Маркетинг-(23702)Математика-(16968)Машиностроение-(1700)Медицина-(12668)Менеджмент-(24684)Механика-(15423)Науковедение-(506)Образование-(11852)Охрана труда-(3308)Педагогика-(5571)Полиграфия-(1312)Политика-(7869)Право-(5454)Приборостроение-(1369)Программирование-(2801)Производство-(97182)Промышленность-(8706)Психология-(18388)Религия-(3217)Связь-(10668)Сельское хозяйство-(299)Социология-(6455)Спорт-(42831)Строительство-(4793)Торговля-(5050)Транспорт-(2929)Туризм-(1568)Физика-(3942)Философия-(17015)Финансы-(26596)Химия-(22929)Экология-(12095)Экономика-(9961)Электроника-(8441)Электротехника-(4623)Энергетика-(12629)Юриспруденция-(1492)Ядерная техника-(1748)
Creating a low-resolution output-module template
|
|
|
|
Next, you’ll create a second output-module template with settings appropriate for producing a low-resolution test version of the movie. In this case, the settings that you’ll select are also appropriate for a web version of the movie.
1 Choose Edit > Templates > Output Module to open the Output Module Templates dialog box.
2 In the Settings area, click New to create a new template.
3 In the Output Module Settings dialog box, for Format, choose QuickTime.
4 For Post-Render Action, choose Import.
5 In the Video Output area, click Format Options, and then select the following settings in the QuickTime Options dialog box:
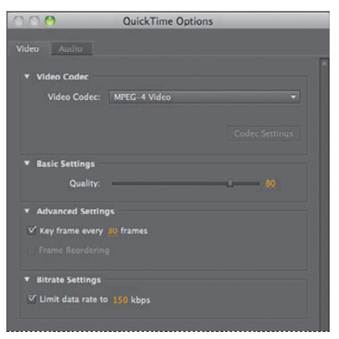
For Video Codec, choose MPEG-4 Video. This compressor automatically determines the color depth.
Set the Quality slider to 80.
In the Advanced Settings area, select Key Frame Every, and then type 30 (frames).
In the Bitrate Settings area, select Limit Data Rate To, and type 150 (kbps).
6 Select the Audio tab, and choose IMA 4:1 from the Audio Codec menu.
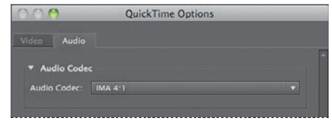
_ Note: The IMA 4:1 compressor is commonly used when compressing audio for web or desktop playback.
7 Click OK to close the QuickTime Options dialog box and return to the Output Module Settings dialog box.
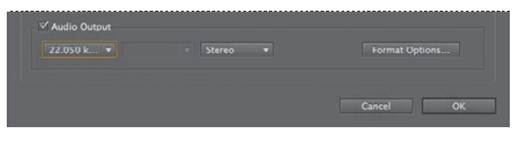
8 Select Audio Output at the bottom of the dialog box, if it’s not already selected. Then choose the following audio settings, from left to right:
For Rate, choose 22.050 khz.
For Use, select Stereo.
9 Click OK to close the Output Module Settings dialog box.
10 In the lower half of the Output Module Templates dialog box, examine your settings, and click Edit if you need to make any changes.
11 For Settings Name, type Test_MPEG4, and then click OK. Now this output template will be available on the Output Module pop-up menu in the Render Queue panel.
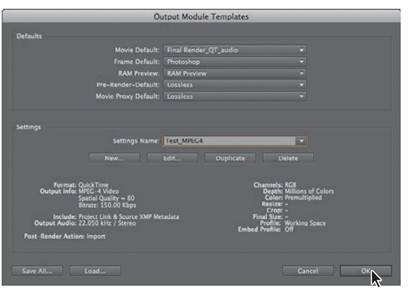
As you might expect, greater compression and lower audio sample rates create smaller file sizes, but they also reduce the quality of the output. However, this low-resolution template is fine for creating test movies or movies for the web.
|
|
|
|
|
Дата добавления: 2014-11-20; Просмотров: 442; Нарушение авторских прав?; Мы поможем в написании вашей работы!