КАТЕГОРИИ:
Архитектура-(3434)Астрономия-(809)Биология-(7483)Биотехнологии-(1457)Военное дело-(14632)Высокие технологии-(1363)География-(913)Геология-(1438)Государство-(451)Демография-(1065)Дом-(47672)Журналистика и СМИ-(912)Изобретательство-(14524)Иностранные языки-(4268)Информатика-(17799)Искусство-(1338)История-(13644)Компьютеры-(11121)Косметика-(55)Кулинария-(373)Культура-(8427)Лингвистика-(374)Литература-(1642)Маркетинг-(23702)Математика-(16968)Машиностроение-(1700)Медицина-(12668)Менеджмент-(24684)Механика-(15423)Науковедение-(506)Образование-(11852)Охрана труда-(3308)Педагогика-(5571)Полиграфия-(1312)Политика-(7869)Право-(5454)Приборостроение-(1369)Программирование-(2801)Производство-(97182)Промышленность-(8706)Психология-(18388)Религия-(3217)Связь-(10668)Сельское хозяйство-(299)Социология-(6455)Спорт-(42831)Строительство-(4793)Торговля-(5050)Транспорт-(2929)Туризм-(1568)Физика-(3942)Философия-(17015)Финансы-(26596)Химия-(22929)Экология-(12095)Экономика-(9961)Электроника-(8441)Электротехника-(4623)Энергетика-(12629)Юриспруденция-(1492)Ядерная техника-(1748)
About compression
|
|
|
|
Preparing to output a test movie
Exporting to different output media
To render with OpenGL
OpenGL is a set of standards for high-performance processing of 2D and 3D graphics. For After Effects users, OpenGL provides fast rendering for previews and final output by moving rendering from the CPU to the OpenGL hardware (GPU).
To use OpenGL to render in After Effects, you’ll need an OpenGL card that supports OpenGL 2.0 and has Shader support and support for NPOT (Non Power Of Two) textures. You can view information about your OpenGL card by choosing Edit > Preferences > Previews (Windows) or After Effects > Preferences > Previews (Mac OS) and clicking the OpenGL Info button.
Note that only features supported by OpenGL and your graphics card will be rendered into the final movie. If your card doesn’t support advanced OpenGL features, don’t use OpenGL to render. For a list of features supported by OpenGL, see After Effects Help.
To render using OpenGL support, first add a composition to the Render Queue panel, and then click the underlined text next to Render Settings, and select Use OpenGL Renderer.
Now that you have created templates for your render settings and output modules, you can use them to export different versions of the movie.
First, you’ll produce the test version, selecting the Test_lowres render-settings template and the Test_MPEG4 output-module template that you created.
Compression is essential to reduce the size of movies so that they can be stored, transmitted, and played back effectively. When exporting or rendering a movie file for playback on a specific type of device at a certain bandwidth, you choose a compressor/decompressor (also known as an encoder/decoder), or codec, to compress the information and generate a file that is readable by that type of device at that bandwidth.
A wide range of codecs is available; no single codec is the best for all situations.
For example, the best codec for compressing cartoon animation is generally not efficient for compressing live-action video. When compressing a movie file, you can fine-tune it for the best-quality playback on a computer, video playback device, the web, or from a DVD player. Depending on which encoder you use, you may be able to reduce the size of compressed files by removing artifacts that interfere with compression, such as random camera motion and excessive film grain.
The codec you use must be available to your entire audience. For instance, if you use a hardware codec on a capture card, your audience must have the same capture card installed, or a software codec that emulates it.
For more about compression and codecs, see After Effects Help.
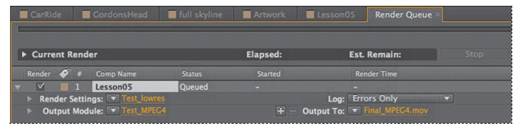
1 Drag the Lesson05 composition from the Project panel to the Render Queue panel.

_ Tip: Alternatively, you can select the Lesson05 compositionin the Project panel and choose Composition > Add To Render Queue.
In the Render Queue panel, note the default settings in the Render Settings and Output Module pop-up menus. You’ll change those settings to your low-resolution templates.
2 Choose Test_lowres from the Render Settings menu.
3 Choose Test_MPEG4 from the Output Module menu.
4 Click the orange, underlined words next to Output To.

5 In the Output Movie To dialog box, locate the AECS5_CIB/Lessons/Lesson14 folder, and create a new folder called Final_Movies:
In Windows, click the Create New Folder icon, and then type a name for the folder.
In Mac OS, click the New Folder button, name the folder, and click Create.
6 Open the Final_Movies folder.
7 Name the file Final_MPEG4.mov, and then click Save to return to the Render Queue panel.
8 Choose File > Save to save your work.
You’ll do a few more things before you render the movie. Leave the Render Queue panel open for the next exercise.
|
|
|
|
|
Дата добавления: 2014-11-20; Просмотров: 499; Нарушение авторских прав?; Мы поможем в написании вашей работы!