КАТЕГОРИИ:
Архитектура-(3434)Астрономия-(809)Биология-(7483)Биотехнологии-(1457)Военное дело-(14632)Высокие технологии-(1363)География-(913)Геология-(1438)Государство-(451)Демография-(1065)Дом-(47672)Журналистика и СМИ-(912)Изобретательство-(14524)Иностранные языки-(4268)Информатика-(17799)Искусство-(1338)История-(13644)Компьютеры-(11121)Косметика-(55)Кулинария-(373)Культура-(8427)Лингвистика-(374)Литература-(1642)Маркетинг-(23702)Математика-(16968)Машиностроение-(1700)Медицина-(12668)Менеджмент-(24684)Механика-(15423)Науковедение-(506)Образование-(11852)Охрана труда-(3308)Педагогика-(5571)Полиграфия-(1312)Политика-(7869)Право-(5454)Приборостроение-(1369)Программирование-(2801)Производство-(97182)Промышленность-(8706)Психология-(18388)Религия-(3217)Связь-(10668)Сельское хозяйство-(299)Социология-(6455)Спорт-(42831)Строительство-(4793)Торговля-(5050)Транспорт-(2929)Туризм-(1568)Физика-(3942)Философия-(17015)Финансы-(26596)Химия-(22929)Экология-(12095)Экономика-(9961)Электроника-(8441)Электротехника-(4623)Энергетика-(12629)Юриспруденция-(1492)Ядерная техника-(1748)
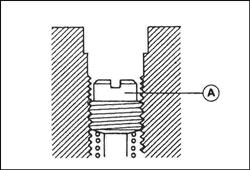
CAUTION. During carburetor disassembly, be careful not to damage the diaphragm
|
|
|
|
Carburetors
During carburetor disassembly, be careful not to damage the diaphragm. Never use a sharp edge to remove the diaphragm.
CAUTION
|
• Turn in the pilot screw [A] fully but not tightly, and then back it out the same number of turns counted during disassembly.
Топливная система 3-15
|
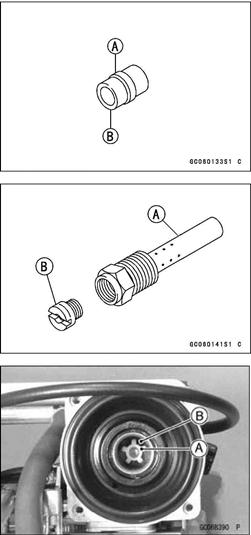
• Turn the carburetor body upside-down, and drop the needle jet [A] into place so that the smaller diameter end [B] of the jet goes in first.
• Carefully screw in the needle jet holder. It will seat against the needle jet, pushing the end of the jet into the carburetor bore.
Do not force the needle jet holder [A] and main jet [B] or overtighten them. The needle jet or the carburetor body could be damaged requiring replacement.
• Slip the jet needle through the hole in the center of the vacuum piston, and put the spring seat [A] on the top of the needle. Turn the seat so that it does not block the hole [B] at the bottom of the vacuum piston.

|
• Install the carburetor top cover.
• Turn in the pilot screw fully but not tightly, and then back it out the same number of turns counted during disassembly.
• When removing the coasting enricher system, unscrew the mounting screws [B] and remove the air cut valve cover [C], spring [D], O-ring [E] and diaphragm [F].
Right Carburetor [A]
Torque - Air Cut valve Cover Screws: 1.0 N·m (0.10 kgf·m, 9 in·lb)
Carburetor Separation/Assembly
• Read the WARNINGS in the Carburetor Removal.
• Remove the choke synchronizing stay spring [A].
• Remove the choke synchronizing stay screws [B] with nylon washers, and remove the stay [C].
3-16 Топливная система
|
|
|
|
|
Дата добавления: 2014-12-23; Просмотров: 384; Нарушение авторских прав?; Мы поможем в написании вашей работы!