КАТЕГОРИИ:
Архитектура-(3434)Астрономия-(809)Биология-(7483)Биотехнологии-(1457)Военное дело-(14632)Высокие технологии-(1363)География-(913)Геология-(1438)Государство-(451)Демография-(1065)Дом-(47672)Журналистика и СМИ-(912)Изобретательство-(14524)Иностранные языки-(4268)Информатика-(17799)Искусство-(1338)История-(13644)Компьютеры-(11121)Косметика-(55)Кулинария-(373)Культура-(8427)Лингвистика-(374)Литература-(1642)Маркетинг-(23702)Математика-(16968)Машиностроение-(1700)Медицина-(12668)Менеджмент-(24684)Механика-(15423)Науковедение-(506)Образование-(11852)Охрана труда-(3308)Педагогика-(5571)Полиграфия-(1312)Политика-(7869)Право-(5454)Приборостроение-(1369)Программирование-(2801)Производство-(97182)Промышленность-(8706)Психология-(18388)Религия-(3217)Связь-(10668)Сельское хозяйство-(299)Социология-(6455)Спорт-(42831)Строительство-(4793)Торговля-(5050)Транспорт-(2929)Туризм-(1568)Физика-(3942)Философия-(17015)Финансы-(26596)Химия-(22929)Экология-(12095)Экономика-(9961)Электроника-(8441)Электротехника-(4623)Энергетика-(12629)Юриспруденция-(1492)Ядерная техника-(1748)
Master Cylinder
|
|
|
|
BRAKES
Do not remove the secondary cup from the piston since removal will damage it.
NOTE
○Do not remove the push rod clevis for master cylinder disassembly since removal requires brake pedal position adjustment.
• Remove the rear master cylinder (see Rear Master Cylinder Removal).
• Slide the dust cover on the push rod out of place, and remove the circlip.
Special Tool - Inside Circlip Pliers: 57001-143
• Pull out the push rod with the piston stop.
• Take off the piston [A], secondary cup [B], primary cup [C], and return spring [D].
CAUTION
Master Cylinder Assembly
• Before assembly, clean all parts including the master
cylinder with brake fluid or alcohol.
CAUTION
Except for the disc pads and disc, use only disc brake fluid, isopropyl alcohol, or ethyl alcohol, for cleaning brake parts. Do not use any other fluid for cleaning these parts. Gasoline, engine oil, or any other petroleum distillate will cause deterioration of the rubber parts. Oil spilled on any part will be difficult to wash off completely, and will eventually deteriorate the rubber used in the disc brake.
• Apply brake fluid to the removed parts and to the inner wall of the cylinder.
• Take care not to scratch the piston or the inner wall of the cylinder.
• Tighten the brake lever pivot bolt and locknut.
Torque - Brake Lever Pivot Bolt: 1.0 N·m (0.1 kgf·m, 9 in·lb) Brake Lever Pivot Nut: 5.9 N·m (0.60 kgf·m, 52 in·lb)
|
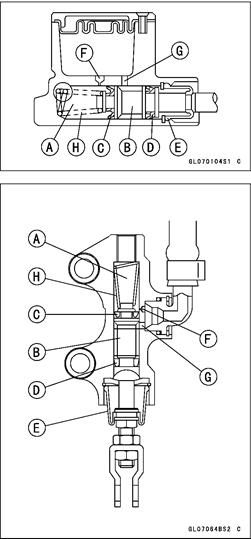
Master Cylinder Inspection (Visual Inspection)
• Disassemble the master cylinder (see Front/Rear Master Cylinder Disassembly).
• Check that there are no scratches, rust or pitting on the inner wall of the master cylinder [A] and on the outside of the piston [B].
• If the master cylinder or piston shows any damage, replace them.
• Inspect the primary [C] and secondary [D] cups.
• If a cup is worn, damaged, softened (rotted), or swollen, the piston assembly should be replaced to renew the cups.
• If fluid leakage is noted at the brake lever, the piston assembly should be replaced to renew the cups.
• Check the dust cover [E] for damage.
+ If it is damaged, replace it.
Check that the relief [F] and supply [G] ports are not
• plugged.
• If the relief port becomes plugged, the brake pads will drag on the disc. Blow the ports clean with compressed air.
• Check the piston return spring [H] for any damage.
• If the spring is damaged, replace it.
|
|
|
|
|
|
Дата добавления: 2014-12-23; Просмотров: 399; Нарушение авторских прав?; Мы поможем в написании вашей работы!